• Support Home
  • Getting Started
    • Connecting Your Camera
    • 3rd Party Software Getting Started Guides
  • Tech Ref Manuals
    • Arena SDK Documentation
    • HTP003S – Helios2+ ToF 3D
    • HLT003S – Helios2 ToF 3D
    • HLS003S – Helios ToF 3D
    • HLF003S – Helios Flex ToF 3D
    • ATX245S – Atlas10 24.5 MP
    • ATX204S – Atlas10 20.4 MP
    • ATX162S – Atlas10 16.2 MP
    • ATX124S – Atlas10 12.3 MP
    • ATX081S – Atlas10 8.1 MP
    • ATX051S – Atlas10 5.0 MP
    • ATL314S – Atlas 31.4 MP
    • ATL196S – Atlas 19.6 MP
    • ATL168S – Atlas 16.8 MP
    • ATL120S – Atlas 12.3 MP
    • ATL089S – Atlas 8.9 MP
    • ATL071S – Atlas 7.1 MP
    • ATL050S – Atlas 5.0 MP
    • ATL028S – Atlas 2.8 MP
    • ATP200S – Atlas IP67 20 MP
    • ATP120S – Atlas IP67 12.3 MP
    • ATP089S -Atlas IP67 8.9 MP
    • ATP071S – Atlas IP67 7.1 MP
    • ATP028S – Atlas IP67 2.8 MP
    • TRI200S – Triton 20.0 MP
    • TRI120S – Triton 12.3 MP
    • TRI122S – Triton 12.2 MP
    • TRI089S – Triton 8.9 MP
    • TRI071S – Triton 7.1 MP
    • TRI064S – Triton 6.3 MP
    • TRI054S – Triton 5.4 MP
    • TRI050S-P/Q – Triton 5.0 MP Polarized
    • TRI050S – Triton 5.0 MP
    • TRI032S – Triton 3.2 MP
    • TRI028S – Triton 2.8 MP
    • TRI023S – Triton 2.3 MP
    • TRI016S – Triton 1.6 MP
    • TRI004S – Triton 0.4 MP
    • TRI02KA – Triton 2K Line Scan
    • PHX200S – Phoenix 20.0 MP
    • PHX120S – Phoenix 12.3 MP
    • PHX122S – Phoenix 12.2 MP
    • PHX089S – Phoenix 8.9 MP
    • PHX064S – Phoenix 6.3 MP
    • PHX050S-P/Q – Phoenix 5.0 MP Polarized
    • PHX050S – Phoenix 5.0 MP
    • PHX032S – Phoenix 3.2 MP
    • PHX023S – Phoenix 2.3 MP
    • PHX016S – Phoenix 1.6 MP
    • PHX004S – Phoenix 0.4 MP
  • Application Notes
    • Bandwidth Sharing in Multi-Camera Systems
    • Combine Helios 3D Point Cloud with RGB Color
    • I2C Support on LUCID Cameras
    • Using GPIO on LUCID Cameras
    • Using PTP & Scheduled Action Commands
    • Helios2 And Triton Synchronization
  • Knowledge Base
  • Additional Support
    • Product Change Notifications (PCN)
    • Contact Support
  • Log In
  • Support Home
  • Getting Started
    • Connecting Your Camera
    • 3rd Party Software Getting Started Guides
  • Tech Ref Manuals
    • Arena SDK Documentation
    • HTP003S – Helios2+ ToF 3D
    • HLT003S – Helios2 ToF 3D
    • HLS003S – Helios ToF 3D
    • HLF003S – Helios Flex ToF 3D
    • ATX245S – Atlas10 24.5 MP
    • ATX204S – Atlas10 20.4 MP
    • ATX162S – Atlas10 16.2 MP
    • ATX124S – Atlas10 12.3 MP
    • ATX081S – Atlas10 8.1 MP
    • ATX051S – Atlas10 5.0 MP
    • ATL314S – Atlas 31.4 MP
    • ATL196S – Atlas 19.6 MP
    • ATL168S – Atlas 16.8 MP
    • ATL120S – Atlas 12.3 MP
    • ATL089S – Atlas 8.9 MP
    • ATL071S – Atlas 7.1 MP
    • ATL050S – Atlas 5.0 MP
    • ATL028S – Atlas 2.8 MP
    • ATP200S – Atlas IP67 20 MP
    • ATP120S – Atlas IP67 12.3 MP
    • ATP089S -Atlas IP67 8.9 MP
    • ATP071S – Atlas IP67 7.1 MP
    • ATP028S – Atlas IP67 2.8 MP
    • TRI200S – Triton 20.0 MP
    • TRI120S – Triton 12.3 MP
    • TRI122S – Triton 12.2 MP
    • TRI089S – Triton 8.9 MP
    • TRI071S – Triton 7.1 MP
    • TRI064S – Triton 6.3 MP
    • TRI054S – Triton 5.4 MP
    • TRI050S-P/Q – Triton 5.0 MP Polarized
    • TRI050S – Triton 5.0 MP
    • TRI032S – Triton 3.2 MP
    • TRI028S – Triton 2.8 MP
    • TRI023S – Triton 2.3 MP
    • TRI016S – Triton 1.6 MP
    • TRI004S – Triton 0.4 MP
    • TRI02KA – Triton 2K Line Scan
    • PHX200S – Phoenix 20.0 MP
    • PHX120S – Phoenix 12.3 MP
    • PHX122S – Phoenix 12.2 MP
    • PHX089S – Phoenix 8.9 MP
    • PHX064S – Phoenix 6.3 MP
    • PHX050S-P/Q – Phoenix 5.0 MP Polarized
    • PHX050S – Phoenix 5.0 MP
    • PHX032S – Phoenix 3.2 MP
    • PHX023S – Phoenix 2.3 MP
    • PHX016S – Phoenix 1.6 MP
    • PHX004S – Phoenix 0.4 MP
  • Application Notes
    • Bandwidth Sharing in Multi-Camera Systems
    • Combine Helios 3D Point Cloud with RGB Color
    • I2C Support on LUCID Cameras
    • Using GPIO on LUCID Cameras
    • Using PTP & Scheduled Action Commands
    • Helios2 And Triton Synchronization
  • Knowledge Base
  • Additional Support
    • Product Change Notifications (PCN)
    • Contact Support
  • Log In
home/Knowledge Base/Arena Software/How to create an Ubuntu docker image and container with Arena SDK

How to create an Ubuntu docker image and container with Arena SDK

259 views 1 February 15, 2023 Updated on April 25, 2023

This knowledge base article will describe how to create a docker image and docker container within Ubuntu 22.04 that can run LUCID’s Arena SDK.

Install Docker Engine on Ubuntu

Before you install Docker Engine for the first time on a new host machine, you need to set up the Docker repository. Afterward, you can install and update Docker from the repository.

Set up the repository:

  1. Update the apt package index and install packages to allow apt to use a repository over HTTPS:
$ sudo apt-get update

$ sudo apt-get install \
    ca-certificates \
    curl \
    gnupg \
    lsb-release
  1. Add Docker’s official GPG key:
$ sudo mkdir -p /etc/apt/keyrings
$ curl -fsSL https://download.docker.com/linux/ubuntu/gpg | sudo gpg --dearmor -o /etc/apt/keyrings/docker.gpg
  1. Use the following command to set up the repository:
$ echo \
  "deb [arch=$(dpkg --print-architecture) signed-by=/etc/apt/keyrings/docker.gpg] https://download.docker.com/linux/ubuntu \
  $(lsb_release -cs) stable" | sudo tee /etc/apt/sources.list.d/docker.list > /dev/null

Install Docker Engine:

  1. Update the apt package index:
$ sudo apt-get update

Install Docker Engine, containerd, and Docker Compose.

  1. To install the latest version, run:
$ sudo apt-get install docker-ce docker-ce-cli containerd.io docker-compose-plugin
  1. Verify that the Docker Engine installation is successful by running the hello-world image:
$ sudo docker run hello-world

This command downloads a test image and runs it in a container. When the container runs, it prints a confirmation message and exits.

You have now successfully installed and started Docker Engine. The docker user group exists but contains no users, which is why you’re required to use sudo to run Docker commands. Continue to Linux post-install to allow non-privileged users to run Docker commands and for other optional configuration steps.

Get the Dockerfile, Install Docker image and run the Docker Container:

Head to GitHub – lucidvisionlabs/arena_camera_ros2: Arena Camera driver for ROS2 and download as a zip file.

Download ArenaSDK and Python_API from Downloads

Extract the ROS2 zip file to the desired installation location.

Here is the directory structure:

arena_camera_ros2-master

── docker-compose.yml   

├── Dockerfile << This should be the dockerfile from the Github repo

├── README.md 

 ├── resources 

 │   ├── arena_api  << copy <arena_api-2.3.3-py3-none-any.whl> under this directory   

│   └── ArenaSDK << copy <ArenaSDK_v0.1.68_Linux_x64.tar.gz> under /ArenaSDK/linux64/   

├── ros2_arena_setup.sh   

├── ros2_ws   

│   ├── arena_api-2.0.0-py3-none-any.whl   

│   ├── build 

│   ├── install

 │   ├── log   

│   ├── ros2_ws_and_software.code-workspace

│   ├── src   

│   └── usefull_cmnds.txt 

└── _VERSION_PY_

After copying the SDK and .whl file to the directory folders open up the terminal:

$ cd back to arena_camera_ros2-master/
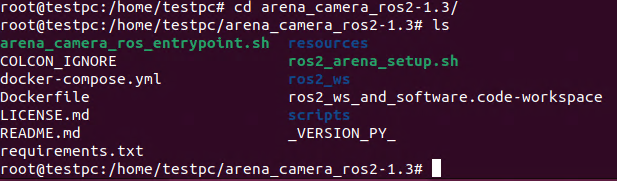
$ sudo docker build -f Dockerfile -t osrf/ros:eloquent-desktop-lucid-camera-v.1.0 .
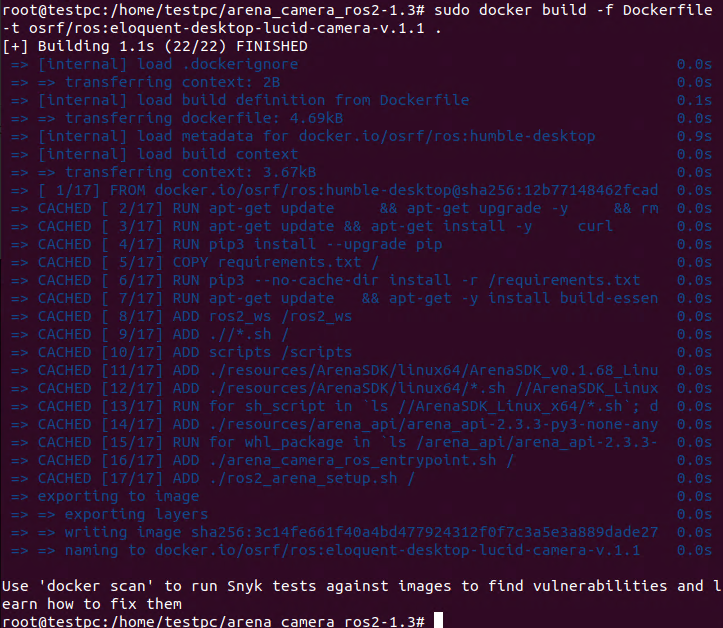
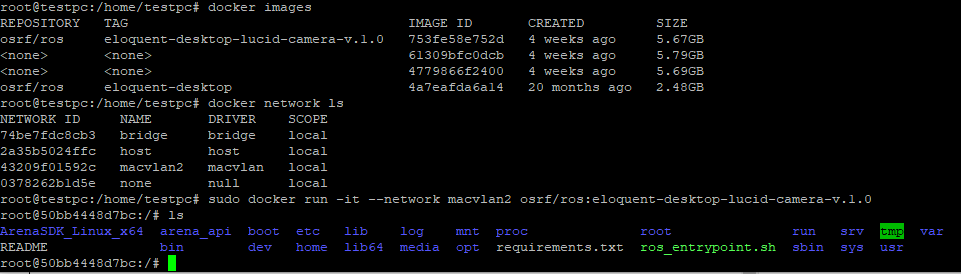
$ sudo docker images

Next, list all the docker images built –

$ sudo docker run -it --network host osrf/ros:eloquent-desktop-lucid-camera-v.1.0 .

The docker container will open.

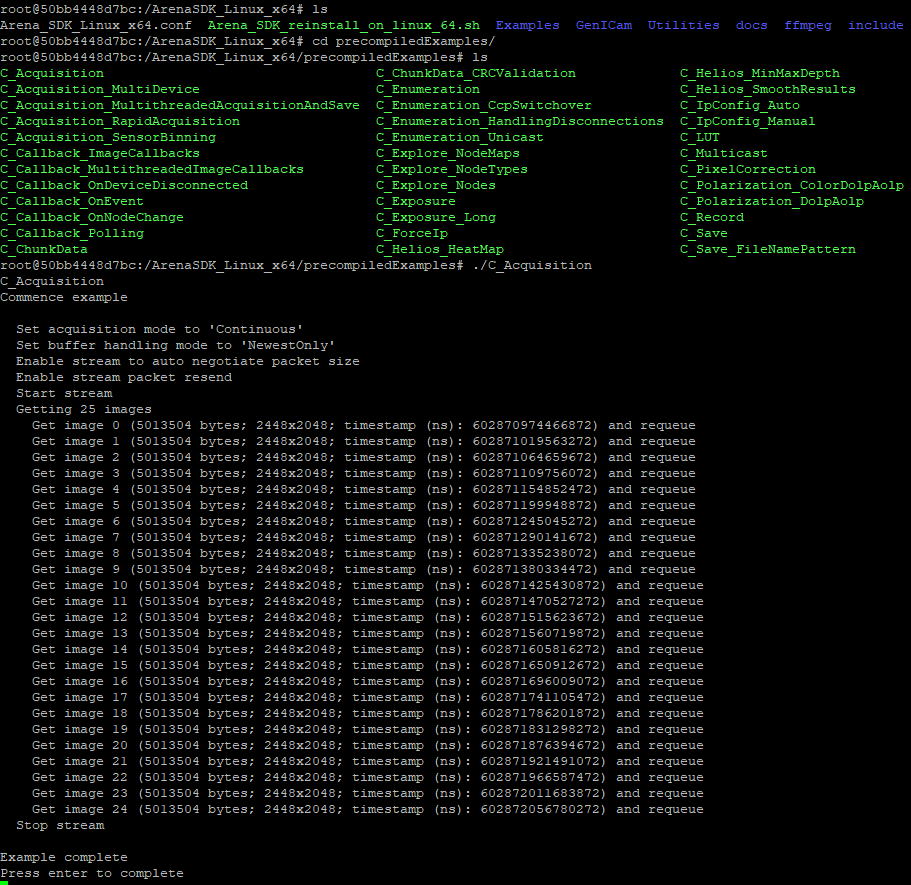
Head to the compiled examples folder in ArenaSDK_Linux_x64 and run Cpp_Acquisition.cpp

Optionally, we can create a MACVLAN network  which assigns a MAC address to the docker container and bridges it to the physical network on the host system.

To create a MacVLan network:

$ sudo docker network create -d macvlan --subnet 169.254.0.0/16 --gateway 169.254.0.1 --ip-range 169.254.0.253/32 -o parent=enp2s0 custommacvlan

Was this helpful?

1 Yes  No
Related Articles
  • Tonemapping images from LUCID’s TRI054S-CC IMX490
  • Using LUCID’s ArenaView with JupyterLab
  • Using Application Switchover with LUCID Cameras
  • Unicast Device Discovery with LUCID Cameras
  • Using VLANs with LUCID Cameras
  • Using TCP with Atlas10 cameras on Linux

Didn't find your answer? Contact Us

  Tonemapping images from LUCID’s TRI054S-CC IMX490

© 2023 LUCID Vision Labs Inc.
Looking to purchase our cameras?
Visit the LUCID Webstore at thinklucid.com