Using HALCON for Windows
MVTec HALCON is the comprehensive standard software for machine vision with an integrated development environment (HDevelop) that is used worldwide. It enables cost savings and improved time to market. HALCON’s flexible architecture facilitates rapid development of any kind of machine vision application. The following instructions describe how to configure Lucid Vision GigE cameras with HALCON for Windows.
HALCON is able to use CTI files. The procedure is described below.
System Specifications
- Windows 10 Pro 64-bit, version 1709, build 16299.64
- HALCON 13.0.1.1 (14.06.2017) 64-bit
Table of Contents
Prerequisites
Installing the MVTec GigE Vision Streaming Filter Driver is recommended. To install the MVTec GigE Vision Streaming Filter Driver, you can run the GevStreamingFilter executable found in the %HALCONROOT%\misc folder. Verify the MVTec GigE Vision Streaming Filter Driver is installed in the Ethernet adapter’s properties window.

HDevelop
-
Launch HDevelop to launch HALCON’s Integrated Development Environment (IDE). HDevelop can be launched from the Start Menu.
-
Click Assistants -> Open New Image Acquisition to open an Image Acquisition window.

-
Select GigEVision under the Image Acquisition Interface dropdown.

-
Click on the Connection tab, select your camera, and click
 .
.
-
Click
 to grab a single frame.
 -
Click
 to continuously grab images.
 -
Click
 to automatically detect valid parameters for the camera.
 -
Click
 to reset parameters to default values.
 -
Click
 to release control of the camera.
 -
Click the Parameters tab to change settings on the camera.

The Code Generation tab assists in creating code based on current settings or changes made to the camera in the Image Acquisition window. The following is an example scenario:

-
Connect to camera with DeviceUserID ‘Camera0001’
-
Set DeviceUserID = Camera0002
-
Set Width = 320
-
Set Height = 240
-
Start acquisition
-
Click Insert Code to generate the code in the Image Acquisition Program Window

HDevelop code can be exported to various programming languages by clicking File -> Export.

Note
Additional HDevelop samples can be found by clicking File -> Browse HDevelop Examples Programs.
For more information on MVTec HALCON please visit http://www.mvtec.com/products/halcon/
Using HALCON for Windows with CTI files
Applies to: Arena SDK version 1.0.44.7 or higher.
Background
MVTec HALCON is a comprehensive software suite for machine vision with an integrated development environment (HDevelop).
Using CTI files allows MVTec Halcon and other “GenTL consumers” to use the CTI file to directly access the GenTL layer of the camera.
However, the Arena SDK installation installs three different CTI files, each for a different transport protocol.
- UDP
- TCP
- RDMA
HALCON cannot handle all three CTI files, but you can still use HALCON as a GenTL Consumer by following the procedure below.
Procedure
To configure HALCON to use a particular CTI file in the Arena SDK:
- In Windows Explorer, navigate to the x64Release folder in the Arena SDK installation. The default location is:
C:\Program Files\LUCID Vision Labs\Arena SDK\x64Release. - Rename the file extensions to all of the CTI files except for the one you are going to use.
- Start HALCON.
- Click Assistants > Open New Image Acquisition.
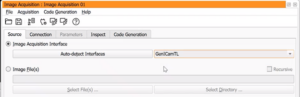
- In the Source tab, select Image Acquisition Interface, and select GeniCamTL. Click the Auto-detect Interfaces button.
- Under the Connection tab, you can now choose the Device dropdown. There is one entry in the dropdown for desired camera for the CTI file that you have.
- To connect to the camera, click Connect under the Connection tab, and click the Live button to start streaming images.
Multiple CTI files
Strictly speaking, you can have up to two CTI files in the x64Release folder. If you do this, you will have two items display in the dropdown for each camera.
- One of these cameras will be named after the user-defined name.
- The other will use the serial number for the camera.
You can tell these cameras apart is to go into the Parameters tab, and look up the tl_pathname tab.