Using National Instruments (NI) software for Windows
NI LabVIEW is systems engineering software for applications that require test, measurement, and control with rapid access to hardware and data insights. NI Vision Acquisition Software is used to acquire, save, and display images.
System Specifications
- Windows 10 Pro 64-bit, version 1709, build 16299.64
- National Instruments LabVIEW 2017 version 17.0
- National Instruments Vision Acquisition Software 17.1
- For 2D LUCID cameras only. (Does not work for Helios 3D ToF camera)
Table of Contents
Prerequisites
-
Install LabVIEW before installing the NI Vision Acquisition Software package.
-
Install LabVIEW Support during NI Vision Acquisition Software installation to use the NI-IMAQdx control within LabVIEW.

Installing the National Instruments High-Performance GigE Vision Driver is recommended if your Ethernet adapter has a supported Intel Pro 1000 chipset. For further information, please see the NI-IMAQdx driver section in the Acquiring from GigE Vision Cameras with Vision Acquisition Software page from National Instruments.

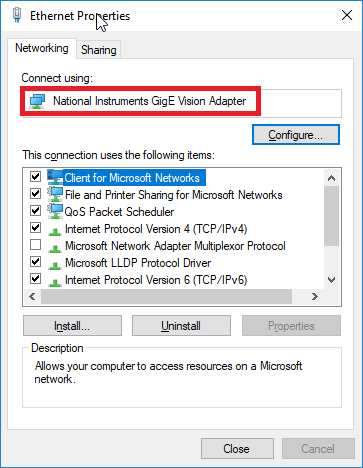
Verify the National Instruments High-Performance GigE Vision Driver is installed by confirming your Ethernet adapter’s name is National Instruments GigE Vision Adapter.
If you want to install the National Instruments High-Performance GigE Vision Driver manually, it is located in C:\Program Files (x86)\National Instruments\NI-IMAQdx\Staging\NI GigE Vision.
LabVIEW
You can interface with a GigE camera in LabVIEW using the IMAQdx Virtual Instruments (VIs). The IMAQdx VIs can be found in the Block Diagram Functions Palette in Vision and Motion -> IMAQdx.

The Vision Acquisition Software package installs examples for LabVIEW that are available in the NI Example Finder. To open the NI Example Finder, start LabVIEW and click Help -> Find Examples.

In the NI Example Finder, the IMAQdx examples are available in Hardware Input and Output -> Vision Acquisition -> NI-IMAQdx. These VIs are located in your examples/Vision Acquisition/NI-IMAQdx folder.

You can also use the Vision Acquisition VI to quickly generate sample imaging scenarios. The Vision Acquisition VI can be found in the Block Diagram Functions Palette in Vision and Motion -> Vision Express.

The following example generated with Vision Express will grab images continuously and display them in the Front Panel with the Vision -> IMAQ -> Image Display control.

NI MAX
NI Measurement and Automation Explorer (NI MAX) is installed by default with the NI Vision Acquisition Software. NI MAX can be launched from the Start Menu.
-
Navigate to My System -> Devices and Interfaces -> Network Devices to find and connect to your camera.

-
Select the Camera Attributes tab to view and adjust the camera features.
