• Support Home
  • Getting Started
    • Connecting Your Camera
    • 3rd Party Software Getting Started Guides
  • Tech Ref Manuals
    • Arena SDK Documentation
    • HTP003S – Helios2+ ToF 3D
    • HLT003S – Helios2 ToF 3D
    • HLS003S – Helios ToF 3D
    • HLF003S – Helios Flex ToF 3D
    • ATX245S – Atlas10 24.5 MP
    • ATX204S – Atlas10 20.4 MP
    • ATX162S – Atlas10 16.2 MP
    • ATX124S – Atlas10 12.3 MP
    • ATX081S – Atlas10 8.1 MP
    • ATX051S – Atlas10 5.0 MP
    • ATL314S – Atlas 31.4 MP
    • ATL196S – Atlas 19.6 MP
    • ATL168S – Atlas 16.8 MP
    • ATL120S – Atlas 12.3 MP
    • ATL089S – Atlas 8.9 MP
    • ATL071S – Atlas 7.1 MP
    • ATL050S – Atlas 5.0 MP
    • ATL028S – Atlas 2.8 MP
    • ATP200S – Atlas IP67 20 MP
    • ATP120S – Atlas IP67 12.3 MP
    • ATP089S -Atlas IP67 8.9 MP
    • ATP071S – Atlas IP67 7.1 MP
    • ATP028S – Atlas IP67 2.8 MP
    • TRI200S – Triton 20.0 MP
    • TRI120S – Triton 12.3 MP
    • TRI122S – Triton 12.2 MP
    • TRI089S – Triton 8.9 MP
    • TRI071S – Triton 7.1 MP
    • TRI064S – Triton 6.3 MP
    • TRI054S – Triton 5.4 MP
    • TRI050S-P/Q – Triton 5.0 MP Polarized
    • TRI050S – Triton 5.0 MP
    • TRI032S – Triton 3.2 MP
    • TRI028S – Triton 2.8 MP
    • TRI023S – Triton 2.3 MP
    • TRI016S – Triton 1.6 MP
    • TRI005S – Triton 0.5 MP
    • TRI004S – Triton 0.4 MP
    • TRI02KA – Triton 2K Line Scan
    • PHX200S – Phoenix 20.0 MP
    • PHX120S – Phoenix 12.3 MP
    • PHX122S – Phoenix 12.2 MP
    • PHX089S – Phoenix 8.9 MP
    • PHX064S – Phoenix 6.3 MP
    • PHX050S-P/Q – Phoenix 5.0 MP Polarized
    • PHX050S – Phoenix 5.0 MP
    • PHX032S – Phoenix 3.2 MP
    • PHX023S – Phoenix 2.3 MP
    • PHX016S – Phoenix 1.6 MP
    • PHX004S – Phoenix 0.4 MP
  • Application Notes
    • Bandwidth Sharing in Multi-Camera Systems
    • Combine Helios 3D Point Cloud with RGB Color
    • I2C Support on LUCID Cameras
    • Using GPIO on LUCID Cameras
    • Using PTP & Scheduled Action Commands
    • Helios2 And Triton Synchronization
    • Product Change Notifications (PCN)
  • Knowledge Base
  • Contact Support
  • Log In
  • Support Home
  • Getting Started
    • Connecting Your Camera
    • 3rd Party Software Getting Started Guides
  • Tech Ref Manuals
    • Arena SDK Documentation
    • HTP003S – Helios2+ ToF 3D
    • HLT003S – Helios2 ToF 3D
    • HLS003S – Helios ToF 3D
    • HLF003S – Helios Flex ToF 3D
    • ATX245S – Atlas10 24.5 MP
    • ATX204S – Atlas10 20.4 MP
    • ATX162S – Atlas10 16.2 MP
    • ATX124S – Atlas10 12.3 MP
    • ATX081S – Atlas10 8.1 MP
    • ATX051S – Atlas10 5.0 MP
    • ATL314S – Atlas 31.4 MP
    • ATL196S – Atlas 19.6 MP
    • ATL168S – Atlas 16.8 MP
    • ATL120S – Atlas 12.3 MP
    • ATL089S – Atlas 8.9 MP
    • ATL071S – Atlas 7.1 MP
    • ATL050S – Atlas 5.0 MP
    • ATL028S – Atlas 2.8 MP
    • ATP200S – Atlas IP67 20 MP
    • ATP120S – Atlas IP67 12.3 MP
    • ATP089S -Atlas IP67 8.9 MP
    • ATP071S – Atlas IP67 7.1 MP
    • ATP028S – Atlas IP67 2.8 MP
    • TRI200S – Triton 20.0 MP
    • TRI120S – Triton 12.3 MP
    • TRI122S – Triton 12.2 MP
    • TRI089S – Triton 8.9 MP
    • TRI071S – Triton 7.1 MP
    • TRI064S – Triton 6.3 MP
    • TRI054S – Triton 5.4 MP
    • TRI050S-P/Q – Triton 5.0 MP Polarized
    • TRI050S – Triton 5.0 MP
    • TRI032S – Triton 3.2 MP
    • TRI028S – Triton 2.8 MP
    • TRI023S – Triton 2.3 MP
    • TRI016S – Triton 1.6 MP
    • TRI005S – Triton 0.5 MP
    • TRI004S – Triton 0.4 MP
    • TRI02KA – Triton 2K Line Scan
    • PHX200S – Phoenix 20.0 MP
    • PHX120S – Phoenix 12.3 MP
    • PHX122S – Phoenix 12.2 MP
    • PHX089S – Phoenix 8.9 MP
    • PHX064S – Phoenix 6.3 MP
    • PHX050S-P/Q – Phoenix 5.0 MP Polarized
    • PHX050S – Phoenix 5.0 MP
    • PHX032S – Phoenix 3.2 MP
    • PHX023S – Phoenix 2.3 MP
    • PHX016S – Phoenix 1.6 MP
    • PHX004S – Phoenix 0.4 MP
  • Application Notes
    • Bandwidth Sharing in Multi-Camera Systems
    • Combine Helios 3D Point Cloud with RGB Color
    • I2C Support on LUCID Cameras
    • Using GPIO on LUCID Cameras
    • Using PTP & Scheduled Action Commands
    • Helios2 And Triton Synchronization
    • Product Change Notifications (PCN)
  • Knowledge Base
  • Contact Support
  • Log In
home/Knowledge Base/Arena Software/Troubleshooting timeouts caused by incomplete images (Windows)

Troubleshooting timeouts caused by incomplete images (Windows)

1502 views 0 September 20, 2022 Updated on July 24, 2024

Timeouts and incompletes usually happen because of a network disruption causing a flood of resend. If resends occur, either the camera did not transmit the whole image, or the host PC did not successfully receive the complete image. Below are the troubleshooting steps to avoid or eliminate the cause of resends.

Check the DeviceLinkSpeed

Check the value of the DeviceLinkSpeed node and see if it matches the rating of the camera.


Speed

Bits / sec

Bytes / sec

Zeroes

1G

1,000,000,000

125,000,000

6

2.5G

2,500,000,000

312,500,000

5

5G

5,000,000,000

625,000,000

6

10G

10,000,000,000

1250,000,000

7

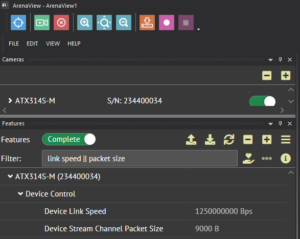
Alternatively, you can check the DeviceLinkSpeed in ArenaView.  The following values should be reported in the DeviceLinkSpeed node and if your camera is properly configured.

Re-enable all cores on your system if they are limited

run -> msconfig -> Boot -> Advanced Options

Uncheck the box for Number of Processors and click ok in the dialogue box.


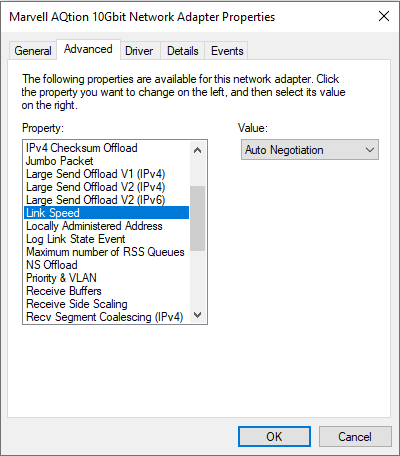
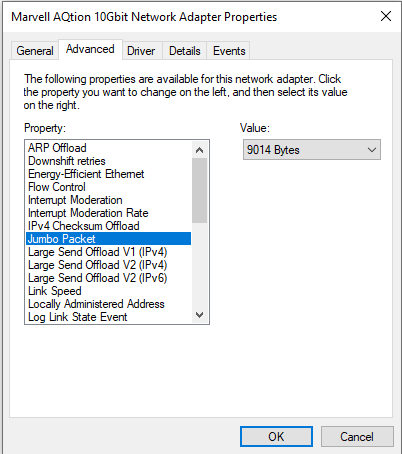
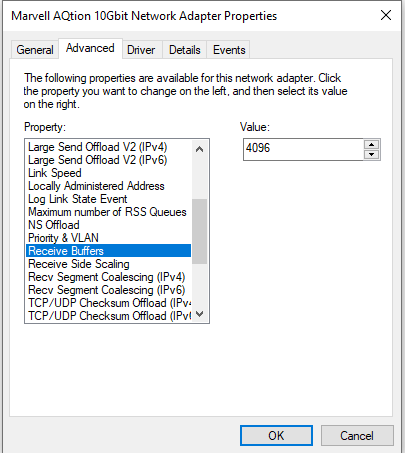
 Set the maximum jumbo packets and receive buffer on the adapter

Right click on the Ethernet Adapter -> Properties -> Configure -> Advanced

Set Jumbo Packet to 9014 Bytes

Set Receive Buffer to 4096


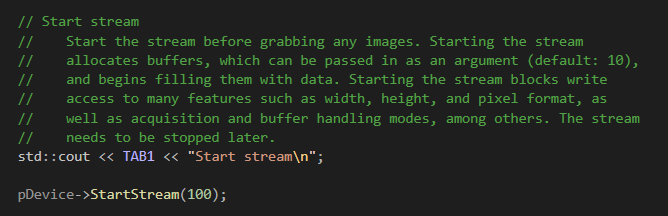
Increase buffer size in the SDK using StartStream(100)

start_stream(number_of_buffers=None)

Causes the device to begin streaming image/chunk data buffers. It must be called before image or chunk data buffers are retrieved via device.get_buffer() otherwise, a BaseException will rise.

Args:

number_of_buffers :

Number of internal buffers to use in the acquisition engine. The default value is None, and the minimum accepted value is 1. It can be:


      1. a positive integer. Relatively small numbers are recommended. Zero or a negative int values will raise ValueError exception.


    1. None. This is the default value, which is equivalent to device.start_stream(device.DEFAULT_NUM_BUFFERS).

Raises:


      1. ValueError :
          • number_of_buffers is zero or a negative intger.


    1. TypeError :
        • number_of_buffers type is not int.

Returns:


    1. None


Turn off power Management on the NIC


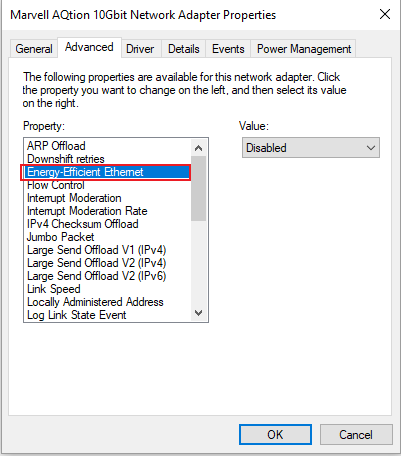
Check power settings in the BIOS


      1. Ensure PC power saving feature is off


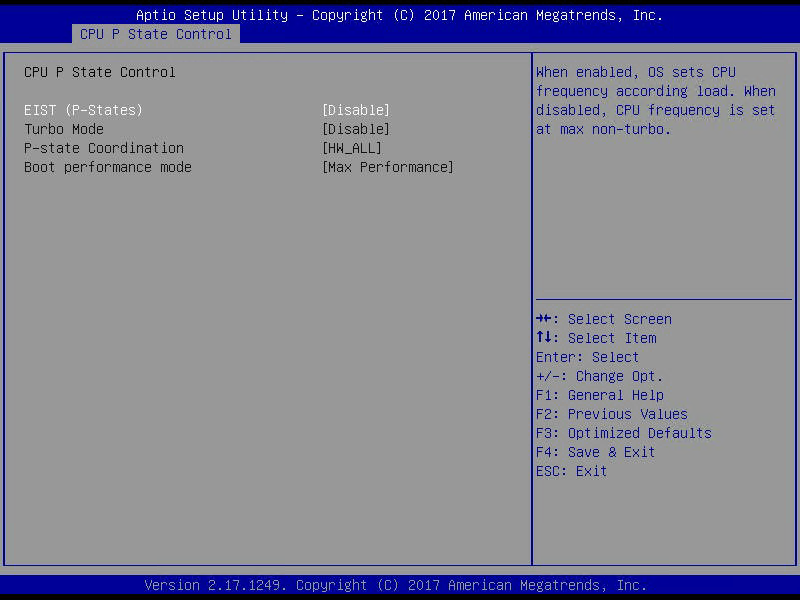
      1. In BIOS, Disable SpeedStep


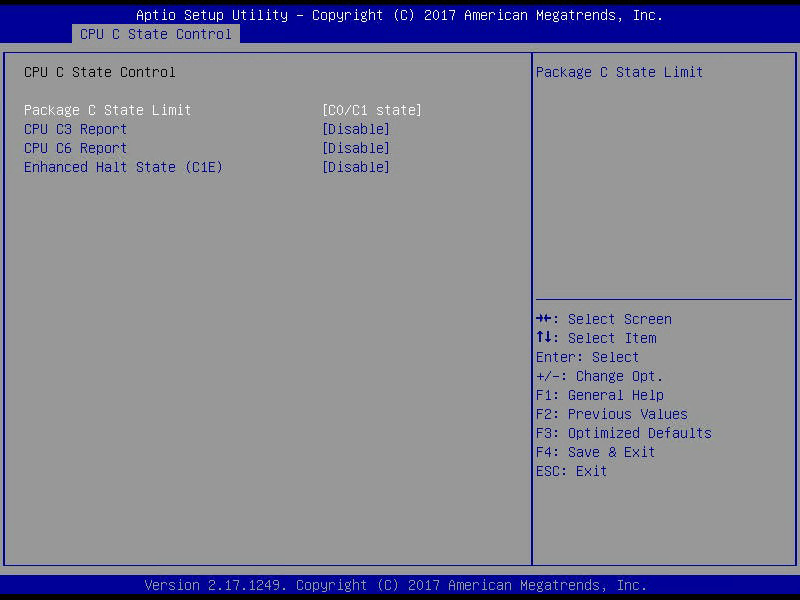
    1. In BIOS, Disable C-States

Missing data/incomplete images with ArenaSDK can occur when EIST and C-State are enabled in the systems power management settings.

C-states are states when the CPU has reduced or turned off selected functions.

Enhanced Intel SpeedStep Technology gives your operating system the ability to switch the processor’s speed and voltage up and down, to preserve power when not much is being computed.

Both C-states and EIST power saving settings should be disabled to resolve the missing data issue with ArenaSDK.

Boot into the systems BIOS settings –

Windows 10 Operating System

Example PC Specifications: Supermicro X10DRi motherboard with Intel Xeon E5 2620v4

Settings → Update and Security → Recovery → Advanced Startup → Restart Now

The computer will boot into a special menu.

Troubleshoot → Advanced Options → UEFI Firmware Settings → Restart

Once in the BIOS settings, there should be an explicit option for  “Intel SpeedStep” or “EIST” that can be disabled.


Then under CPU Power Management in the BIOS, to disable CPU C-States change Package C State Limit to C0/C1 state and deactivate CPU C3 Report, CPU C6 Report and Enhanced Halt State (C1E).


 Disable Audio

We have found that sometimes window sounds can effect the network:


      • Disable Audio


      • Uncheck “Allow Notifications to play sounds”


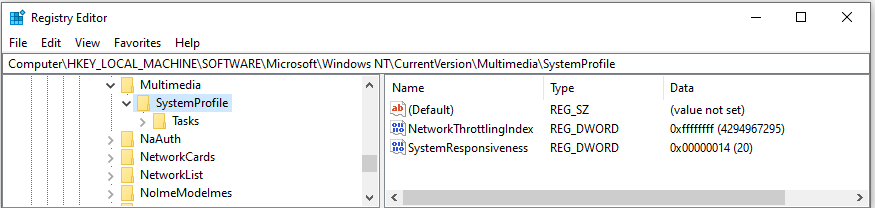
    • Set NetworkThrottlingIndex to 0xFFFFFFFF from registry editor. Please note you MUST reboot after this is modified
      HKEY_LOCAL_MACHINE\SOFTWARE\Microsoft\Windows NT\CurrentVersion\Multimedia\SystemProfile\NetworkThrottlingIndex to 0xFFFFFFFF.


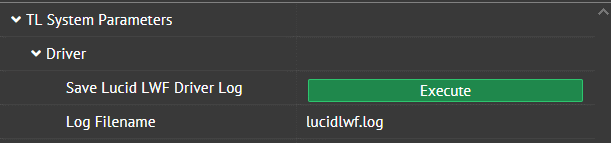
Then check the lucidlwf.log and a PktMon log floods of resends just before a timeout or incomplete:


We will be able to use Microsoft’s utility PktMon. This utility is built into Windows 10 as of October 2018, version 1809. This utility is not available on earlier versions of Windows 10 or Windows 7.


Saving a PktMon Log


  • Open Command Prompt with administrator permission
  • (Optional) Navigate to a convenient directory

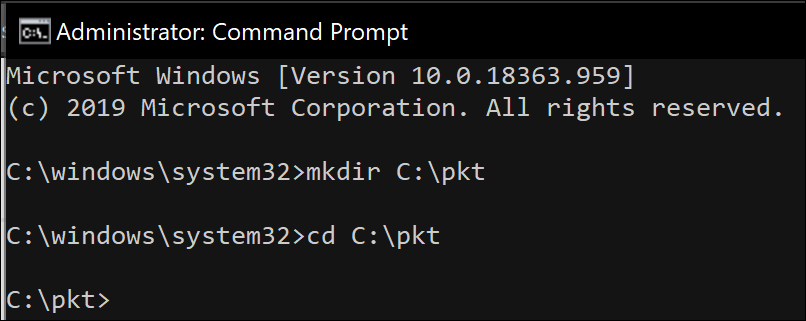
  • Start recording a log with PktMon:

1pktmon start --etw

  • Perform camera actions
  • Stop recording a log with PktMon:

1pktmon stop

The above steps would record traffic on ALL interfaces, which may not be desired.


Recording on a specific interface


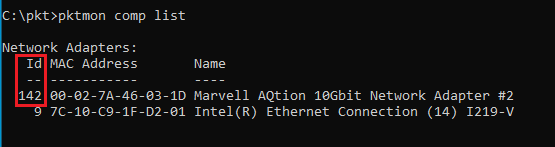
  • Use the following command to list your computer’s interfaces

1pktmon comp list

  • Find your desired NIC and take note of the interface’s ID:


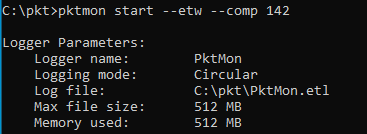
  • Record with pktmon on the desired interface ID:

  • Use the following command to convert the etl to pcapng format

1pktmon pcapng PktMon.etl -o output.pcapng

The PktMon utility from Windows 10 May 2020 (version 2004) or higher is REQUIRED to perform this conversion step.

  • Open your new pcapng file in Wireshark and you’ll find GVSP packets again


Other Notes


  • Use the -f parameter to output to a different filename (default is PktMon.etl)

1pktmon start --etw -f myoutput.etl

  • Use the -p parameter to capture a different packet size (default is 128 Bytes, -p 0 will capture the full packet size)

1pktmon start --etw -p 512

  • Use the -s parameter to change the ETL file size (by default the circular buffer is 512MB)

1pktmon start --etw -s 1024

  • Use the -m parameter to make PktMon create a new file when the current ETL file is full

1pktmon start --etw -m

  • In Windows 10 2004 and Windows 10 20H2, use -l multi-file parameter (instead of -m) to make PktMon create a new file when the current ETL file is full.


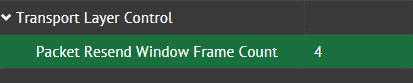
Increase DeviceLinkThroughputReserve and PacketResendWindowFrameCount


There is a node called PacketResendWindowFrameCount which decides how far back resends can be requested for images. By default the number is 4 which means SDK will attempt to request packets for as far back as frame n-3 while receiving the current frame n. Please keep in mind that there still has to be enough bandwidth reserve within that window for the camera to actually send those packets.

Camera uses reserve bandwidth to resend the packets. By default DeviceLinkThroughputReserve is set to 10%.

What you can try is to increase the  PacketResendWindowFrameCount to 8 and slightly increase the reserve bandwidth. You can first try with 10% and then slowly increase or decrease.


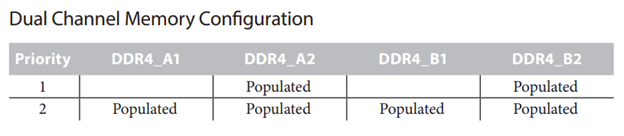
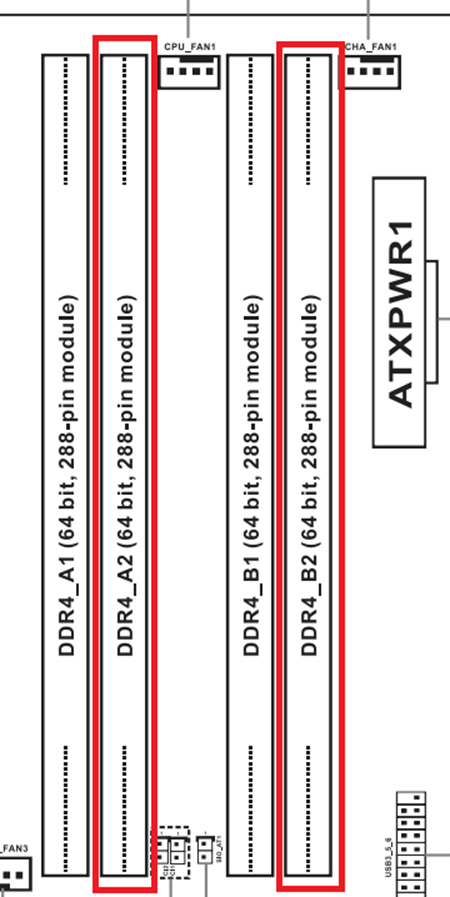
Dual Channel Memory configuration

We recommend dual channel memory configuration for your RAM.
Below is an example on how you want to populate RAM slots to make use of dual channel. In the below example DDR4_A1 and DDR4_B2 will get first priority. Check the manual of your motherboard to make sure you are using the dual channels.


Pages: 1 2

Was this helpful?

Yes  No
Related Articles
  • Solving driver-related RDMA streaming issues with Ubuntu 22.04
  • Using Multiple Helios Cameras Simultaneously
  • Troubleshooting Network Timeouts (Linux)
  • How to create an Ubuntu docker image and container with Arena SDK
  • Tonemapping images from LUCID’s TRI054S-CC IMX490
  • Using LUCID’s ArenaView with JupyterLab

Didn't find your answer? Contact Us

  Tonemapping images from LUCID’s TRI054S-CC IMX490

How to create an Ubuntu docker image and container with Arena SDK  

© 2024 LUCID Vision Labs Inc.
Looking to purchase our cameras?
Visit the LUCID Webstore at thinklucid.com
LUCID Support & Help
Welcome to LUCID

We use cookies to facilitate online purchases and analyze our traffic. By clicking "Accept", you consent to our use of cookies.

Functional Always active
The technical storage or access is strictly necessary for the legitimate purpose of enabling the use of a specific service explicitly requested by the subscriber or user, or for the sole purpose of carrying out the transmission of a communication over an electronic communications network.
Preferences
The technical storage or access is necessary for the legitimate purpose of storing preferences that are not requested by the subscriber or user.
Statistics
The technical storage or access that is used exclusively for statistical purposes. The technical storage or access that is used exclusively for anonymous statistical purposes. Without a subpoena, voluntary compliance on the part of your Internet Service Provider, or additional records from a third party, information stored or retrieved for this purpose alone cannot usually be used to identify you.
Marketing
The technical storage or access is required to create user profiles to send advertising, or to track the user on a website or across several websites for similar marketing purposes.
Manage options Manage services Manage {vendor_count} vendors Read more about these purposes
View preferences
{title} {title} {title}