• Support Home
  • Getting Started
    • Connecting Your Camera
    • 3rd Party Software Getting Started Guides
  • Tech Ref Manuals
    • Arena SDK Documentation
    • HTP003S – Helios2+ ToF 3D
    • HLT003S – Helios2 ToF 3D
    • HLS003S – Helios ToF 3D
    • HLF003S – Helios Flex ToF 3D
    • ATX245S – Atlas10 24.5 MP
    • ATX204S – Atlas10 20.4 MP
    • ATX162S – Atlas10 16.2 MP
    • ATX124S – Atlas10 12.3 MP
    • ATX081S – Atlas10 8.1 MP
    • ATX051S – Atlas10 5.0 MP
    • ATL314S – Atlas 31.4 MP
    • ATL196S – Atlas 19.6 MP
    • ATL168S – Atlas 16.8 MP
    • ATL120S – Atlas 12.3 MP
    • ATL089S – Atlas 8.9 MP
    • ATL071S – Atlas 7.1 MP
    • ATL050S – Atlas 5.0 MP
    • ATL028S – Atlas 2.8 MP
    • ATP200S – Atlas IP67 20 MP
    • ATP120S – Atlas IP67 12.3 MP
    • ATP089S -Atlas IP67 8.9 MP
    • ATP071S – Atlas IP67 7.1 MP
    • ATP028S – Atlas IP67 2.8 MP
    • TRI200S – Triton 20.0 MP
    • TRI120S – Triton 12.3 MP
    • TRI122S – Triton 12.2 MP
    • TRI089S – Triton 8.9 MP
    • TRI071S – Triton 7.1 MP
    • TRI064S – Triton 6.3 MP
    • TRI054S – Triton 5.4 MP
    • TRI050S-P/Q – Triton 5.0 MP Polarized
    • TRI050S – Triton 5.0 MP
    • TRI032S – Triton 3.2 MP
    • TRI028S – Triton 2.8 MP
    • TRI023S – Triton 2.3 MP
    • TRI016S – Triton 1.6 MP
    • TRI005S – Triton 0.5 MP
    • TRI004S – Triton 0.4 MP
    • TRI02KA – Triton 2K Line Scan
    • PHX200S – Phoenix 20.0 MP
    • PHX120S – Phoenix 12.3 MP
    • PHX122S – Phoenix 12.2 MP
    • PHX089S – Phoenix 8.9 MP
    • PHX064S – Phoenix 6.3 MP
    • PHX050S-P/Q – Phoenix 5.0 MP Polarized
    • PHX050S – Phoenix 5.0 MP
    • PHX032S – Phoenix 3.2 MP
    • PHX023S – Phoenix 2.3 MP
    • PHX016S – Phoenix 1.6 MP
    • PHX004S – Phoenix 0.4 MP
  • Application Notes
    • Bandwidth Sharing in Multi-Camera Systems
    • Combine Helios 3D Point Cloud with RGB Color
    • I2C Support on LUCID Cameras
    • Using Helios2 with the Point Cloud Library for Dimensioning
    • Using GPIO on LUCID Cameras
    • Using PTP & Scheduled Action Commands
    • Helios2 And Triton Synchronization
    • Product Change Notifications (PCN)
  • Knowledge Base
  • Contact Support
  • Log In
  • Support Home
  • Getting Started
    • Connecting Your Camera
    • 3rd Party Software Getting Started Guides
  • Tech Ref Manuals
    • Arena SDK Documentation
    • HTP003S – Helios2+ ToF 3D
    • HLT003S – Helios2 ToF 3D
    • HLS003S – Helios ToF 3D
    • HLF003S – Helios Flex ToF 3D
    • ATX245S – Atlas10 24.5 MP
    • ATX204S – Atlas10 20.4 MP
    • ATX162S – Atlas10 16.2 MP
    • ATX124S – Atlas10 12.3 MP
    • ATX081S – Atlas10 8.1 MP
    • ATX051S – Atlas10 5.0 MP
    • ATL314S – Atlas 31.4 MP
    • ATL196S – Atlas 19.6 MP
    • ATL168S – Atlas 16.8 MP
    • ATL120S – Atlas 12.3 MP
    • ATL089S – Atlas 8.9 MP
    • ATL071S – Atlas 7.1 MP
    • ATL050S – Atlas 5.0 MP
    • ATL028S – Atlas 2.8 MP
    • ATP200S – Atlas IP67 20 MP
    • ATP120S – Atlas IP67 12.3 MP
    • ATP089S -Atlas IP67 8.9 MP
    • ATP071S – Atlas IP67 7.1 MP
    • ATP028S – Atlas IP67 2.8 MP
    • TRI200S – Triton 20.0 MP
    • TRI120S – Triton 12.3 MP
    • TRI122S – Triton 12.2 MP
    • TRI089S – Triton 8.9 MP
    • TRI071S – Triton 7.1 MP
    • TRI064S – Triton 6.3 MP
    • TRI054S – Triton 5.4 MP
    • TRI050S-P/Q – Triton 5.0 MP Polarized
    • TRI050S – Triton 5.0 MP
    • TRI032S – Triton 3.2 MP
    • TRI028S – Triton 2.8 MP
    • TRI023S – Triton 2.3 MP
    • TRI016S – Triton 1.6 MP
    • TRI005S – Triton 0.5 MP
    • TRI004S – Triton 0.4 MP
    • TRI02KA – Triton 2K Line Scan
    • PHX200S – Phoenix 20.0 MP
    • PHX120S – Phoenix 12.3 MP
    • PHX122S – Phoenix 12.2 MP
    • PHX089S – Phoenix 8.9 MP
    • PHX064S – Phoenix 6.3 MP
    • PHX050S-P/Q – Phoenix 5.0 MP Polarized
    • PHX050S – Phoenix 5.0 MP
    • PHX032S – Phoenix 3.2 MP
    • PHX023S – Phoenix 2.3 MP
    • PHX016S – Phoenix 1.6 MP
    • PHX004S – Phoenix 0.4 MP
  • Application Notes
    • Bandwidth Sharing in Multi-Camera Systems
    • Combine Helios 3D Point Cloud with RGB Color
    • I2C Support on LUCID Cameras
    • Using Helios2 with the Point Cloud Library for Dimensioning
    • Using GPIO on LUCID Cameras
    • Using PTP & Scheduled Action Commands
    • Helios2 And Triton Synchronization
    • Product Change Notifications (PCN)
  • Knowledge Base
  • Contact Support
  • Log In
home/Knowledge Base/Camera Setup/Factors for Selecting a PCIe card

Factors for Selecting a PCIe card

573 views 0 July 7, 2022 Updated on August 18, 2022

Introduction

The following article discusses important factors when selecting a PCIe card for your host system.

PCIe Bandwidth

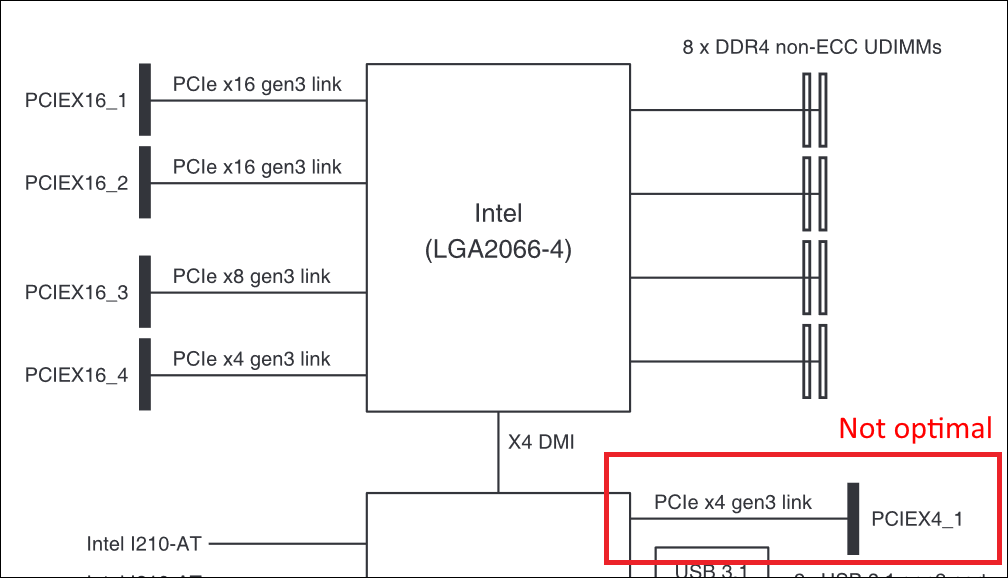
Confirm the PCIe bandwidth available on your motherboard. It is important to confirm you have the correct PCIe slot available (or a compatible PCIe slot) and your selected PCIe slot can negotiate the correct amount of PCIe bandwidth.

It is recommended to install a PCIe card on a slot that is connected to the CPU controller. The following motherboard diagram shows an x4 slot that has to go over a bridge which is less optimal. Consult your motherboard manual to see what PCIe slots are directly connected to the CPU controller.
Physical Considerations

Review the dimensions of the PCIe card. Some PCIe cards include a low profile adapter to fit into slimmer cases.

Power

A Power over Ethernet (PoE) device, e.x. a LUCID camera, utilizing PoE receives its power from Power Sourcing Equipment (PSE). The power can be delivered through a PoE injector, PoE switch, or a PCIe card. This article will focus on PoE through a PCIe card.

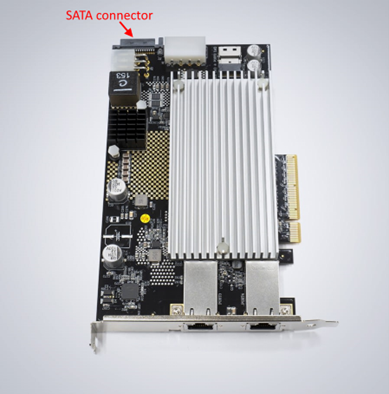
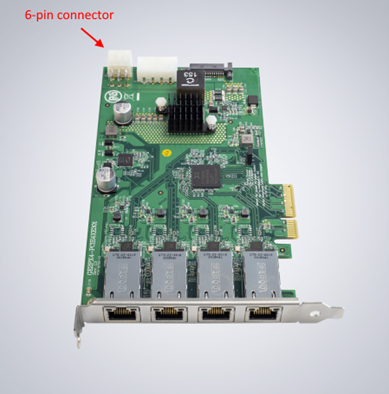
When using a PCIe card, review the power specifications for your PCIe card. Depending on your motherboard design, a PCIe powered card may not provide enough power for a PoE device. Many cards offer a connection to the PC power through a SATA connector, a 4-pin Molex connector, or a 6-pin connector.

PCIE-POE2-MG PCIE-POE4-2G

When connecting multiple PoE devices, review the maximum power that can be supplied by your card to make sure you have enough power for all PoE devices.

Power Requirements for a PoE device:

Power over Ethernet (PoE) Standard Maximum Power delivered by Power Sourcing Equipment (PSE) Voltage Range at PSE Used by
802.3af ("PoE") 15.40 W 44.0 – 57.0 V Phoenix, Triton, Atlas, Atlas IP67
802.3at ("PoE+") 30.0 W 50.0 – 57.0 V Helios2, Atlas SWIR, Atlas10

802.3at is backwards compatible with 802.3at, so a PoE+ PSE will power PoE devices.

PoE Isolation Considerations

Both the PCIe card and camera can have transformer-based isolation between the Ethernet PHY and ethernet cable. Power is sourced on the external side of the magnetics (no transformer isolation). Isolated power converters are used on all Lucid cameras to provide isolation to the internal circuits. GPIO connections to external devices can be isolated or non-isolated (both options are available and can be used).

The PCIe card can implement PoE power sourcing in a number of ways:

  • Single non-isolated power supply for all ports
  • Single isolated power supply for all ports
  • Separate isolated power supplies for each port

There are a number of reasons you would need isolation in an industrial environment. The most obvious one is safety, where the purpose of isolation is to protect the user from being exposed to dangerous voltages.

Non-isolated power supply relies on the PC power supply isolation from the AC mains. This can be dangerous in certain areas of the world with no AC plug grounding, when PC chassis is not properly earthed. This effectively connects internal PC ground to Ethernet cable, creating a potential for user exposure.

Isolated power supplies add a level of protection from improper earthing of the PC, as they isolate the ethernet cable from the PC.
The other, more common problem solved by isolation is EMI (electromagnetic interference). Industrial environments are often electrically noisy, as there are motors, strong magnetic fields, and other high power devices. This can induce electrical currents and potential differences between devices tied to the same potential in different locations. The impact of EMI can range from performance degradation to component failures. EMI mitigation is typically a system level problem.

Having isolated PoE power supply on the PCIe side breaks a potential ground loop between the PC ground and a lighting controller or another device connected to the camera using non-isolated GPIO. The ground loop would be created through the shield of the Ethernet cable, which is connected to the chassis of the PC, camera chassis, and lighting controller or another device ground/chassis which ties its ground and chassis together.
Was this helpful?

Yes  No
Related Articles
  • Projecting a Helios2 3D image to and from a 2D image
  • Focusing a Triton2 EVS Camera
  • Controlling Triton2 EVS camera’s event rate when connected at less than 2.5GigE (Event Rate Control / ERC)
  • Using Multiple RDMA Cameras on a Switch
  • Configuring RDMA for Linux
  • Configuring RDMA for Windows

Didn't find your answer? Contact Us

  Default Network Ports for LUCID Cameras

Long Reach Mode  

© 2024 LUCID Vision Labs Inc.
Looking to purchase our cameras?
Visit the LUCID Webstore at thinklucid.com
Welcome to LUCID

We use cookies to facilitate online purchases and analyze our traffic. By clicking "Accept", you consent to our use of cookies.

Functional Always active
The technical storage or access is strictly necessary for the legitimate purpose of enabling the use of a specific service explicitly requested by the subscriber or user, or for the sole purpose of carrying out the transmission of a communication over an electronic communications network.
Preferences
The technical storage or access is necessary for the legitimate purpose of storing preferences that are not requested by the subscriber or user.
Statistics
The technical storage or access that is used exclusively for statistical purposes. The technical storage or access that is used exclusively for anonymous statistical purposes. Without a subpoena, voluntary compliance on the part of your Internet Service Provider, or additional records from a third party, information stored or retrieved for this purpose alone cannot usually be used to identify you.
Marketing
The technical storage or access is required to create user profiles to send advertising, or to track the user on a website or across several websites for similar marketing purposes.
Manage options Manage services Manage {vendor_count} vendors Read more about these purposes
View preferences
{title} {title} {title}