• Support Home
  • Getting Started
    • Connecting Your Camera
    • 3rd Party Software Getting Started Guides
  • Tech Ref Manuals
    • Arena SDK Documentation
    • HTP003S – Helios2+ ToF 3D
    • HLT003S – Helios2 ToF 3D
    • HLS003S – Helios ToF 3D
    • HLF003S – Helios Flex ToF 3D
    • ATX245S – Atlas10 24.5 MP
    • ATX204S – Atlas10 20.4 MP
    • ATX162S – Atlas10 16.2 MP
    • ATX124S – Atlas10 12.3 MP
    • ATX081S – Atlas10 8.1 MP
    • ATX051S – Atlas10 5.0 MP
    • ATL314S – Atlas 31.4 MP
    • ATL196S – Atlas 19.6 MP
    • ATL168S – Atlas 16.8 MP
    • ATL120S – Atlas 12.3 MP
    • ATL089S – Atlas 8.9 MP
    • ATL071S – Atlas 7.1 MP
    • ATL050S – Atlas 5.0 MP
    • ATL028S – Atlas 2.8 MP
    • ATP200S – Atlas IP67 20 MP
    • ATP120S – Atlas IP67 12.3 MP
    • ATP089S -Atlas IP67 8.9 MP
    • ATP071S – Atlas IP67 7.1 MP
    • ATP028S – Atlas IP67 2.8 MP
    • TRI200S – Triton 20.0 MP
    • TRI120S – Triton 12.3 MP
    • TRI122S – Triton 12.2 MP
    • TRI089S – Triton 8.9 MP
    • TRI071S – Triton 7.1 MP
    • TRI064S – Triton 6.3 MP
    • TRI054S – Triton 5.4 MP
    • TRI050S-P/Q – Triton 5.0 MP Polarized
    • TRI050S – Triton 5.0 MP
    • TRI032S – Triton 3.2 MP
    • TRI028S – Triton 2.8 MP
    • TRI023S – Triton 2.3 MP
    • TRI016S – Triton 1.6 MP
    • TRI005S – Triton 0.5 MP
    • TRI004S – Triton 0.4 MP
    • TRI02KA – Triton 2K Line Scan
    • PHX200S – Phoenix 20.0 MP
    • PHX120S – Phoenix 12.3 MP
    • PHX122S – Phoenix 12.2 MP
    • PHX089S – Phoenix 8.9 MP
    • PHX064S – Phoenix 6.3 MP
    • PHX050S-P/Q – Phoenix 5.0 MP Polarized
    • PHX050S – Phoenix 5.0 MP
    • PHX032S – Phoenix 3.2 MP
    • PHX023S – Phoenix 2.3 MP
    • PHX016S – Phoenix 1.6 MP
    • PHX004S – Phoenix 0.4 MP
  • Application Notes
    • Bandwidth Sharing in Multi-Camera Systems
    • Combine Helios 3D Point Cloud with RGB Color
    • I2C Support on LUCID Cameras
    • Using GPIO on LUCID Cameras
    • Using PTP & Scheduled Action Commands
    • Helios2 And Triton Synchronization
    • Product Change Notifications (PCN)
  • Knowledge Base
  • Contact Support
  • Log In
  • Support Home
  • Getting Started
    • Connecting Your Camera
    • 3rd Party Software Getting Started Guides
  • Tech Ref Manuals
    • Arena SDK Documentation
    • HTP003S – Helios2+ ToF 3D
    • HLT003S – Helios2 ToF 3D
    • HLS003S – Helios ToF 3D
    • HLF003S – Helios Flex ToF 3D
    • ATX245S – Atlas10 24.5 MP
    • ATX204S – Atlas10 20.4 MP
    • ATX162S – Atlas10 16.2 MP
    • ATX124S – Atlas10 12.3 MP
    • ATX081S – Atlas10 8.1 MP
    • ATX051S – Atlas10 5.0 MP
    • ATL314S – Atlas 31.4 MP
    • ATL196S – Atlas 19.6 MP
    • ATL168S – Atlas 16.8 MP
    • ATL120S – Atlas 12.3 MP
    • ATL089S – Atlas 8.9 MP
    • ATL071S – Atlas 7.1 MP
    • ATL050S – Atlas 5.0 MP
    • ATL028S – Atlas 2.8 MP
    • ATP200S – Atlas IP67 20 MP
    • ATP120S – Atlas IP67 12.3 MP
    • ATP089S -Atlas IP67 8.9 MP
    • ATP071S – Atlas IP67 7.1 MP
    • ATP028S – Atlas IP67 2.8 MP
    • TRI200S – Triton 20.0 MP
    • TRI120S – Triton 12.3 MP
    • TRI122S – Triton 12.2 MP
    • TRI089S – Triton 8.9 MP
    • TRI071S – Triton 7.1 MP
    • TRI064S – Triton 6.3 MP
    • TRI054S – Triton 5.4 MP
    • TRI050S-P/Q – Triton 5.0 MP Polarized
    • TRI050S – Triton 5.0 MP
    • TRI032S – Triton 3.2 MP
    • TRI028S – Triton 2.8 MP
    • TRI023S – Triton 2.3 MP
    • TRI016S – Triton 1.6 MP
    • TRI005S – Triton 0.5 MP
    • TRI004S – Triton 0.4 MP
    • TRI02KA – Triton 2K Line Scan
    • PHX200S – Phoenix 20.0 MP
    • PHX120S – Phoenix 12.3 MP
    • PHX122S – Phoenix 12.2 MP
    • PHX089S – Phoenix 8.9 MP
    • PHX064S – Phoenix 6.3 MP
    • PHX050S-P/Q – Phoenix 5.0 MP Polarized
    • PHX050S – Phoenix 5.0 MP
    • PHX032S – Phoenix 3.2 MP
    • PHX023S – Phoenix 2.3 MP
    • PHX016S – Phoenix 1.6 MP
    • PHX004S – Phoenix 0.4 MP
  • Application Notes
    • Bandwidth Sharing in Multi-Camera Systems
    • Combine Helios 3D Point Cloud with RGB Color
    • I2C Support on LUCID Cameras
    • Using GPIO on LUCID Cameras
    • Using PTP & Scheduled Action Commands
    • Helios2 And Triton Synchronization
    • Product Change Notifications (PCN)
  • Knowledge Base
  • Contact Support
  • Log In
home/Knowledge Base/Camera Setup/Long Reach Mode

Long Reach Mode

432 views 0 June 1, 2023 Updated on January 29, 2024

Introduction

This article explains how to use Long Reach mode with a LUCID Atlas10 camera. To minimize power consumption and camera temperature, the Atlas10 camera configures its Ethernet interface in Short Reach mode by default. Short Reach mode limits the maximum Ethernet cable length to 20 meters or less. It is possible to configure the Ethernet interface to use Long Reach mode and support cable lengths of up to 100 meters.

Prerequisites

  • Atlas10 camera with Long Reach mode option.
  • Power supplied to Atlas10 via GPIO.
    Note: Power over Ethernet is not supported.

Test Environment

PC Specifications

Long Reach mode was tested on the system shown below:

Motherboard ASUS PRIME Z270-A
Processor Intel(R) Core(TM) i7-7700 CPU @ 3.60GHz
Memory Kingston KHX2400C15D4 16GB (2x8GB) DDR4 SDRAM
Operating System Microsoft Windows 10 Professional (x64) version 19.09, build 18363.1082
Arena SDK UDP or TCP Setup: Arena SDK for Windows v1.0.36.7
RDMA Setup: Arena SDK for Windows v1.0.41.8
Video Intel HD Graphics 630
Storage Samsung SSD 850 EVO 500GB
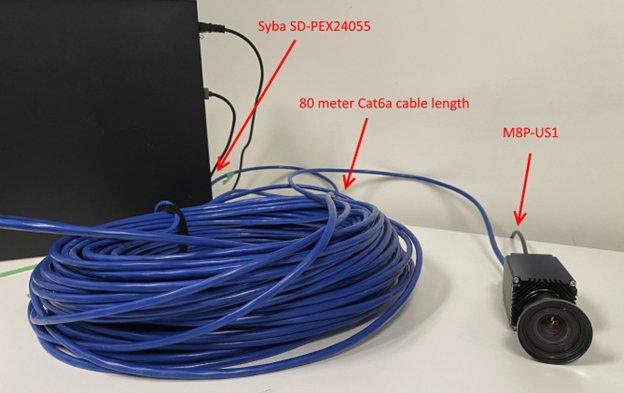
Network Interface Card (NIC) UDP or TCP Setup: Syba SD-PEX24055 - 10 Gigabit 10GBase-T NBASE-T Ethernet PCI-e x4 Network Card, Aquantia AQC-107 (non-PoE)
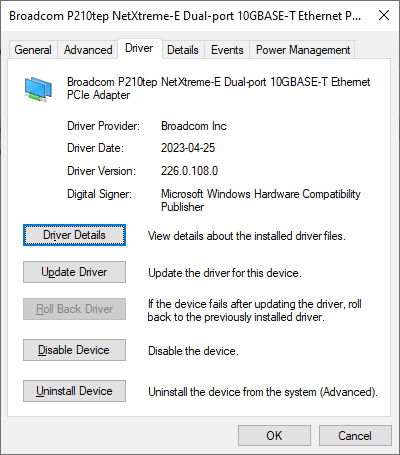
RDMA Setup: LUCID PCIE-10GETH2-BC - Broadcom 2-CH 10G/1G RDMA Host Channel Adapter (HCA) Network Card, Broadcom BCM957416A4160C (non-PoE)

A non-PoE card is used because a PoE-card injects noise from the PoE power circuit, limiting the maximum length.

Network Card (UDP or TCP)

  • Syba SD-PEX24055
  • 10G/5G/2.5G/1G NBASE-T Ethernet Card
  • Chipset: Marvell Aquantia AQC107
  • Driver Version: 2.2.1.0, Date: 8/13/2020

Network Card (RDMA)

  • LUCID PCIE-10GETH2-BC
  • 2-CH 10G/1G RDMA Host Channel Adapter (HCA) Network Card
  • Chipset: Broadcom BCM957416A4160C
  • Driver Version: 226.0.108.0, Date: 4/25/2023
NIC Setup

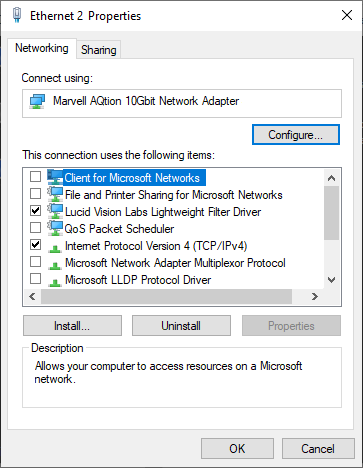
Open your NIC properties window. Uncheck all options under the Networking tab except the following:

  • LUCID Vision Labs Lightweight Filter Driver
  • Internet Protocol Version 4 (TCP/IPv4)
  • Internet Protocol Version 6 (TCP/IPv6)
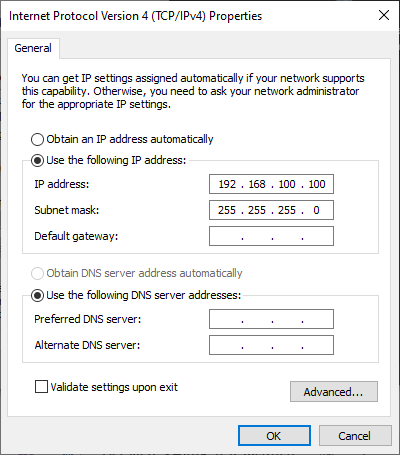
Assign an IP address and subnet to your NIC:
Apply the following to cards featuring the Marvell Aquantia AQC107 chipset:

  • Transmit Buffers: 4096
  • Receiver Buffers: 4096
  • Jumbo Packets: 16348 Bytes
  • Interrupt Moderation: Enabled
  • Interrupt Moderation Rate: Adaptive
  • IPv4 Checksum Offload: Rx & Tx enabled
  • TCP/UDP Checksum Offload (IPv4): Rx & Tx enabled
  • Energy-Efficient Ethernet: Disabled
  • Allow the computer to turn off this device to save power: Unchecked

Arena SDK v1.0.41.8 and higher will automatically set up LUCID RDMA cards that are found on the system during SDK installation.

Physical Setup

The camera should be mounted on a structure to keep the case temperature below the maximum specified value. See the Knowledge Base article Heat management for LUCID cameras for more information.

Enabling Long Reach Mode

Use the following steps to use Long Reach mode with your Atlas10.

  1. Connect your camera to your NIC with a cable length of 20 meters or less.
  2. Connect to the camera in your host software.
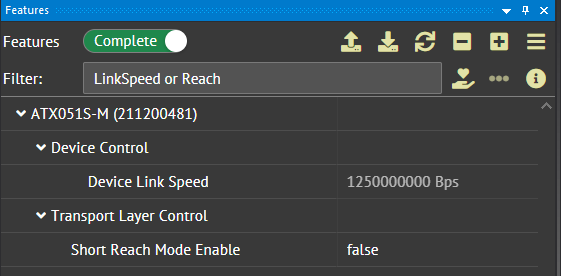
  3. Set Short Reach Mode Enable = False.

This node’s setting persists on power cycle. It is not necessary to save to a User Set when setting this node.

  1. Remove power from the camera.
  2. When reattaching power, the camera will use Long Reach mode.

With this setup, the Atlas10 was able to stream with UDP or TCP with an 80 meter network cable length.

Using TCP

Follow the instructions in the Knowledge Base article Using TCP with Atlas10 Cameras.
NOTE: In Atlas10 v1.20 firmware, the TCP Enable node has been renamed to Transmission Stream Protocol
In C++ code:

Arena::IDevice* pDevice = pSystem->CreateDevice(deviceInfos[0]);
Arena::SetNodeValue<GenICam::gcstring>(pDevice->GetNodeMap(), "TransportStreamProtocol", "TCP");

// When using TCP, there is no need to enable packet resend.
//    The packet delay and bandwidth reserve should be set to 0
//    to maximize TCP efficiency.

std::cout << TAB1 << "GevSCPD = " << 0 << std::endl;
Arena::SetNodeValue<int64_t>(pDevice->GetNodeMap(), "GevSCPD", 0);         
std::cout << TAB1 << "DeviceLinkThroughputReserve = " << 0 << std::endl;
Arena::SetNodeValue<int64_t>(pDevice->GetNodeMap(), "DeviceLinkThroughputReserve", 0);


// Packet size should be set to the maximum value supported by the NIC.
//    In practice, the TCP engine may negotiate a smaller packet size.

std::cout << TAB1 << "GevSCPSPacketSize = " << 9000 << std::endl;
Arena::SetNodeValue<int64_t>(pDevice->GetNodeMap(), "GevSCPSPacketSize", 9000);

Using RDMA

NOTE: Arena SDK v1.0.41.8 or higher, Atlas10 v1.20 firmware or higher, and an RDMA-enabled NIC are required. See this link for more details.

In C++ code:

Arena::IDevice* pDevice = pSystem->CreateDevice(deviceInfos[0]);
Arena::SetNodeValue<GenICam::gcstring>(pDevice->GetNodeMap(), "TransportStreamProtocol", "RDMA");

// When using RDMA, there is no need to enable packet resend.
//    The packet delay and bandwidth reserve should be set to 0
//    to maximize RDMA efficiency.

std::cout << TAB1 << "GevSCPD = " << 0 << std::endl;
Arena::SetNodeValue<int64_t>(pDevice->GetNodeMap(), "GevSCPD", 0);         
std::cout << TAB1 << "DeviceLinkThroughputReserve = " << 0 << std::endl;
Arena::SetNodeValue<int64_t>(pDevice->GetNodeMap(), "DeviceLinkThroughputReserve", 0);


std::cout << TAB1 << "GevSCPSPacketSize = " << 9000 << std::endl;
Arena::SetNodeValue<int64_t>(pDevice->GetNodeMap(), "GevSCPSPacketSize", 9000);

Was this helpful?

Yes  No
Related Articles
  • Projecting a Helios2 3D image to and from a 2D image
  • Focusing a Triton2 EVS Camera
  • Controlling Triton2 EVS camera’s event rate when connected at less than 2.5GigE (Event Rate Control / ERC)
  • Using Multiple RDMA Cameras on a Switch
  • Configuring RDMA for Linux
  • Configuring RDMA for Windows

Didn't find your answer? Contact Us

  Factors for Selecting a PCIe card

Reliability testing of LUCID Cameras  

© 2024 LUCID Vision Labs Inc.
Looking to purchase our cameras?
Visit the LUCID Webstore at thinklucid.com
LUCID Support & Help
Welcome to LUCID

We use cookies to facilitate online purchases and analyze our traffic. By clicking "Accept", you consent to our use of cookies.

Functional Always active
The technical storage or access is strictly necessary for the legitimate purpose of enabling the use of a specific service explicitly requested by the subscriber or user, or for the sole purpose of carrying out the transmission of a communication over an electronic communications network.
Preferences
The technical storage or access is necessary for the legitimate purpose of storing preferences that are not requested by the subscriber or user.
Statistics
The technical storage or access that is used exclusively for statistical purposes. The technical storage or access that is used exclusively for anonymous statistical purposes. Without a subpoena, voluntary compliance on the part of your Internet Service Provider, or additional records from a third party, information stored or retrieved for this purpose alone cannot usually be used to identify you.
Marketing
The technical storage or access is required to create user profiles to send advertising, or to track the user on a website or across several websites for similar marketing purposes.
Manage options Manage services Manage {vendor_count} vendors Read more about these purposes
View preferences
{title} {title} {title}