• Support Home
  • Getting Started
    • Connecting Your Camera
    • 3rd Party Software Getting Started Guides
  • Tech Ref Manuals
    • Arena SDK Documentation
    • HTP003S – Helios2+ ToF 3D
    • HLT003S – Helios2 ToF 3D
    • HLS003S – Helios ToF 3D
    • HLF003S – Helios Flex ToF 3D
    • ATX245S – Atlas10 24.5 MP
    • ATX204S – Atlas10 20.4 MP
    • ATX162S – Atlas10 16.2 MP
    • ATX124S – Atlas10 12.3 MP
    • ATX081S – Atlas10 8.1 MP
    • ATX051S – Atlas10 5.0 MP
    • ATL314S – Atlas 31.4 MP
    • ATL196S – Atlas 19.6 MP
    • ATL168S – Atlas 16.8 MP
    • ATL120S – Atlas 12.3 MP
    • ATL089S – Atlas 8.9 MP
    • ATL071S – Atlas 7.1 MP
    • ATL050S – Atlas 5.0 MP
    • ATL028S – Atlas 2.8 MP
    • ATP200S – Atlas IP67 20 MP
    • ATP120S – Atlas IP67 12.3 MP
    • ATP089S -Atlas IP67 8.9 MP
    • ATP071S – Atlas IP67 7.1 MP
    • ATP028S – Atlas IP67 2.8 MP
    • TRI200S – Triton 20.0 MP
    • TRI120S – Triton 12.3 MP
    • TRI122S – Triton 12.2 MP
    • TRI089S – Triton 8.9 MP
    • TRI071S – Triton 7.1 MP
    • TRI064S – Triton 6.3 MP
    • TRI054S – Triton 5.4 MP
    • TRI050S-P/Q – Triton 5.0 MP Polarized
    • TRI050S – Triton 5.0 MP
    • TRI032S – Triton 3.2 MP
    • TRI028S – Triton 2.8 MP
    • TRI023S – Triton 2.3 MP
    • TRI016S – Triton 1.6 MP
    • TRI005S – Triton 0.5 MP
    • TRI004S – Triton 0.4 MP
    • TRI02KA – Triton 2K Line Scan
    • PHX200S – Phoenix 20.0 MP
    • PHX120S – Phoenix 12.3 MP
    • PHX122S – Phoenix 12.2 MP
    • PHX089S – Phoenix 8.9 MP
    • PHX064S – Phoenix 6.3 MP
    • PHX050S-P/Q – Phoenix 5.0 MP Polarized
    • PHX050S – Phoenix 5.0 MP
    • PHX032S – Phoenix 3.2 MP
    • PHX023S – Phoenix 2.3 MP
    • PHX016S – Phoenix 1.6 MP
    • PHX004S – Phoenix 0.4 MP
  • Application Notes
    • Bandwidth Sharing in Multi-Camera Systems
    • Combine Helios 3D Point Cloud with RGB Color
    • I2C Support on LUCID Cameras
    • Using GPIO on LUCID Cameras
    • Using PTP & Scheduled Action Commands
    • Helios2 And Triton Synchronization
    • Product Change Notifications (PCN)
  • Knowledge Base
  • Contact Support
  • Log In
  • Support Home
  • Getting Started
    • Connecting Your Camera
    • 3rd Party Software Getting Started Guides
  • Tech Ref Manuals
    • Arena SDK Documentation
    • HTP003S – Helios2+ ToF 3D
    • HLT003S – Helios2 ToF 3D
    • HLS003S – Helios ToF 3D
    • HLF003S – Helios Flex ToF 3D
    • ATX245S – Atlas10 24.5 MP
    • ATX204S – Atlas10 20.4 MP
    • ATX162S – Atlas10 16.2 MP
    • ATX124S – Atlas10 12.3 MP
    • ATX081S – Atlas10 8.1 MP
    • ATX051S – Atlas10 5.0 MP
    • ATL314S – Atlas 31.4 MP
    • ATL196S – Atlas 19.6 MP
    • ATL168S – Atlas 16.8 MP
    • ATL120S – Atlas 12.3 MP
    • ATL089S – Atlas 8.9 MP
    • ATL071S – Atlas 7.1 MP
    • ATL050S – Atlas 5.0 MP
    • ATL028S – Atlas 2.8 MP
    • ATP200S – Atlas IP67 20 MP
    • ATP120S – Atlas IP67 12.3 MP
    • ATP089S -Atlas IP67 8.9 MP
    • ATP071S – Atlas IP67 7.1 MP
    • ATP028S – Atlas IP67 2.8 MP
    • TRI200S – Triton 20.0 MP
    • TRI120S – Triton 12.3 MP
    • TRI122S – Triton 12.2 MP
    • TRI089S – Triton 8.9 MP
    • TRI071S – Triton 7.1 MP
    • TRI064S – Triton 6.3 MP
    • TRI054S – Triton 5.4 MP
    • TRI050S-P/Q – Triton 5.0 MP Polarized
    • TRI050S – Triton 5.0 MP
    • TRI032S – Triton 3.2 MP
    • TRI028S – Triton 2.8 MP
    • TRI023S – Triton 2.3 MP
    • TRI016S – Triton 1.6 MP
    • TRI005S – Triton 0.5 MP
    • TRI004S – Triton 0.4 MP
    • TRI02KA – Triton 2K Line Scan
    • PHX200S – Phoenix 20.0 MP
    • PHX120S – Phoenix 12.3 MP
    • PHX122S – Phoenix 12.2 MP
    • PHX089S – Phoenix 8.9 MP
    • PHX064S – Phoenix 6.3 MP
    • PHX050S-P/Q – Phoenix 5.0 MP Polarized
    • PHX050S – Phoenix 5.0 MP
    • PHX032S – Phoenix 3.2 MP
    • PHX023S – Phoenix 2.3 MP
    • PHX016S – Phoenix 1.6 MP
    • PHX004S – Phoenix 0.4 MP
  • Application Notes
    • Bandwidth Sharing in Multi-Camera Systems
    • Combine Helios 3D Point Cloud with RGB Color
    • I2C Support on LUCID Cameras
    • Using GPIO on LUCID Cameras
    • Using PTP & Scheduled Action Commands
    • Helios2 And Triton Synchronization
    • Product Change Notifications (PCN)
  • Knowledge Base
  • Contact Support
  • Log In
home/Knowledge Base/Camera Setup/Tips for Reaching Maximum Frame Rate (FPS)

Tips for Reaching Maximum Frame Rate (FPS)

9482 views 15 April 27, 2020 Updated on December 2, 2024

If you're having trouble reaching your maximum frame rate please try these following steps.

1) Enable Jumbo Frames
LUCID Vision Labs recommends enabling jumbo frames on your Ethernet adapter. A jumbo frame is an Ethernet frame that is larger than 1500 bytes. Most Ethernet adapters support jumbo frames, however it is usually turned off by default.

The following table are some of the Ethernet adapters that LUCID Vision Labs has tested:

Product Name Maximum Jumbo Frame Size
ADLINK PCIe-GIE64+ 9000
ADLINK PCIe-GIE72/74 9000
Neousys PCIe-PoE354at 9500
Intel EXPI9301CT (non-POE) 9000
IOI GE10-PCIE4XG202P 9000
IOI GE10P-PCIE4XG301 16000

Enabling jumbo frames on the Ethernet adapter allows a packet size of up to 9000 bytes. The larger packet size will enable optimal performance on high-bandwidth cameras, and it usually reduces CPU load on the host system. Please note in order to set a 9000 byte packet size on the camera, the Ethernet adapter must support a jumbo frame size of 9000 bytes or higher.

https://support.thinklucid.com/wp-content/uploads/sites/2/2020/04/Jumbo-Frames-Video-Edited.mp4


2) Increase Receive Buffers
A receive buffer is the size of system memory that can be used by the Ethernet adapter to receive packets. Some Ethernet adapter drivers or the operating system itself may set the receive buffer value to a low value by default, which may result in decreased performance. Increasing the receive buffer size, however, will also result in increased system memory usage.

https://support.thinklucid.com/wp-content/uploads/sites/2/2020/04/Receive-Buffers-Video-Edited.mp4


3) Set Speed & Duplex to Auto Negotiation
In some scenarios it is possible that your camera enumerates at a lower link speed with your Ethernet interface card (for example, 100Mbps instead of 1000Mbps) due to lower speed setting on your Ethernet interface card. This can cap your frame rate at a much lower speed than the stated maximum frame rate of the camera. Your interface card should be able to negotiate up to the maximum speed connection. Alternatively you can manually set it to the maximum link speed (for example 1.0 Gbps Full Duplex for 1 GigE cards).

https://support.thinklucid.com/wp-content/uploads/sites/2/2020/04/Speed-and-Duplex-Video-Edited.mp4


4) Enable Interrupt Moderation, Set Interrupt Moderation Rate to Adaptive
Interrupt Moderation allows your computer to interrupt the system to manage incoming and outgoing packets. The moderation rate determines how often this happens. A high moderation rate yields higher system performance at the cost of slower packet handling, while a low moderation rate yields faster packet handling at the cost of system performance. Setting Interrupt Moderation Rate to Adaptive allows the system to decide what rate to use given current circumstances.

https://support.thinklucid.com/wp-content/uploads/sites/2/2020/04/Interrupt-Moderation-Video-Edited.mp4


5) Set ADC to 8-bit (Atlas cameras only)
Our stated maximum frame rates for Atlas models are based on 8-bit ADC setting. If your Atlas camera’s ADC is set to 10-bit or 12-bit your maximum frame rate will be lower as more data is sent per frame. If higher ADC bit depth is not needed, please set it to 8-bit to reach higher frame rates. Please note that Phoenix and Triton cameras only run at 12-bit ADC.


6) Check Device Link Speed in ArenaView
Once you have applied the setting changes, power cycle your camera and check the Device Link Speed node in ArenaView.

https://support.thinklucid.com/wp-content/uploads/sites/2/2020/04/Device-Link-Speed-Video.mp4


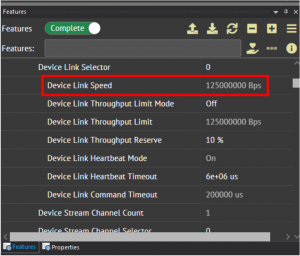
This shows the connection speed of the camera. You should see the following values for Device Link Speed:

  • 1G cameras: 125000000 Bps (six zeros) as pictured
  • 5G cameras: 625000000 Bps
  • 10G cameras: 1250000000 Bps

If your Device Link Speed matches the expected value for your camera, this will allow you to achieve the highest possible frame rate.

Please note that frame rates listed on our website are for 8-bit pixel formats and the lowest selectable ADC option.

7) Check Device Stream Channel Packet Size in ArenaView

To ensure the packet size is set to 9000 Bytes, make sure Stream Auto Negotiate Packet Size is set to true and check Device Stream Channel Packet Size is 9000 B when streaming.

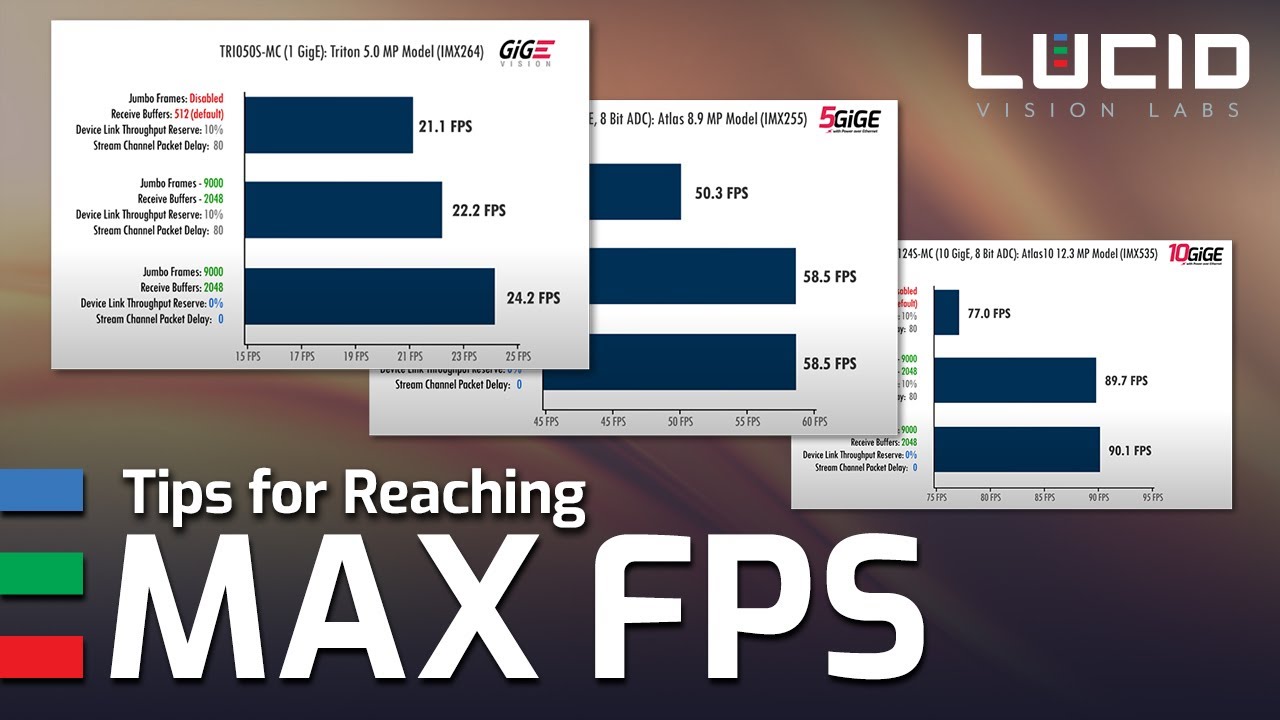
The above settings will allow users to achieve a high framerate while reserving some bandwidth for packet resend. The above settings are the recommended settings for most use cases.

Achieving Maximum Possible Framerate

The steps below will show how to achieve the highest possible framerate on the camera.

1) Set Device Link Throughput Reserve to 0%

Device Link Throughput Reserve: Allocates the maximum percentage of bandwidth reserved for re-transmissions.

By setting Device Link Throughput Reserve to 0%, there is no bandwidth allocated for packet resend which is the equivalent to turning off packet resend functionality.

2) Set Stream Channel Packet Delay to 0

Stream Channel Packet Delay: Controls the delay (in GEV timestamp counter unit) to insert between each packet for this stream channel.

By setting Stream Channel Packet Delay to 0, there is no delay between packet deliveries which may result in packet loss if the host system does not keep up.

Tags:Frame RateFPS

Was this helpful?

15 Yes  16 No
Related Articles
  • Projecting a Helios2 3D image to and from a 2D image
  • Focusing a Triton2 EVS Camera
  • Controlling Triton2 EVS camera’s event rate when connected at less than 2.5GigE (Event Rate Control / ERC)
  • Using Multiple RDMA Cameras on a Switch
  • Configuring RDMA for Linux
  • Configuring RDMA for Windows

Didn't find your answer? Contact Us

What to do when some cameras are not enumerating (Windows or Linux)  

© 2024 LUCID Vision Labs Inc.
Looking to purchase our cameras?
Visit the LUCID Webstore at thinklucid.com
LUCID Support & Help
Welcome to LUCID

We use cookies to facilitate online purchases and analyze our traffic. By clicking "Accept", you consent to our use of cookies.

Functional Always active
The technical storage or access is strictly necessary for the legitimate purpose of enabling the use of a specific service explicitly requested by the subscriber or user, or for the sole purpose of carrying out the transmission of a communication over an electronic communications network.
Preferences
The technical storage or access is necessary for the legitimate purpose of storing preferences that are not requested by the subscriber or user.
Statistics
The technical storage or access that is used exclusively for statistical purposes. The technical storage or access that is used exclusively for anonymous statistical purposes. Without a subpoena, voluntary compliance on the part of your Internet Service Provider, or additional records from a third party, information stored or retrieved for this purpose alone cannot usually be used to identify you.
Marketing
The technical storage or access is required to create user profiles to send advertising, or to track the user on a website or across several websites for similar marketing purposes.
Manage options Manage services Manage {vendor_count} vendors Read more about these purposes
View preferences
{title} {title} {title}