• Support Home
  • Getting Started
    • Connecting Your Camera
    • 3rd Party Software Getting Started Guides
  • Tech Ref Manuals
    • Arena SDK Documentation
    • HTP003S – Helios2+ ToF 3D
    • HLT003S – Helios2 ToF 3D
    • HLS003S – Helios ToF 3D
    • HLF003S – Helios Flex ToF 3D
    • ATX245S – Atlas10 24.5 MP
    • ATX204S – Atlas10 20.4 MP
    • ATX162S – Atlas10 16.2 MP
    • ATX124S – Atlas10 12.3 MP
    • ATX081S – Atlas10 8.1 MP
    • ATX051S – Atlas10 5.0 MP
    • ATL314S – Atlas 31.4 MP
    • ATL196S – Atlas 19.6 MP
    • ATL168S – Atlas 16.8 MP
    • ATL120S – Atlas 12.3 MP
    • ATL089S – Atlas 8.9 MP
    • ATL071S – Atlas 7.1 MP
    • ATL050S – Atlas 5.0 MP
    • ATL028S – Atlas 2.8 MP
    • ATP200S – Atlas IP67 20 MP
    • ATP120S – Atlas IP67 12.3 MP
    • ATP089S -Atlas IP67 8.9 MP
    • ATP071S – Atlas IP67 7.1 MP
    • ATP028S – Atlas IP67 2.8 MP
    • TRI200S – Triton 20.0 MP
    • TRI120S – Triton 12.3 MP
    • TRI122S – Triton 12.2 MP
    • TRI089S – Triton 8.9 MP
    • TRI071S – Triton 7.1 MP
    • TRI064S – Triton 6.3 MP
    • TRI054S – Triton 5.4 MP
    • TRI050S-P/Q – Triton 5.0 MP Polarized
    • TRI050S – Triton 5.0 MP
    • TRI032S – Triton 3.2 MP
    • TRI028S – Triton 2.8 MP
    • TRI023S – Triton 2.3 MP
    • TRI016S – Triton 1.6 MP
    • TRI004S – Triton 0.4 MP
    • TRI02KA – Triton 2K Line Scan
    • PHX200S – Phoenix 20.0 MP
    • PHX120S – Phoenix 12.3 MP
    • PHX122S – Phoenix 12.2 MP
    • PHX089S – Phoenix 8.9 MP
    • PHX064S – Phoenix 6.3 MP
    • PHX050S-P/Q – Phoenix 5.0 MP Polarized
    • PHX050S – Phoenix 5.0 MP
    • PHX032S – Phoenix 3.2 MP
    • PHX023S – Phoenix 2.3 MP
    • PHX016S – Phoenix 1.6 MP
    • PHX004S – Phoenix 0.4 MP
  • Application Notes
    • Bandwidth Sharing in Multi-Camera Systems
    • Combine Helios 3D Point Cloud with RGB Color
    • I2C Support on LUCID Cameras
    • Using GPIO on LUCID Cameras
    • Using PTP & Scheduled Action Commands
    • Helios2 And Triton Synchronization
  • Knowledge Base
  • Additional Support
    • Product Change Notifications (PCN)
    • Contact Support
  • Log In
  • Support Home
  • Getting Started
    • Connecting Your Camera
    • 3rd Party Software Getting Started Guides
  • Tech Ref Manuals
    • Arena SDK Documentation
    • HTP003S – Helios2+ ToF 3D
    • HLT003S – Helios2 ToF 3D
    • HLS003S – Helios ToF 3D
    • HLF003S – Helios Flex ToF 3D
    • ATX245S – Atlas10 24.5 MP
    • ATX204S – Atlas10 20.4 MP
    • ATX162S – Atlas10 16.2 MP
    • ATX124S – Atlas10 12.3 MP
    • ATX081S – Atlas10 8.1 MP
    • ATX051S – Atlas10 5.0 MP
    • ATL314S – Atlas 31.4 MP
    • ATL196S – Atlas 19.6 MP
    • ATL168S – Atlas 16.8 MP
    • ATL120S – Atlas 12.3 MP
    • ATL089S – Atlas 8.9 MP
    • ATL071S – Atlas 7.1 MP
    • ATL050S – Atlas 5.0 MP
    • ATL028S – Atlas 2.8 MP
    • ATP200S – Atlas IP67 20 MP
    • ATP120S – Atlas IP67 12.3 MP
    • ATP089S -Atlas IP67 8.9 MP
    • ATP071S – Atlas IP67 7.1 MP
    • ATP028S – Atlas IP67 2.8 MP
    • TRI200S – Triton 20.0 MP
    • TRI120S – Triton 12.3 MP
    • TRI122S – Triton 12.2 MP
    • TRI089S – Triton 8.9 MP
    • TRI071S – Triton 7.1 MP
    • TRI064S – Triton 6.3 MP
    • TRI054S – Triton 5.4 MP
    • TRI050S-P/Q – Triton 5.0 MP Polarized
    • TRI050S – Triton 5.0 MP
    • TRI032S – Triton 3.2 MP
    • TRI028S – Triton 2.8 MP
    • TRI023S – Triton 2.3 MP
    • TRI016S – Triton 1.6 MP
    • TRI004S – Triton 0.4 MP
    • TRI02KA – Triton 2K Line Scan
    • PHX200S – Phoenix 20.0 MP
    • PHX120S – Phoenix 12.3 MP
    • PHX122S – Phoenix 12.2 MP
    • PHX089S – Phoenix 8.9 MP
    • PHX064S – Phoenix 6.3 MP
    • PHX050S-P/Q – Phoenix 5.0 MP Polarized
    • PHX050S – Phoenix 5.0 MP
    • PHX032S – Phoenix 3.2 MP
    • PHX023S – Phoenix 2.3 MP
    • PHX016S – Phoenix 1.6 MP
    • PHX004S – Phoenix 0.4 MP
  • Application Notes
    • Bandwidth Sharing in Multi-Camera Systems
    • Combine Helios 3D Point Cloud with RGB Color
    • I2C Support on LUCID Cameras
    • Using GPIO on LUCID Cameras
    • Using PTP & Scheduled Action Commands
    • Helios2 And Triton Synchronization
  • Knowledge Base
  • Additional Support
    • Product Change Notifications (PCN)
    • Contact Support
  • Log In
home/Knowledge Base/Camera Features/Unicast Device Discovery with LUCID Cameras

Unicast Device Discovery with LUCID Cameras

374 views 0 March 7, 2022 Updated on October 19, 2022

Introduction

By default, GigE Vision software will discover cameras by sending a discovery command that is broadcast to cameras on the same subnet. This is referred to as Broadcast Device Discovery. If a camera is located on a different subnet but still part of the same network, and the IP address of the camera is known, it is possible to discover this camera using Unicast Device Discovery.

Requirements

Arena SDK:

  • Windows: Arena SDK v1.0.36.5 or higher
  • Linux x64: Arena SDK v0.1.68 or higher
  • Linux ARM64: Arena SDK v0.1.48 or higher

Firmware:

  • Phoenix: firmware v1.64 or higher
  • Triton: firmware v1.75 or higher

Hardware:

  • Router with static route capability
  • PCIE-POE1-MG2 (ioi GE10P-PCIE4XG301)

Example Setup

Consider the following example setup:
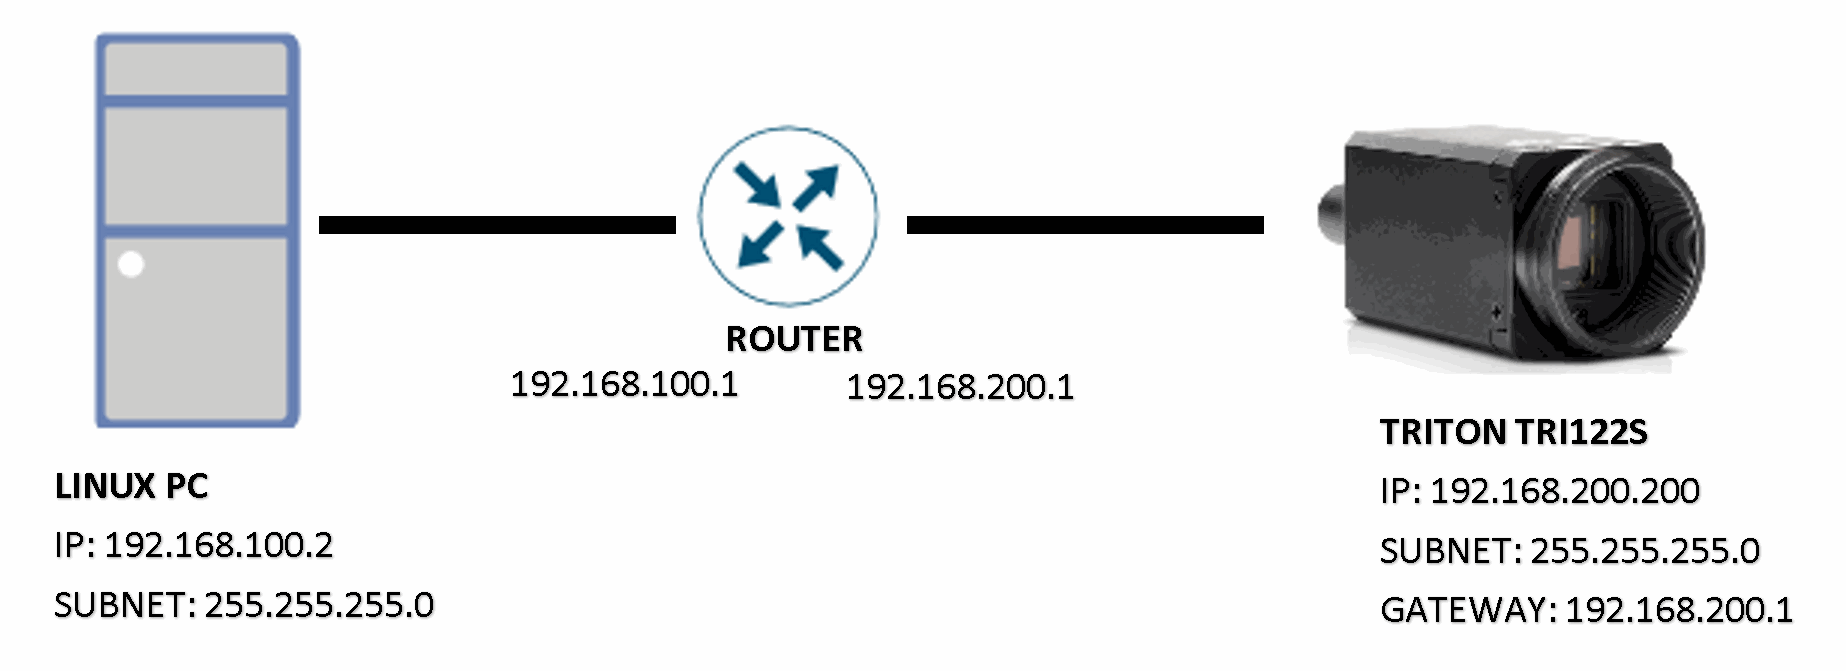
Using Broadcast Device Discovery, the PC will not be able to find the TRI122S because it is in a different subnet. It would only find devices on the same network as 192.168.100.x. Using Unicast Device Discovery, the PC will send a discovery packet to the device’s IP address. The router would route traffic coming into 192.168.100.1 and destined for 192.168.200.x since it would be aware of both connected networks.

The IP address of the unicast device to be discovered must be known in advance.

Discovering Unicast Devices

Since the host PC is in a different subnet from the camera, the host PC’s NIC that will be communicating with the router must be told to route packets meant for 192.168.200.x/24 addresses:

$ sudo route add -net 192.168.200.0/24 gw 192.168.100.1

To discover a camera with unicast device discovery, use the AddUnicastDeviceDiscovery function:

GenICam::gcstring deviceToDiscover = "192.168.200.200";

std::cout << "AddUnicastDiscoveryDevice: " << deviceToDiscover << std::endl;
pSystem->AddUnicastDiscoveryDevice(deviceToDiscover.c_str());
pSystem->UpdateDevices(100);
std::vector deviceInfos deviceInfos = pSystem->GetDevices();

When the unicast device is discovered, you can connect to it as an Arena::IDevice:

size_t numDevices = deviceInfos.size();
if (numDevices > 0)
{
	Arena::IDevice* pDevice = nullptr;
	size_t cameraIndex = -1;

	for (size_t i = 0; i < numDevices; i++) 
        { 
            if (deviceToDiscover == deviceInfos[i].IpAddressStr()) 
            { 
                cameraIndex = i; 
                break; 
            } 
        } 

        if (cameraIndex != -1) 
        { 
            pDevice = pSystem->CreateDevice(deviceInfos[cameraIndex]);
	}
}

Removing Unicast Devices

To remove a device from the unicast device discovery list, use the RemoveUnicastDeviceDiscovery function:

GenICam::gcstring deviceToDiscover = "192.168.200.200";
// [...]

std::cout << "RemoveUnicastDiscoveryDevice: " << deviceToDiscover << std::endl; 
pSystem->RemoveUnicastDiscoveryDevice(deviceToDiscover.c_str());

Reverse path filtering should be turned on. See our Arena SDK for Linux instructions for further details.

Was this helpful?

Yes  1 No
Related Articles
  • Tonemapping images from LUCID’s TRI054S-CC IMX490
  • Using LUCID’s ArenaView with JupyterLab
  • Using Application Switchover with LUCID Cameras
  • Using Multiple ROIs with LUCID Cameras
  • Using VLANs with LUCID Cameras
  • Using TCP with Atlas10 cameras on Linux

Didn't find your answer? Contact Us

  Using VLANs with LUCID Cameras

Using Application Switchover with LUCID Cameras  

© 2023 LUCID Vision Labs Inc.
Looking to purchase our cameras?
Visit the LUCID Webstore at thinklucid.com