• Support Home
  • Getting Started
    • Connecting Your Camera
    • 3rd Party Software Getting Started Guides
  • Tech Ref Manuals
    • Arena SDK Documentation
    • HTP003S – Helios2+ ToF 3D
    • HLT003S – Helios2 ToF 3D
    • HLS003S – Helios ToF 3D
    • HLF003S – Helios Flex ToF 3D
    • ATX245S – Atlas10 24.5 MP
    • ATX204S – Atlas10 20.4 MP
    • ATX162S – Atlas10 16.2 MP
    • ATX124S – Atlas10 12.3 MP
    • ATX081S – Atlas10 8.1 MP
    • ATX051S – Atlas10 5.0 MP
    • ATL314S – Atlas 31.4 MP
    • ATL196S – Atlas 19.6 MP
    • ATL168S – Atlas 16.8 MP
    • ATL120S – Atlas 12.3 MP
    • ATL089S – Atlas 8.9 MP
    • ATL071S – Atlas 7.1 MP
    • ATL050S – Atlas 5.0 MP
    • ATL028S – Atlas 2.8 MP
    • ATP200S – Atlas IP67 20 MP
    • ATP120S – Atlas IP67 12.3 MP
    • ATP089S -Atlas IP67 8.9 MP
    • ATP071S – Atlas IP67 7.1 MP
    • ATP028S – Atlas IP67 2.8 MP
    • TRI200S – Triton 20.0 MP
    • TRI120S – Triton 12.3 MP
    • TRI122S – Triton 12.2 MP
    • TRI089S – Triton 8.9 MP
    • TRI071S – Triton 7.1 MP
    • TRI064S – Triton 6.3 MP
    • TRI054S – Triton 5.4 MP
    • TRI050S-P/Q – Triton 5.0 MP Polarized
    • TRI050S – Triton 5.0 MP
    • TRI032S – Triton 3.2 MP
    • TRI028S – Triton 2.8 MP
    • TRI023S – Triton 2.3 MP
    • TRI016S – Triton 1.6 MP
    • TRI005S – Triton 0.5 MP
    • TRI004S – Triton 0.4 MP
    • TRI02KA – Triton 2K Line Scan
    • PHX200S – Phoenix 20.0 MP
    • PHX120S – Phoenix 12.3 MP
    • PHX122S – Phoenix 12.2 MP
    • PHX089S – Phoenix 8.9 MP
    • PHX064S – Phoenix 6.3 MP
    • PHX050S-P/Q – Phoenix 5.0 MP Polarized
    • PHX050S – Phoenix 5.0 MP
    • PHX032S – Phoenix 3.2 MP
    • PHX023S – Phoenix 2.3 MP
    • PHX016S – Phoenix 1.6 MP
    • PHX004S – Phoenix 0.4 MP
  • Application Notes
    • Bandwidth Sharing in Multi-Camera Systems
    • Combine Helios 3D Point Cloud with RGB Color
    • I2C Support on LUCID Cameras
    • Using GPIO on LUCID Cameras
    • Using PTP & Scheduled Action Commands
    • Helios2 And Triton Synchronization
    • Product Change Notifications (PCN)
  • Knowledge Base
  • Contact Support
  • Log In
  • Support Home
  • Getting Started
    • Connecting Your Camera
    • 3rd Party Software Getting Started Guides
  • Tech Ref Manuals
    • Arena SDK Documentation
    • HTP003S – Helios2+ ToF 3D
    • HLT003S – Helios2 ToF 3D
    • HLS003S – Helios ToF 3D
    • HLF003S – Helios Flex ToF 3D
    • ATX245S – Atlas10 24.5 MP
    • ATX204S – Atlas10 20.4 MP
    • ATX162S – Atlas10 16.2 MP
    • ATX124S – Atlas10 12.3 MP
    • ATX081S – Atlas10 8.1 MP
    • ATX051S – Atlas10 5.0 MP
    • ATL314S – Atlas 31.4 MP
    • ATL196S – Atlas 19.6 MP
    • ATL168S – Atlas 16.8 MP
    • ATL120S – Atlas 12.3 MP
    • ATL089S – Atlas 8.9 MP
    • ATL071S – Atlas 7.1 MP
    • ATL050S – Atlas 5.0 MP
    • ATL028S – Atlas 2.8 MP
    • ATP200S – Atlas IP67 20 MP
    • ATP120S – Atlas IP67 12.3 MP
    • ATP089S -Atlas IP67 8.9 MP
    • ATP071S – Atlas IP67 7.1 MP
    • ATP028S – Atlas IP67 2.8 MP
    • TRI200S – Triton 20.0 MP
    • TRI120S – Triton 12.3 MP
    • TRI122S – Triton 12.2 MP
    • TRI089S – Triton 8.9 MP
    • TRI071S – Triton 7.1 MP
    • TRI064S – Triton 6.3 MP
    • TRI054S – Triton 5.4 MP
    • TRI050S-P/Q – Triton 5.0 MP Polarized
    • TRI050S – Triton 5.0 MP
    • TRI032S – Triton 3.2 MP
    • TRI028S – Triton 2.8 MP
    • TRI023S – Triton 2.3 MP
    • TRI016S – Triton 1.6 MP
    • TRI005S – Triton 0.5 MP
    • TRI004S – Triton 0.4 MP
    • TRI02KA – Triton 2K Line Scan
    • PHX200S – Phoenix 20.0 MP
    • PHX120S – Phoenix 12.3 MP
    • PHX122S – Phoenix 12.2 MP
    • PHX089S – Phoenix 8.9 MP
    • PHX064S – Phoenix 6.3 MP
    • PHX050S-P/Q – Phoenix 5.0 MP Polarized
    • PHX050S – Phoenix 5.0 MP
    • PHX032S – Phoenix 3.2 MP
    • PHX023S – Phoenix 2.3 MP
    • PHX016S – Phoenix 1.6 MP
    • PHX004S – Phoenix 0.4 MP
  • Application Notes
    • Bandwidth Sharing in Multi-Camera Systems
    • Combine Helios 3D Point Cloud with RGB Color
    • I2C Support on LUCID Cameras
    • Using GPIO on LUCID Cameras
    • Using PTP & Scheduled Action Commands
    • Helios2 And Triton Synchronization
    • Product Change Notifications (PCN)
  • Knowledge Base
  • Contact Support
  • Log In
home/Knowledge Base/Arena Software/Using LUCID’s ArenaView with JupyterLab

Using LUCID’s ArenaView with JupyterLab

8059 views 9 March 22, 2022 Updated on October 24, 2023

Introduction

JupyterLab on ArenaView enables application designers to quickly test and validate all camera features and speed up their product qualification workflow without having to setup a custom development environment. JupyterLab provides a built-in and preconfigured interactive development environment that can be used for testing and documenting all SDK functions and camera performances. It is installed with Arena SDK using the Developer installation option. The following instructions explains how to launch and use JupyterLab within ArenaView.

Looking for sample Notebook files for JupyterLab? After setting up ArenaView with JupypterLab visit our JupyterLab Resource Center for downloadable sample Notebooks.

Requirements

Arena SDK:

  • ArenaView v1.0.33.0 or newer

The Developer option must be chosen at installation.

Initial Setup

Please make sure you have read and completed the initial setup section found in the Arena SDK documentation. In particular, make sure you have turned on jumbo frames and set your receive buffer size. Atlas10 users that plan to use TCP should read and complete our setup guide for using TCP with Atlas10 cameras.

Enabling JupyterLab Server

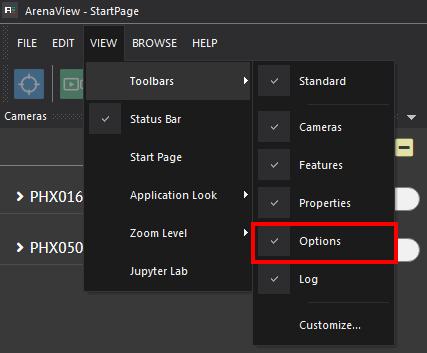
Step 1: Open the Options Window

Open the Options Windows by clicking View -> Toolbar -> Options.
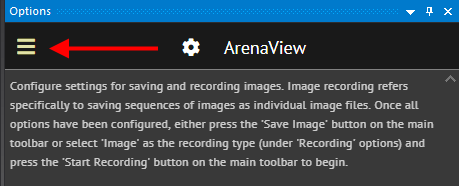
Step 2: Select the JupyterLab Options tab

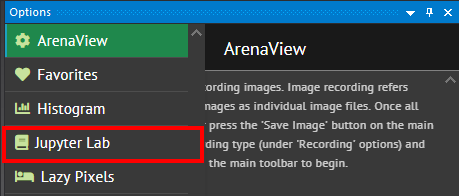
In the Options Window, click the hamburger button and choose the JupyterLab tab.
Step 3: Turn on the JupyterLab server

In the Jupyter Lab options tab, turn on the Jupyer Lab server. If this is your first time installing Jupyter Lab, ArenaView will download and install the required dependencies.
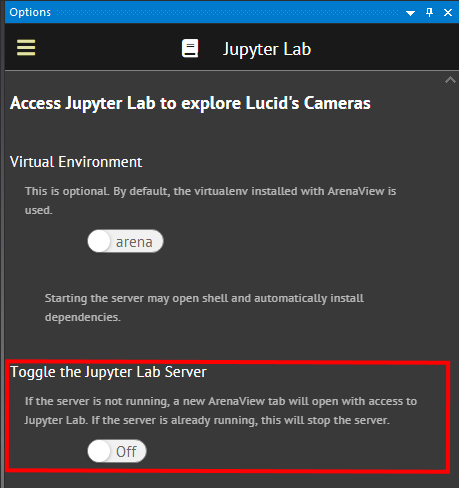
An Internet connection is required for this step.

Step 4: Enter the JupyerLab server token or create a server password

If this is your first time installing JupyterLab, you will also be asked for a token to access the JuptyerLab server. This token is presented after ArenaView installs the JupyterLab dependencies. Enter the token into the “Password or token” field and press Log in. You can also assign a server password instead of using a token.

If you assigned a password to your JupyterLab server and need to reset it, you can remove the password key for the server by editing the file at:

C:\Users\<your_user_name>\.jupyter\jupyter_server_config.json

Opening Jupyter Notebooks

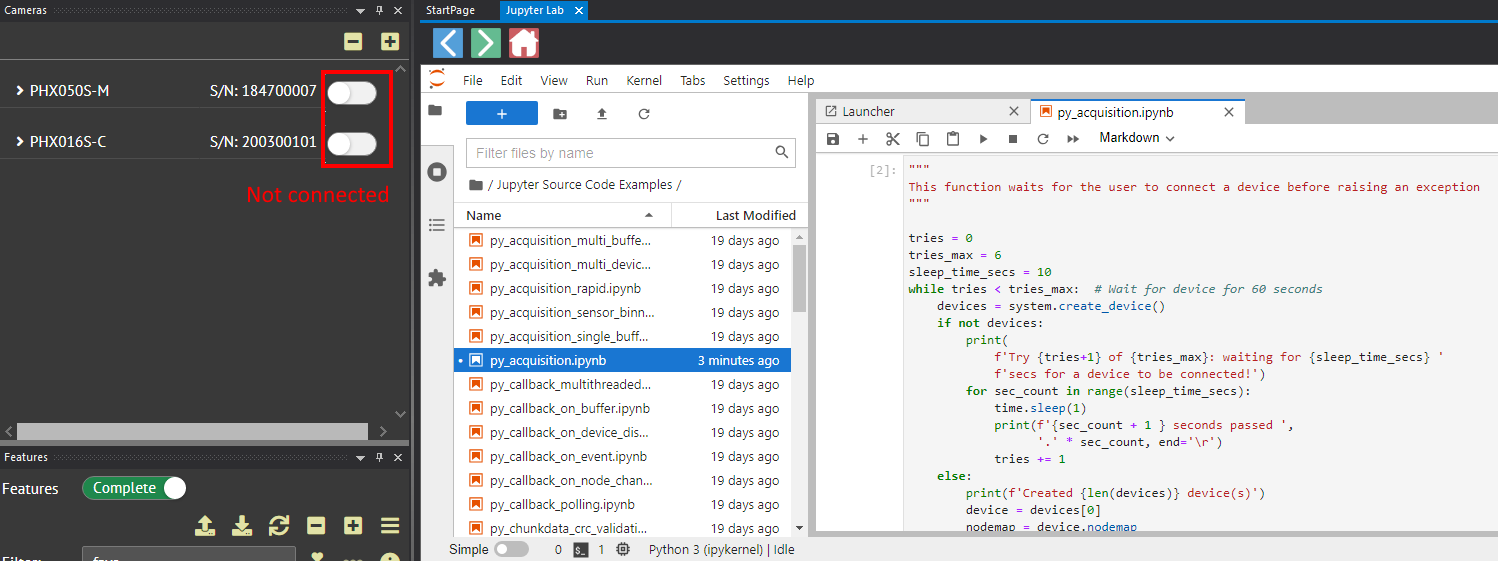
After starting the JupyterLab server, you will be presented with the Jupyer launch page. From this page, you can start your own Jupyter notebook or browse the preinstalled examples that come with the Arena SDK installation.

By default, Jupyter notebooks are found at C:\ProgramData\LUCID Vision Labs\ArenaView\ArenaJp.
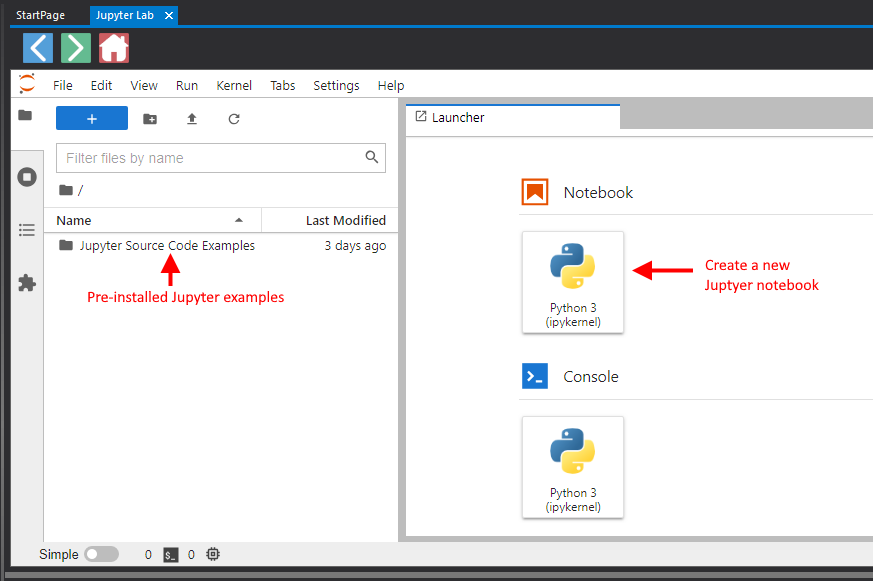
Using Jupyter Notebooks

The Jupyter Lab environment will let you write Arena Python code to control camera features and quickly integrate image analysis and processing.

Jupyter Code Cells

A Jupyter code cell contains Python code that is executed by the Jupyter kernel. When the cell type is set to Code:

  • Press the + button to insert a new code cell. This will place a new cell under the currently selected cell.
  • Press the ▶ button to execute a code cell. The code cell will display an asterisk (*) beside the cell while it is being executed, and it will show a number upon completion.
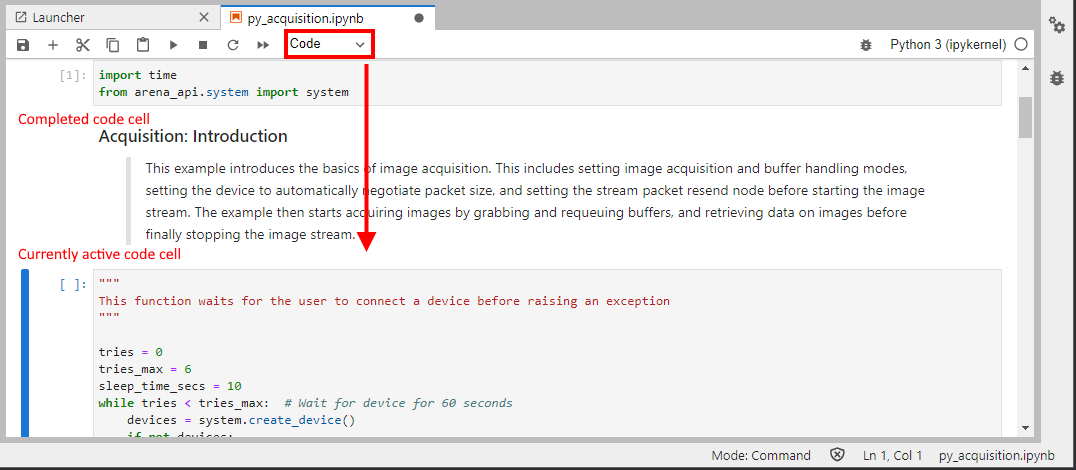
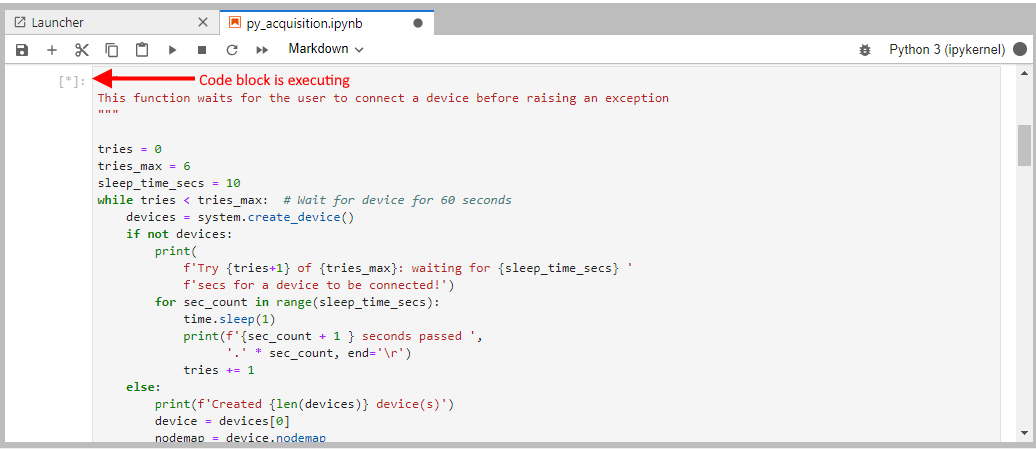
Ensure the camera is not connected in ArenaView or in other software before running a Jupyter notebook.

Jupyter Markdown Cells

Formatted text can be entered in a Jupyter notebook for documentation.

Formatted text can be entered in a Jupyter notebook for displaying visually rich documentation. When the cell type is set to Markdown:

  • Press the + button to insert a new markdown cell. This will place a new cell under the currently selected cell.
  • Press the ▶ button to execute a markdown cell. The markdown cell will be formatted for display.
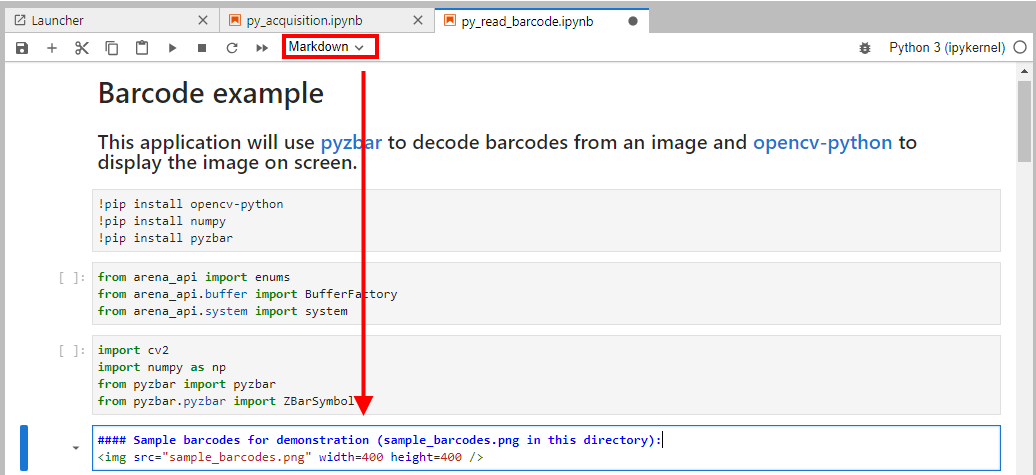
For a list of markdown options, visit the Markdown Cells section in the Jupyter documentation.

SDK Documentation

The Arena SDK Python documentation can be found at the ArenaView Start Page (View -> Start Page):

Within a Jupyter notebook, it is also possible to display a function’s documentation by adding ?? at the end of a function:

Sample Code Snippets

Create Device By Serial Number

The following code snippet shows how to connect to a camera by its serial number.

def create_device_from_serial_number(serial_number):
    camera_found = False

    device_infos = None
    selected_index = None

    device_infos = system.device_infos
    for i in range(len(device_infos)):
        if serial_number == device_infos[i]['serial']:
            selected_index = i
            camera_found = True
            break

    if camera_found == True:
        selected_model = device_infos[selected_index]['model']
        print(f"Create device: {selected_model}...")
        device = system.create_device(device_infos=device_infos[selected_index])[0]
    else:
        raise Exception(f"Serial number {serial_number} cannot be found")
        
    return device

Connect to the camera by calling:

device = select_device_from_serial_number("192900063")

Convert Image into OpenCV

The following code snippet shows how to convert an image into OpenCV:

!pip install opencv-python

[...]

import cv2

[...]    

image_buffer = device.get_buffer()
nparray = np.ctypeslib.as_array(image_buffer.pdata,shape=(image_buffer.height, image_buffer.width, int(image_buffer.bits_per_pixel / 8))).reshape(image_buffer.height, image_buffer.width, int(image_buffer.bits_per_pixel / 8))

Convert a Jupyter Notebook to an Executable Program

ArenaView allows users to generate an executable program out of their Jupyter notebook.

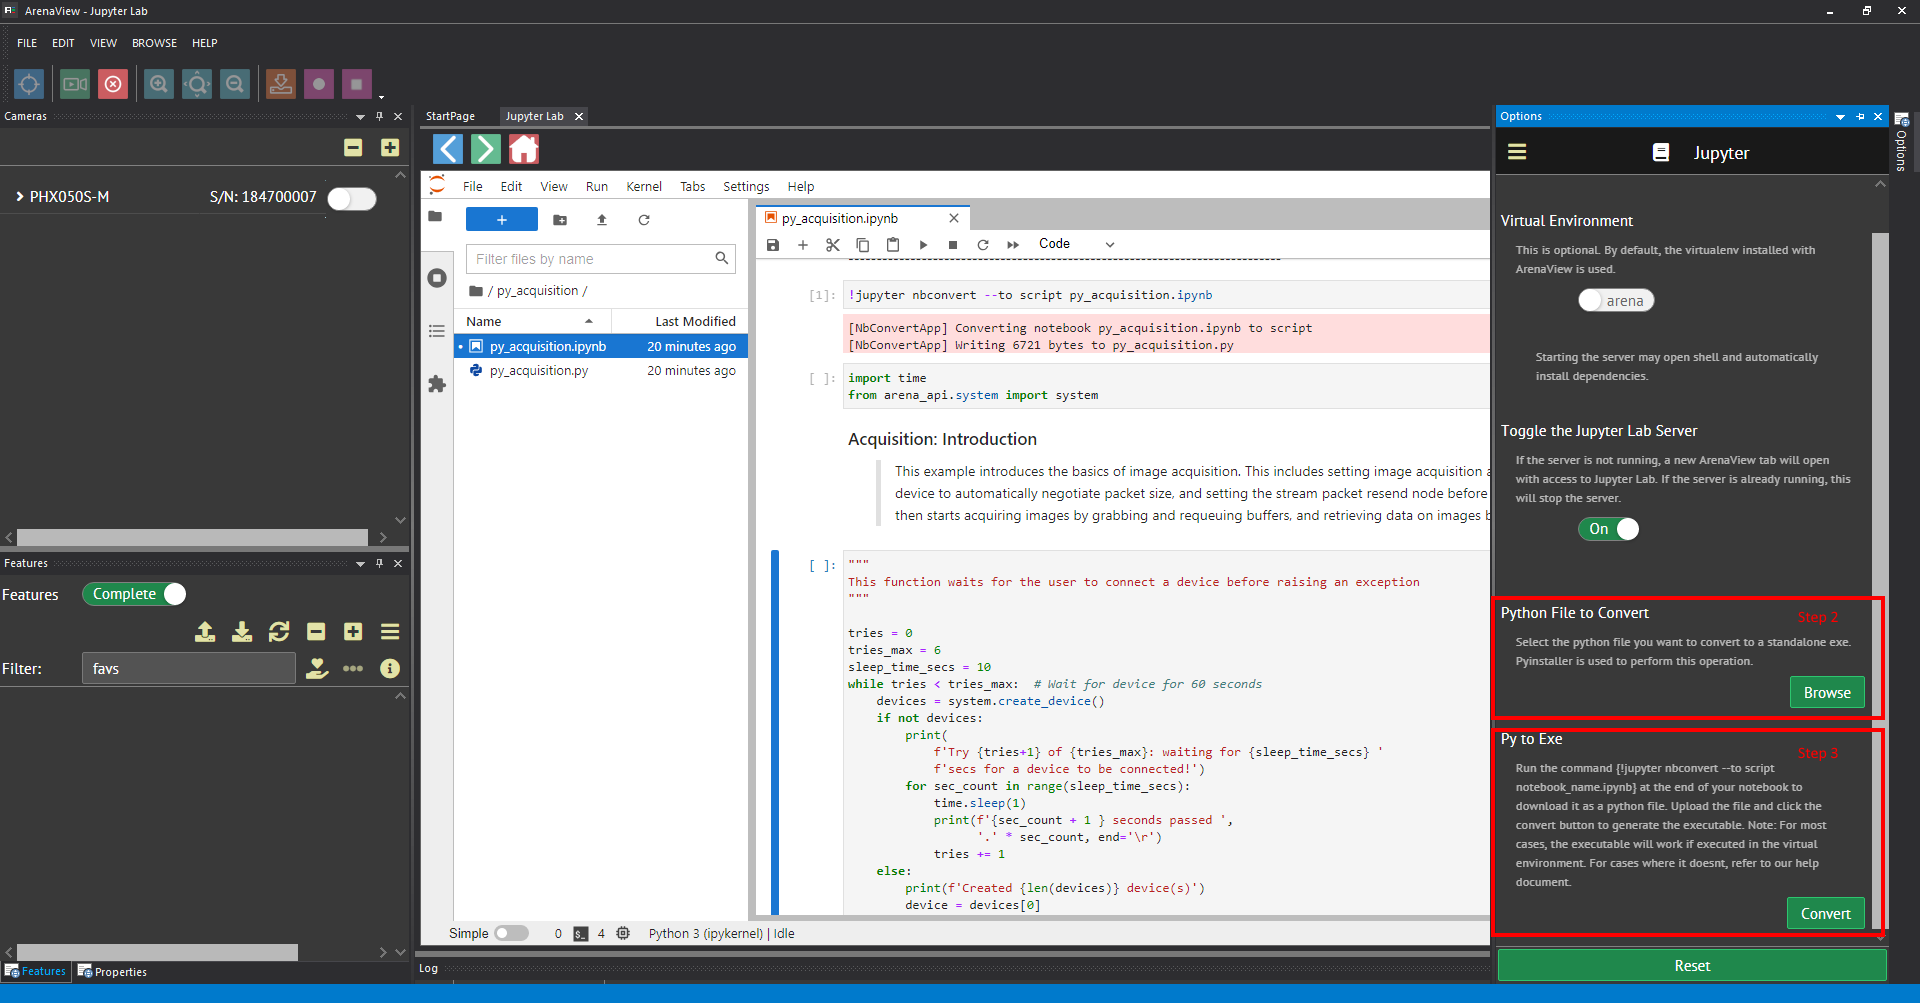
The following steps show converting the included Jupyter notebook, py_acquisition.ipynb, into an executable file.

Step 1: Run the following command in your Jupyter notebook:

!jupyter nbconvert --to script py_acquisition.ipynb

This command will create a py file in the current directory:

Step 2: Select the py file to convert to an exe file in the JupterLab Options

Step 3: Convert the py file to an exe file in the JupterLab Options
When you click the Convert button, you will be asked if you want to edit the pytoexe.bat file.
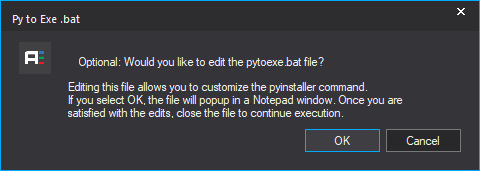
Editing the pytoexe.bat file allows you to add additional paths and binaries to the pyinstaller command to ensure your exe file works correctly.

Editing this file is necessary if:

  • You are using a custom virtual environment
  • You have downloaded additional libraries to the default environment, and are using the new libraries in your program

Only edit the pyinstaller command in this file.

When the conversion is complete, you will be prompted to press a key to continue. This will open a window to the location of your new exe file.

When running this exe file outside of ArenaView’s default virtual environment, make sure arena_api and its dependencies are installed on the new environment.

The arena_api wheel used by the ArenaJp virtual environment can be found at C:\ProgramData\LUCID Vision Labs\ArenaView\ArenaPy.

The wheel file can be installed with a command similar to the following:

pip install arena_api-<>.<>.<>-py3-none-any.whl

Using a Custom Virtual Environment

By default, ArenaView uses a preinstalled Miniconda virtual environment for the JupyterLab server. The preinstalled virtual environment is found at: C:\ProgramData\LUCID Vision Labs\ArenaView\ArenaPy.

It is possible to define the virtual environment used by ArenaView in the JupyerLab Options tab. Set the virtual environment slider to arena to use the preinstalled virtual environment:
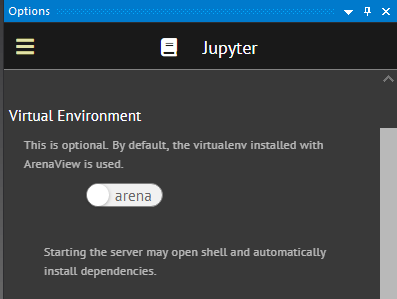
Set the virtual environment slider to venv and press the Browse button to select the to your custom virtual environment:
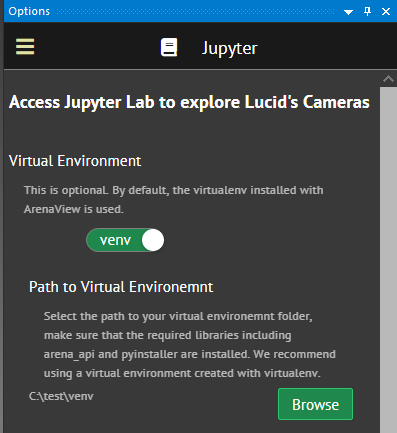
It is recommended to use a virtual environment created by virtualenv or miniconda. In either case, installing packages using pip in your environment is recommended, as that works the best with pyinstaller.

Custom virtual environments must install the JupyterLab requirements in the jupyter_requirements_win.txt file found at C:\ProgramData\LUCID Vision Labs\ArenaView\ArenaPy:

pip install -r jupyter_requirements_win.txt

Was this helpful?

9 Yes  5 No
Related Articles
  • Solving driver-related RDMA streaming issues with Ubuntu 22.04
  • Using Multiple Helios Cameras Simultaneously
  • Troubleshooting Network Timeouts (Linux)
  • How to create an Ubuntu docker image and container with Arena SDK
  • Troubleshooting timeouts caused by incomplete images (Windows)
  • Tonemapping images from LUCID’s TRI054S-CC IMX490

Didn't find your answer? Contact Us

  Using Application Switchover with LUCID Cameras

Tonemapping images from LUCID’s TRI054S-CC IMX490  

© 2024 LUCID Vision Labs Inc.
Looking to purchase our cameras?
Visit the LUCID Webstore at thinklucid.com
LUCID Support & Help
Welcome to LUCID

We use cookies to facilitate online purchases and analyze our traffic. By clicking "Accept", you consent to our use of cookies.

Functional Always active
The technical storage or access is strictly necessary for the legitimate purpose of enabling the use of a specific service explicitly requested by the subscriber or user, or for the sole purpose of carrying out the transmission of a communication over an electronic communications network.
Preferences
The technical storage or access is necessary for the legitimate purpose of storing preferences that are not requested by the subscriber or user.
Statistics
The technical storage or access that is used exclusively for statistical purposes. The technical storage or access that is used exclusively for anonymous statistical purposes. Without a subpoena, voluntary compliance on the part of your Internet Service Provider, or additional records from a third party, information stored or retrieved for this purpose alone cannot usually be used to identify you.
Marketing
The technical storage or access is required to create user profiles to send advertising, or to track the user on a website or across several websites for similar marketing purposes.
Manage options Manage services Manage {vendor_count} vendors Read more about these purposes
View preferences
{title} {title} {title}