Camera mounting and operating temperature
This knowledge base article outlines some heat management tips for all LUCID cameras, and dispels some common misunderstandings about camera heat, operating temperature, and power consumption.
Operating temperature
Industrial devices typically have a permissible range of operating temperatures in which the device can operate stably. Outside of this range, the device can fail or behave unexpectedly; this is because the device can overheat. Some commonly encountered questions regarding the operation of LUCID cameras are addressed below.
All LUCID cameras specify an allowable storage and operating temperature range—an example is shown below.

The lower and upper operating temperatures are derived from LUCID’s extensive design and manufacturing tests. In these tests, LUCID cameras repeatedly undergo extreme temperature cycles to ensure they operate as expected under extreme ambient operating temperature environments with temperature swings.
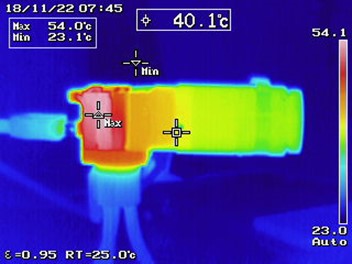
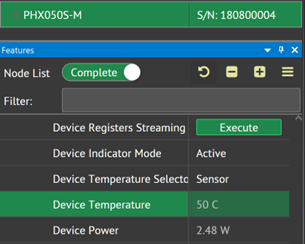
The images below show the camera with an internal temperature sensor reading of 50°C and an actual case temperature of around 50°C (maximum temperature point at 54°C).
Monitoring device temperature
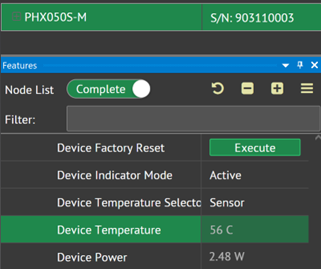
LUCID cameras are equipped with internal temperature sensor located on the imager circuit board. The device internal temperature can be monitored by calling relevant APIs in the Arena SDK.
// Get device temperature node
// In order to get the current device temperature value, get the
// device temperature node.

GenApi::CFloatPtr deviceTemperature = pDevice->GetNodeMap()->GetNode("DeviceTemperature");

// Get device temperature value

double deviceTemperatureValue = deviceTemperature->GetValue();

std::cout << TAB1 << "Device Temperature is " << deviceTemperatureValue <<; "\n";
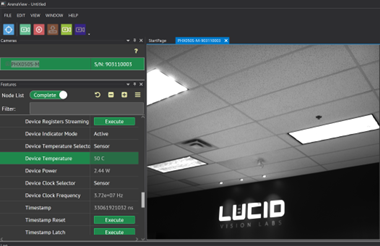
You can also obtain this information in ArenaView as shown below.
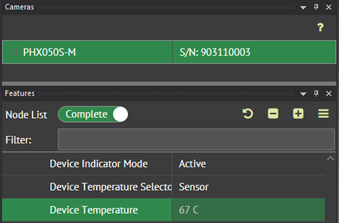
Internal temperature reading for PHX050S sitting on a desk at 25°C ambient after streaming for some time. The internal temperature is 67°C, but the camera is not operating out of spec; there is still room to increase the room temperature by another 30°C.
For safety reasons, consider using a heat dissipation method to ensure the camera is not too hot to touch. Refer to the Heat Dissipation section below for recommendations.
Camera powering options
LUCID Ethernet cameras can be powered in two ways: Power over Ethernet (PoE) and external power via GPIO interface.
Power over Ethernet (PoE)
To power the camera via PoE, select a PoE injector or PoE switch that is compliant with the IEEE 802.3af standard. This standard specifies a range of voltage at the device being powered (i.e., the LUCID camera). Different voltages supplied to the device may affect the power consumption used by the camera. For example, two different IEEE802.3af PoE power supplies can result in different power consumption with the PHX050S IMX264 camera as outlined below.
| PoE #1 | PoE #2 | |
| Voltage supplied to device | 37V | 57V |
| PHX050S Power consumption | 2.86W | 3W |
External power via GPIO
The camera can be powered via Vaux pin on the GPIO connector to achieve even lower power consumption. The camera can take power from supplies in the range of 12V to 24V. With the same PHX050S, using Vaux allow for lower power consumption as outlined in the table below.
| Power Supply #1 | Power Supply #2 | |
| Voltage supplied to device | 12V | 24V |
| PHX050S Power consumption | 2.38W | 2.5W |
Heat dissipation / heatsinking
Heatsinking can be applied to lower the case temperature of the camera. Since each installation is unique, LUCID can only make the following general recommendations.
- Mount a relatively large contact area of the camera housing directly to a conductive metal structure (e.g., an aluminum mounting bracket).
- Increase the air flow to cool the camera more through convective cooling.
Mounting options
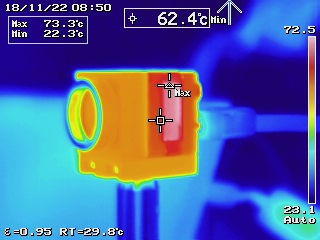
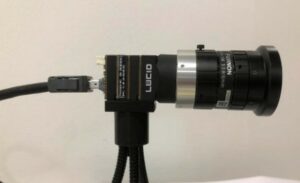
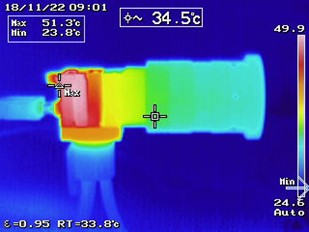
The camera operates without any attachment such as lenses or mounting; however, in any application an optics component will be required, and a mounting component is likely needed as well. Below is an example of the camera running without anything attached at room temperature. The camera runs hot because the heat has no path to escape. As you can see below, there are some discrepancies between the camera temperature sensor reading, the measured average temperature, and the maximum temperature of the camera. These discrepancies decrease over time because the heat spreads more evenly across the device since there is no escape path for the heat.
| Camera Internal Temperature | Camera Surface Temperature | Ambient Operating temperature |
|---|---|---|
| 50C | ~65C | 22C |

Stainless Steel
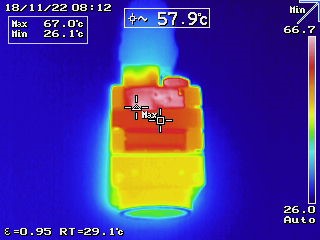
Stainless steel mounting components have poor thermal conductivity, and can lead to elevated camera temperatures. As can be seen below, the stainless-steel post and camera body have a drastic temperature difference of more than 30°C. The camera surface is around 62°C while the post is less than 30°C.

Aluminum
The same camera shown above mounted on an aluminum structure has better heat transfer. This is expected as thermal conductivity coefficient for aluminum is more than five times greater than stainless steel.
Lenses
Lenses can act as a heat sink if the barrel of the lens base is made of a material with good thermal conductivity. Some cheap lenses with a plastic base will not work well as a heat sink.
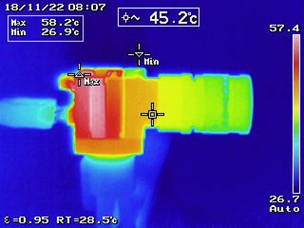
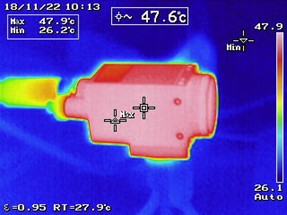
Shown below is the temperature profile of a Phoenix camera with LUCID’s NF-mount lens streaming at room temperature mounted on a tripod stand. The camera/lens system has an average surface temperature of about 52°C while the hottest point on the camera surface goes up to 58°C. The heat is evenly distributed across the camera body and the small NF lens. The internal temperature reading (from device temperature node) is slightly higher than the surface temperature as heat is distributed across the entire camera and lens assembly.
| Camera Internal Temperature | Camera Surface Temperature | Ambient Operating temperature |
|---|---|---|
| 56°C | ~52°C | 22°C |
The same camera with a C mount lens runs measurably cooler due to the extra material on the lens which can transfer heat from camera body all the way to the tip of the lens. Aa nice heat gradient along the optical axis of the lens can be seen below. In this case the camera’s maximum and average temperature is about 10°C less than the equivalent NF version. Compared to the previous example, there is a more pronounced difference between internal temperature reading (from the Device Temperature Node) and surface temperature as the gradient of temperature across the entire camera/lens assembly is more drastic.
| Camera Internal Temperature | Camera Surface Temperature | Ambient Operating temperature |
|---|---|---|
| 50°C | ~40°C | 22°C |
A similar heat-sinking effect can be applied to LUCID’s Triton camera, which is thermally more efficient than the Phoenix due to its slightly larger size and heat-dissipating mass. Below we examine the difference between operating Tritons with and without a lens attached.
When the Triton camera is operated without a lens installed in the ambient environment of 22°C, the camera reaches an average surface temperature of 47°C with the maximum temperature also at 47°C, which indicates uniformly distributed heat across the camera surface. The internal temperature reading is 50°C, which is close to these measurements.
| Camera Internal Temperature | Camera Surface Temperature | Ambient Operating temperature |
|---|---|---|
| 50°C | ~47°C | 22°C |
When the Triton camera is operated with a lens installed, the heat has more material to dissipate heat, resulting in a uniform temperature distribution of around 37°C across the camera body. Similarly, the internal temperature reading is lower, with a measurement of 40°C below.
| Camera Internal Temperature | Camera Surface Temperature | Ambient Operating temperature |
|---|---|---|
| 40°C | ~37°C | 22°C |

Heat and Image Noise
It is commonly believed that the higher device temperatures lead to increased noise in images. However, there are actually many sources of noise in a camera sensor. Many image noise sources do not change significantly with device temperature; the most important noise that is correlated to camera temperature (as well as exposure time) is the dark current noise. The extent in which dark current noise affects image quality over rising temperature can differ from sensor to sensor.
Dark current noise is caused by electrons becoming randomly generated by the semiconductor even when no photons are present. As device temperature rises, more of these electrons are randomly generated, causing an increase in Dark Current Noise on hotter devices. Dark current noise also accumulates with greater exposure time. The longer the exposure time at a given operating temperature, the higher the dark current noise. Due to the contribution of dark current noise from both high temperatures and extended exposure time, some imaging applications such those in astronomical imaging require long exposure times use cooled cameras to achieve low noise.
Thanks to Sony’s global shutter CMOS technology, the new Sony CMOS sensors can achieve very low noise performance compared to traditional CMOS sensors. More information on this technology can be found here.
In addition to the low noise in the Sony sensor lineup in LUCID’s Phoenix and Triton cameras, all LUCID cameras undergo unit tests to ensure the noise does not exceed threshold noise in the specified operating range. With the Pregius Sony sensor lineup, only a 2dB degradation[1] of Signal to Noise Ratio is observed over an ambient operating temperature difference of over 100°C.
[1] Measured at minimum exposure time setting using the Phoenix IMX264 camera.
Network interface cards (NICs)
Regardless of if you provide your own NIC or purchase one from our website, keep in mind the following guidelines:
- Ensure that there is adequate airflow around the host computers and NICs.
- Ensure that the inside of host computers are cleaned regularly to be free of dust.
- Install hardware monitoring tools to track and warn of excessive NIC temperatures.
- (Unrelated to heat management) Ensure that you power down and disconnect the power to your host computer before installing NICs.
Summary
Compact and packed with functionality, LUCID’s Phoenix cameras do run hot when no accessories are attached. However, when used in real-world applications, these cameras always requires optics and some type of mounting to be useful. LUCID recommends that you consider heat management in the application design process if heat is a concern. The mounting surface, lens options, and powering options are all areas you can optimize to reduce the amount of heat generated by the device.