• Support Home
  • Getting Started
    • Connecting Your Camera
    • 3rd Party Software Getting Started Guides
  • Tech Ref Manuals
    • Arena SDK Documentation
    • HTP003S – Helios2+ ToF 3D
    • HLT003S – Helios2 ToF 3D
    • HLS003S – Helios ToF 3D
    • HLF003S – Helios Flex ToF 3D
    • ATX245S – Atlas10 24.5 MP
    • ATX204S – Atlas10 20.4 MP
    • ATX162S – Atlas10 16.2 MP
    • ATX124S – Atlas10 12.3 MP
    • ATX081S – Atlas10 8.1 MP
    • ATX051S – Atlas10 5.0 MP
    • ATL314S – Atlas 31.4 MP
    • ATL196S – Atlas 19.6 MP
    • ATL168S – Atlas 16.8 MP
    • ATL120S – Atlas 12.3 MP
    • ATL089S – Atlas 8.9 MP
    • ATL071S – Atlas 7.1 MP
    • ATL050S – Atlas 5.0 MP
    • ATL028S – Atlas 2.8 MP
    • ATP200S – Atlas IP67 20 MP
    • ATP120S – Atlas IP67 12.3 MP
    • ATP089S -Atlas IP67 8.9 MP
    • ATP071S – Atlas IP67 7.1 MP
    • ATP028S – Atlas IP67 2.8 MP
    • TRI200S – Triton 20.0 MP
    • TRI120S – Triton 12.3 MP
    • TRI122S – Triton 12.2 MP
    • TRI089S – Triton 8.9 MP
    • TRI071S – Triton 7.1 MP
    • TRI064S – Triton 6.3 MP
    • TRI054S – Triton 5.4 MP
    • TRI050S-P/Q – Triton 5.0 MP Polarized
    • TRI050S – Triton 5.0 MP
    • TRI032S – Triton 3.2 MP
    • TRI028S – Triton 2.8 MP
    • TRI023S – Triton 2.3 MP
    • TRI016S – Triton 1.6 MP
    • TRI005S – Triton 0.5 MP
    • TRI004S – Triton 0.4 MP
    • TRI02KA – Triton 2K Line Scan
    • PHX200S – Phoenix 20.0 MP
    • PHX120S – Phoenix 12.3 MP
    • PHX122S – Phoenix 12.2 MP
    • PHX089S – Phoenix 8.9 MP
    • PHX064S – Phoenix 6.3 MP
    • PHX050S-P/Q – Phoenix 5.0 MP Polarized
    • PHX050S – Phoenix 5.0 MP
    • PHX032S – Phoenix 3.2 MP
    • PHX023S – Phoenix 2.3 MP
    • PHX016S – Phoenix 1.6 MP
    • PHX004S – Phoenix 0.4 MP
  • Application Notes
    • Bandwidth Sharing in Multi-Camera Systems
    • Combine Helios 3D Point Cloud with RGB Color
    • I2C Support on LUCID Cameras
    • Using GPIO on LUCID Cameras
    • Using PTP & Scheduled Action Commands
    • Helios2 And Triton Synchronization
    • Product Change Notifications (PCN)
  • Knowledge Base
  • Contact Support
  • Log In
  • Support Home
  • Getting Started
    • Connecting Your Camera
    • 3rd Party Software Getting Started Guides
  • Tech Ref Manuals
    • Arena SDK Documentation
    • HTP003S – Helios2+ ToF 3D
    • HLT003S – Helios2 ToF 3D
    • HLS003S – Helios ToF 3D
    • HLF003S – Helios Flex ToF 3D
    • ATX245S – Atlas10 24.5 MP
    • ATX204S – Atlas10 20.4 MP
    • ATX162S – Atlas10 16.2 MP
    • ATX124S – Atlas10 12.3 MP
    • ATX081S – Atlas10 8.1 MP
    • ATX051S – Atlas10 5.0 MP
    • ATL314S – Atlas 31.4 MP
    • ATL196S – Atlas 19.6 MP
    • ATL168S – Atlas 16.8 MP
    • ATL120S – Atlas 12.3 MP
    • ATL089S – Atlas 8.9 MP
    • ATL071S – Atlas 7.1 MP
    • ATL050S – Atlas 5.0 MP
    • ATL028S – Atlas 2.8 MP
    • ATP200S – Atlas IP67 20 MP
    • ATP120S – Atlas IP67 12.3 MP
    • ATP089S -Atlas IP67 8.9 MP
    • ATP071S – Atlas IP67 7.1 MP
    • ATP028S – Atlas IP67 2.8 MP
    • TRI200S – Triton 20.0 MP
    • TRI120S – Triton 12.3 MP
    • TRI122S – Triton 12.2 MP
    • TRI089S – Triton 8.9 MP
    • TRI071S – Triton 7.1 MP
    • TRI064S – Triton 6.3 MP
    • TRI054S – Triton 5.4 MP
    • TRI050S-P/Q – Triton 5.0 MP Polarized
    • TRI050S – Triton 5.0 MP
    • TRI032S – Triton 3.2 MP
    • TRI028S – Triton 2.8 MP
    • TRI023S – Triton 2.3 MP
    • TRI016S – Triton 1.6 MP
    • TRI005S – Triton 0.5 MP
    • TRI004S – Triton 0.4 MP
    • TRI02KA – Triton 2K Line Scan
    • PHX200S – Phoenix 20.0 MP
    • PHX120S – Phoenix 12.3 MP
    • PHX122S – Phoenix 12.2 MP
    • PHX089S – Phoenix 8.9 MP
    • PHX064S – Phoenix 6.3 MP
    • PHX050S-P/Q – Phoenix 5.0 MP Polarized
    • PHX050S – Phoenix 5.0 MP
    • PHX032S – Phoenix 3.2 MP
    • PHX023S – Phoenix 2.3 MP
    • PHX016S – Phoenix 1.6 MP
    • PHX004S – Phoenix 0.4 MP
  • Application Notes
    • Bandwidth Sharing in Multi-Camera Systems
    • Combine Helios 3D Point Cloud with RGB Color
    • I2C Support on LUCID Cameras
    • Using GPIO on LUCID Cameras
    • Using PTP & Scheduled Action Commands
    • Helios2 And Triton Synchronization
    • Product Change Notifications (PCN)
  • Knowledge Base
  • Contact Support
  • Log In
home/Knowledge Base/Camera Setup/Sample PC Config for Streaming Multiple Atlas10 Cameras

Sample PC Config for Streaming Multiple Atlas10 Cameras

2105 views 5 May 19, 2021 Updated on August 10, 2021

Introduction

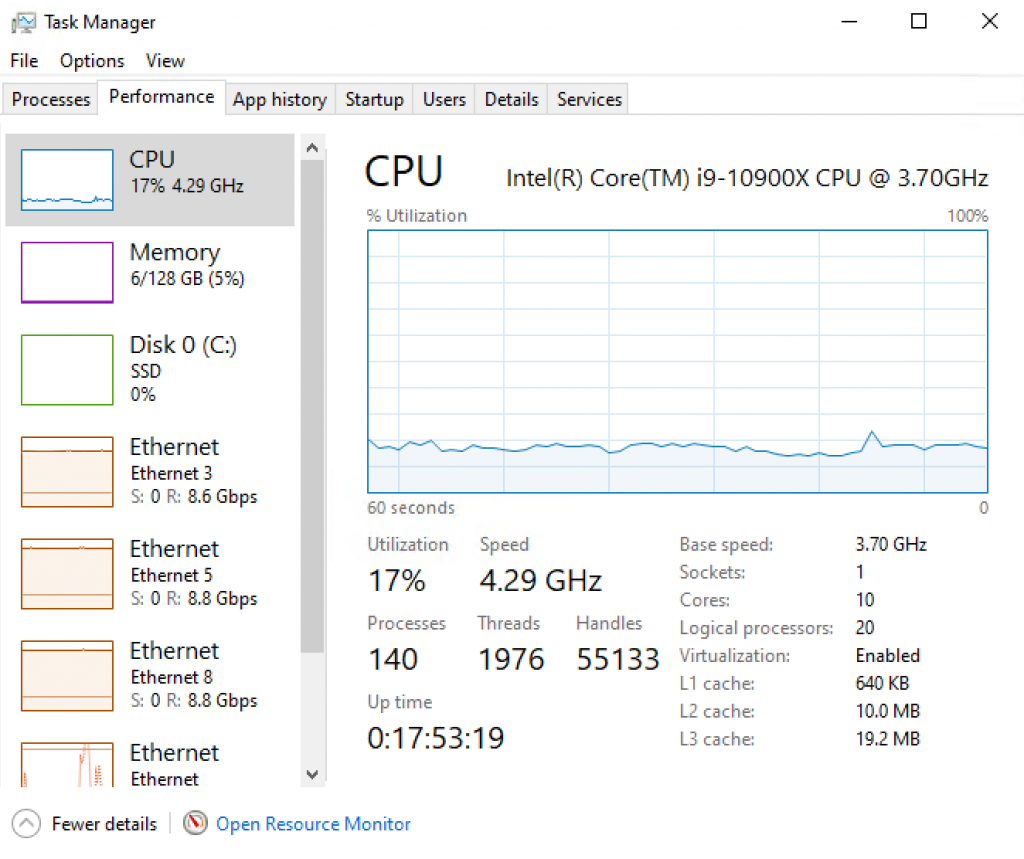
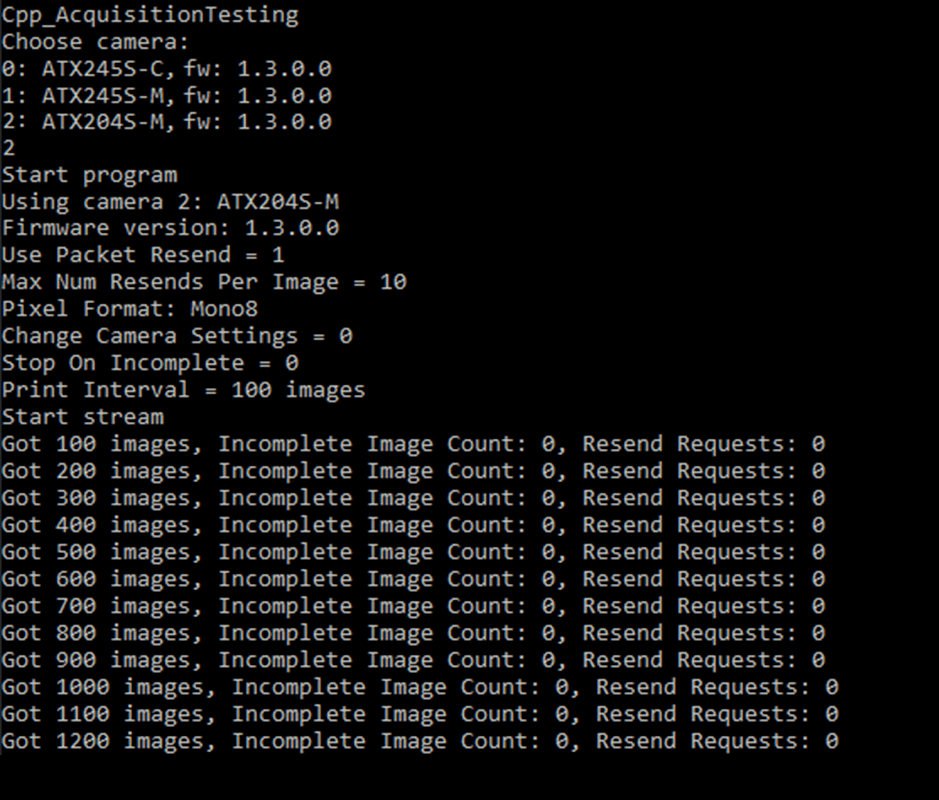
Running multiple Atlas10 10GigE cameras requires a certain level of computer resources for streaming reliability. This KB will describe our PC configuration and network settings, where images were captured from multiple Atlas10 cameras simultaneously on an Intel i9 PC in ArenaView without any dropped packets.

Hardware and Software Test Environment

Cameras:

  • ATX245S-CT
  • ATX245S-MT
  • ATX204S-MC

Camera Settings:

  • Packet Size: 9000 B
  • ADC Bit Depth: 12-Bit
  • Device Link Throughput Reserve: 10%
  • Device Stream Channel Packet Delay: 80
  • Packet Resend: Enabled
  • Pixel Format: BayerRG8 (for color models)
    Mono8 (for mono models)
  • Max Resolution and FPS

Software:

  • ArenaSDK 1.0.29.5
  • LUCID Light Weight Filter Driver:
    • Driver Name: LUCIDLwf.sys
    • Driver Version: 0.0.25.0
  • Windows 10 Pro 64-bit version 20H2, build 19042.804

Host PC System Configuration:

Motherboard ASUS WS X299 PRO/SE Intel LGA2066 M.2 PCIe USB3.1 Dual Lan ATA
Processor Intel(R) Core(TM) i9-10900X CPU @ 3.70GHz
Memory Corsair VENGEANCE LPX 128GB (8x16GB) DDR4 DRAM 2933MHz (Quad Channel)
Operating System Windows 10 Pro 64-bit version 20H2, build 19042.804
Video Zotac nVidia GeForce GT710 2GB GDDR3 PCIe
Storage Kingston A2000 M.2 2280 500GB Internal Solid State Drive (SA2000M8/500G)
Network Interface Cards
(more details below)
PCIE-POE2-MG (MFR P/N: IOI DGEAP2X-PCIE8XG302, 2-port 10G/5G/2.5G/1G PoE+ NBASE-T)
PCIE-POE1-MG2 (MFR P/N: IOI GE10P-PCIE4XG301, 1-port 2-port 10G/5G/2.5G/1G PoE+ NBASE-T)

Network Card #1 Settings

  • PCIE-POE2-MG (MFR P/N: IOI DGEAP2X-PCIE8XG302)
  • 2-port, 2-ch, 10G/5G/2.5G/1G PoE+ NBASE-T
  • Chipset: Marvell Aquantia ACQ107 (2x)
  • Driver Version: 2.2.1.0, Date: 8/13/2020
  • Each NIC had the following settings:
    • Receiver Buffers: 4096
    • Jumbo Packets: 9014 Bytes
    • Interrupt Moderation: Enabled
    • Interrupt Moderation Rate: Adaptive
    • IPv4 Checksum Offload = Rx & Tx enabled
    • TCP/UDP Checksum Offload (IPv4) = Rx & Tx enabled
    • Power Management: Disabled

Network Card #2 Settings

  • PCIE-POE1-MG2 (MFR P/N: IOI GE10P-PCIE4XG301)
  • 1-port, 10G/5G/2.5G/1G PoE+ NBASE-T
  • Chipset: Marvell Aquantia ACQ107
  • Driver Version: 2.2.1.0, Date: 8/13/2020
  • Each NIC had the following settings:
    • Receiver Buffers: 4096
    • Jumbo Packets: 9014 Bytes
    • Interrupt Moderation: Enabled
    • Interrupt Moderation Rate: Adaptive
    • IPv4 Checksum Offload = Rx & Tx enabled
    • TCP/UDP Checksum Offload (IPv4) = Rx & Tx enabled
    • Power Management: Disabled

Network Card #3 Settings

  • PCIE-POE1-MG2 (MFR P/N: IOI GE10P-PCIE4XG301)
  • 1-port, 10G/5G/2.5G/1G PoE+ NBASE-T
  • Chipset: Marvell Aquantia ACQ107
  • Driver Version: 2.2.1.0, Date: 8/13/2020
  • Each NIC had the following settings:
    • Receiver Buffers: 4096
    • Jumbo Packets: 9014 Bytes
    • Interrupt Moderation: Enabled
    • Interrupt Moderation Rate: Adaptive
    • IPv4 Checksum Offload = Rx & Tx enabled
    • TCP/UDP Checksum Offload (IPv4) = Rx & Tx enabled
    • Power Management: Disabled

Additional Comments on Setup

  • This motherboard (ASUS WS X299 PRO/SE) supports 4 memory channels and installing RAM at each memory controller will give us 4 active memory channels (quad-channel). For an application that needs a lot of bandwidth and processing, you’ll want to look into activating all of the memory channels to maximize the memory bandwidth as much as possible. We filled each DIMM on this system as well. If you don’t fill in each DIMM, the motherboard manual should state the order of DIMM slots to install to make sure you’re activating the most memory channels possible (see Diagram 1). Important! While installing 128 GB might not be necessary for the system, it is highly recommended to pair DIMMs to enable quad-channel bandwidth or at the very least dual-channel DDR bandwidth. Installing all memory on 1 DIMM for single channel operation is not recommended and will result in streaming issues.
  • Side note: Why is memory bandwidth so important?  Streaming in ArenaView means we’re taking the image, converting it to BGR8 for display, and rendering the converted image on screen (also include Windows 10 background tasks and other actions or metrics that ArenaView performs or monitors in the background, for example, some node polling, the status bar counters, the log window, heartbeat threads for cameras, etc.). For example, a 24.5MP BGR8 image means streaming 3 color channels of 8-bit data, equating to 5320 x 4600  x 3. Do this for each Atlas10 camera attached and processing image data can quickly stress memory bandwidth and capacity.
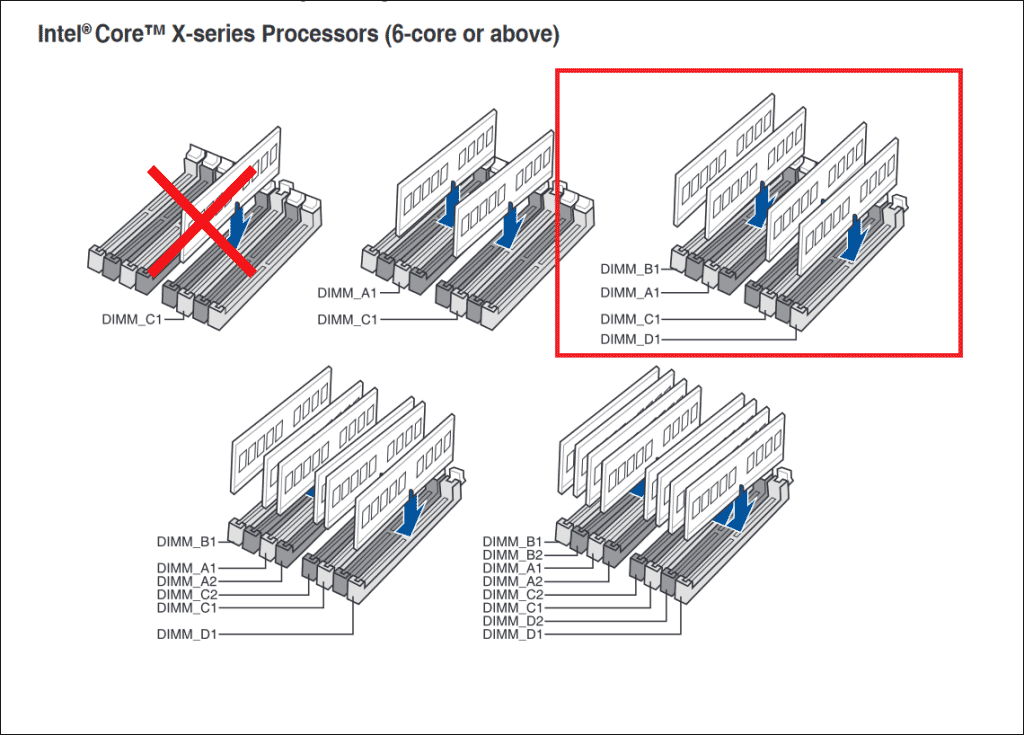
Memory Dimm Slots For 10GigE

Diagram 1

  • You will also want to take a look at the maximum memory bandwidth supported by the CPU too. Your theoretical maximum memory bandwidth may be higher than what the CPU itself supports. For example, this Intel CPU supports up to 94GB/s: https://ark.intel.com/content/www/us/en/ark/products/198019/intel-core-i9-10900x-x-series-processor-19-25m-cache-3-70-ghz.html
  • It is recommended to install a PCIe card on a slot that is connected to the CPU controller rather than to the PCIe controller and over a bridge. For example, see the Diagram 2, there’s an x4 slot that has to go over a bridge which is less optimal.
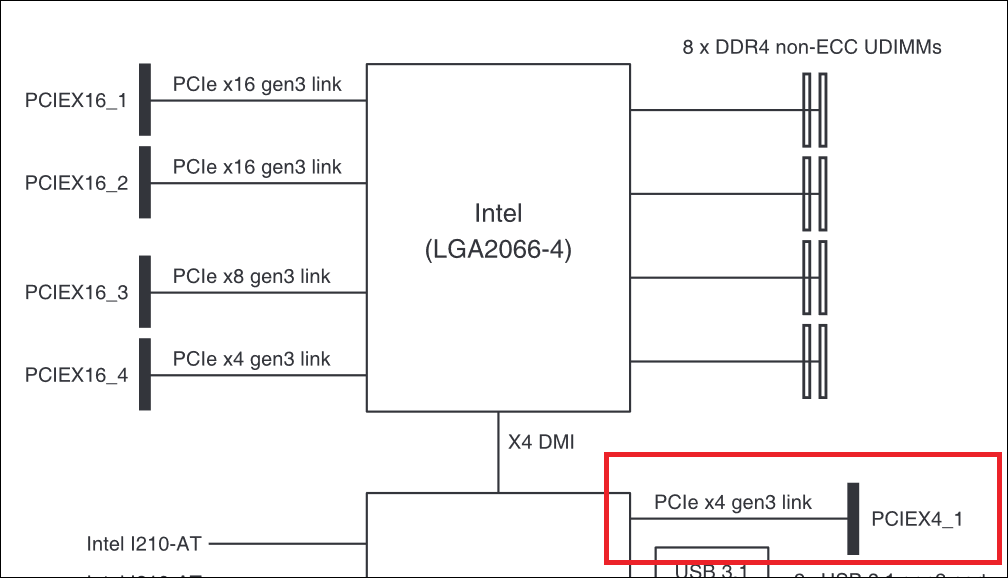
PCIE bandwidth

Diagram 2

Test Results

The PC host system did not report any dropped frames or packet resend requests while streaming 3 Atlas10 cameras simultaneously.

Atlas10 using CPU resources
Atlas10 using system processes
Atlas10 resources details
Atlas10 Test Results, no dropped frames

Was this helpful?

5 Yes  1 No
Related Articles
  • Projecting a Helios2 3D image to and from a 2D image
  • Focusing a Triton2 EVS Camera
  • Controlling Triton2 EVS camera’s event rate when connected at less than 2.5GigE (Event Rate Control / ERC)
  • Using Multiple RDMA Cameras on a Switch
  • Configuring RDMA for Linux
  • Configuring RDMA for Windows

Didn't find your answer? Contact Us

  Installing PCIE-POE1-MG2 Driver

Focusing Universe Compact Lenses  

© 2024 LUCID Vision Labs Inc.
Looking to purchase our cameras?
Visit the LUCID Webstore at thinklucid.com
LUCID Support & Help
Welcome to LUCID

We use cookies to facilitate online purchases and analyze our traffic. By clicking "Accept", you consent to our use of cookies.

Functional Always active
The technical storage or access is strictly necessary for the legitimate purpose of enabling the use of a specific service explicitly requested by the subscriber or user, or for the sole purpose of carrying out the transmission of a communication over an electronic communications network.
Preferences
The technical storage or access is necessary for the legitimate purpose of storing preferences that are not requested by the subscriber or user.
Statistics
The technical storage or access that is used exclusively for statistical purposes. The technical storage or access that is used exclusively for anonymous statistical purposes. Without a subpoena, voluntary compliance on the part of your Internet Service Provider, or additional records from a third party, information stored or retrieved for this purpose alone cannot usually be used to identify you.
Marketing
The technical storage or access is required to create user profiles to send advertising, or to track the user on a website or across several websites for similar marketing purposes.
Manage options Manage services Manage {vendor_count} vendors Read more about these purposes
View preferences
{title} {title} {title}