• Support Home
  • Getting Started
    • Connecting Your Camera
    • 3rd Party Software Getting Started Guides
  • Tech Ref Manuals
    • Arena SDK Documentation
    • HTP003S – Helios2+ ToF 3D
    • HLT003S – Helios2 ToF 3D
    • HLS003S – Helios ToF 3D
    • HLF003S – Helios Flex ToF 3D
    • ATX245S – Atlas10 24.5 MP
    • ATX204S – Atlas10 20.4 MP
    • ATX162S – Atlas10 16.2 MP
    • ATX124S – Atlas10 12.3 MP
    • ATX081S – Atlas10 8.1 MP
    • ATX051S – Atlas10 5.0 MP
    • ATL314S – Atlas 31.4 MP
    • ATL196S – Atlas 19.6 MP
    • ATL168S – Atlas 16.8 MP
    • ATL120S – Atlas 12.3 MP
    • ATL089S – Atlas 8.9 MP
    • ATL071S – Atlas 7.1 MP
    • ATL050S – Atlas 5.0 MP
    • ATL028S – Atlas 2.8 MP
    • ATP200S – Atlas IP67 20 MP
    • ATP120S – Atlas IP67 12.3 MP
    • ATP089S -Atlas IP67 8.9 MP
    • ATP071S – Atlas IP67 7.1 MP
    • ATP028S – Atlas IP67 2.8 MP
    • TRI200S – Triton 20.0 MP
    • TRI120S – Triton 12.3 MP
    • TRI122S – Triton 12.2 MP
    • TRI089S – Triton 8.9 MP
    • TRI071S – Triton 7.1 MP
    • TRI064S – Triton 6.3 MP
    • TRI054S – Triton 5.4 MP
    • TRI050S-P/Q – Triton 5.0 MP Polarized
    • TRI050S – Triton 5.0 MP
    • TRI032S – Triton 3.2 MP
    • TRI028S – Triton 2.8 MP
    • TRI023S – Triton 2.3 MP
    • TRI016S – Triton 1.6 MP
    • TRI004S – Triton 0.4 MP
    • TRI02KA – Triton 2K Line Scan
    • PHX200S – Phoenix 20.0 MP
    • PHX120S – Phoenix 12.3 MP
    • PHX122S – Phoenix 12.2 MP
    • PHX089S – Phoenix 8.9 MP
    • PHX064S – Phoenix 6.3 MP
    • PHX050S-P/Q – Phoenix 5.0 MP Polarized
    • PHX050S – Phoenix 5.0 MP
    • PHX032S – Phoenix 3.2 MP
    • PHX023S – Phoenix 2.3 MP
    • PHX016S – Phoenix 1.6 MP
    • PHX004S – Phoenix 0.4 MP
  • Application Notes
    • Bandwidth Sharing in Multi-Camera Systems
    • Combine Helios 3D Point Cloud with RGB Color
    • I2C Support on LUCID Cameras
    • Using GPIO on LUCID Cameras
    • Using PTP & Scheduled Action Commands
    • Helios2 And Triton Synchronization
  • Knowledge Base
  • Additional Support
    • Product Change Notifications (PCN)
    • Contact Support
  • Log In
  • Support Home
  • Getting Started
    • Connecting Your Camera
    • 3rd Party Software Getting Started Guides
  • Tech Ref Manuals
    • Arena SDK Documentation
    • HTP003S – Helios2+ ToF 3D
    • HLT003S – Helios2 ToF 3D
    • HLS003S – Helios ToF 3D
    • HLF003S – Helios Flex ToF 3D
    • ATX245S – Atlas10 24.5 MP
    • ATX204S – Atlas10 20.4 MP
    • ATX162S – Atlas10 16.2 MP
    • ATX124S – Atlas10 12.3 MP
    • ATX081S – Atlas10 8.1 MP
    • ATX051S – Atlas10 5.0 MP
    • ATL314S – Atlas 31.4 MP
    • ATL196S – Atlas 19.6 MP
    • ATL168S – Atlas 16.8 MP
    • ATL120S – Atlas 12.3 MP
    • ATL089S – Atlas 8.9 MP
    • ATL071S – Atlas 7.1 MP
    • ATL050S – Atlas 5.0 MP
    • ATL028S – Atlas 2.8 MP
    • ATP200S – Atlas IP67 20 MP
    • ATP120S – Atlas IP67 12.3 MP
    • ATP089S -Atlas IP67 8.9 MP
    • ATP071S – Atlas IP67 7.1 MP
    • ATP028S – Atlas IP67 2.8 MP
    • TRI200S – Triton 20.0 MP
    • TRI120S – Triton 12.3 MP
    • TRI122S – Triton 12.2 MP
    • TRI089S – Triton 8.9 MP
    • TRI071S – Triton 7.1 MP
    • TRI064S – Triton 6.3 MP
    • TRI054S – Triton 5.4 MP
    • TRI050S-P/Q – Triton 5.0 MP Polarized
    • TRI050S – Triton 5.0 MP
    • TRI032S – Triton 3.2 MP
    • TRI028S – Triton 2.8 MP
    • TRI023S – Triton 2.3 MP
    • TRI016S – Triton 1.6 MP
    • TRI004S – Triton 0.4 MP
    • TRI02KA – Triton 2K Line Scan
    • PHX200S – Phoenix 20.0 MP
    • PHX120S – Phoenix 12.3 MP
    • PHX122S – Phoenix 12.2 MP
    • PHX089S – Phoenix 8.9 MP
    • PHX064S – Phoenix 6.3 MP
    • PHX050S-P/Q – Phoenix 5.0 MP Polarized
    • PHX050S – Phoenix 5.0 MP
    • PHX032S – Phoenix 3.2 MP
    • PHX023S – Phoenix 2.3 MP
    • PHX016S – Phoenix 1.6 MP
    • PHX004S – Phoenix 0.4 MP
  • Application Notes
    • Bandwidth Sharing in Multi-Camera Systems
    • Combine Helios 3D Point Cloud with RGB Color
    • I2C Support on LUCID Cameras
    • Using GPIO on LUCID Cameras
    • Using PTP & Scheduled Action Commands
    • Helios2 And Triton Synchronization
  • Knowledge Base
  • Additional Support
    • Product Change Notifications (PCN)
    • Contact Support
  • Log In
home/Knowledge Base/Camera Setup/Setting up a Network Bridge

Setting up a Network Bridge

1207 views 1 October 7, 2021 Updated on December 6, 2021

Introduction

This article will demonstrate how to set up a network bridge on both Windows and Ubuntu systems. This may be necessary when attempting to synchronize cameras using PTP which are connected directly to a multi-port Ethernet card or separate Ethernet cards, as PTP expects them to be connected to a switch first. For example:

  • https://support.thinklucid.com/app-note-multi-camera-synchronization-using-ptp-and-scheduled-action-commands/
  • https://support.thinklucid.com/app-note-helios2-and-triton-sync/


Windows

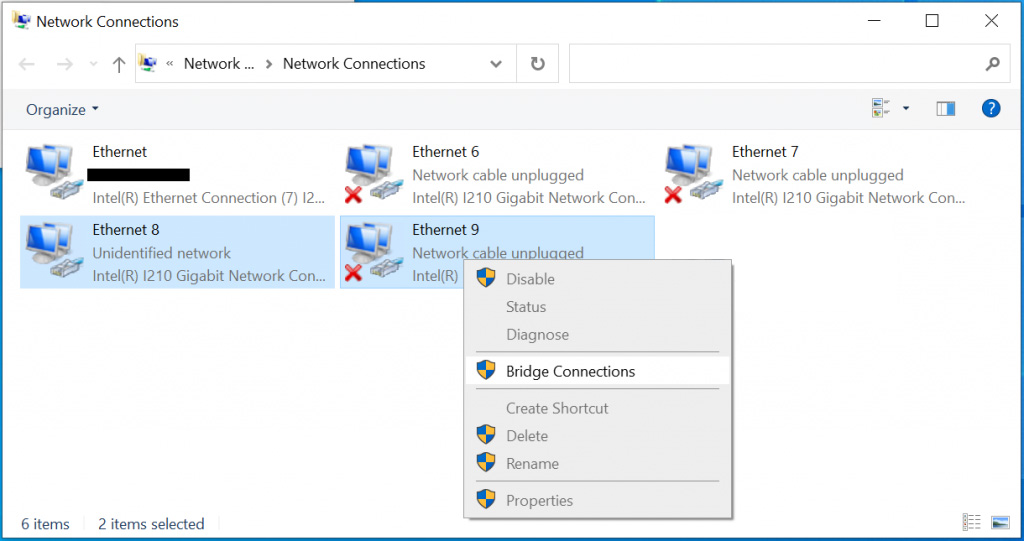
1. Go to Control Panel > Network and Internet > Network Connections

2. Select (shift + click) the interfaces to bridge

3. Right click one, and select Bridge Connections

For example, on a Windows 10 system:

Bridge Connections - Windows


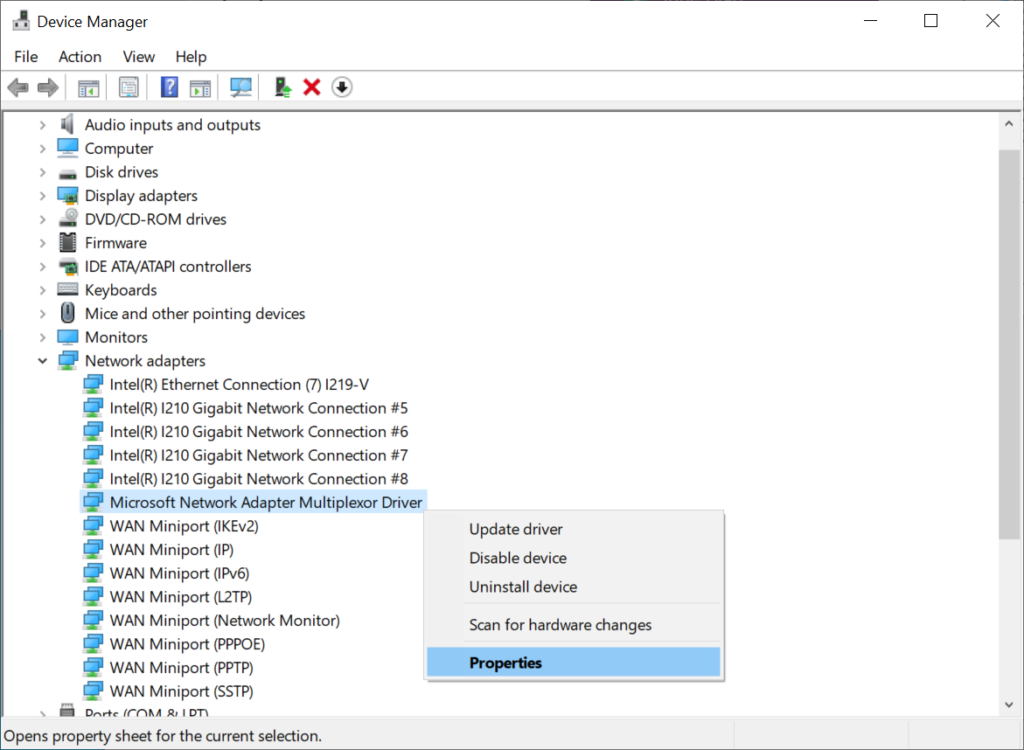
Occasionally, bridging ports of a multi-port NIC may cause the connected cameras to disappear from ArenaView. To fix this:

1. Open Device Manager

2. Open the Properties for the Microsoft Network Adapter Multiplexor Driver

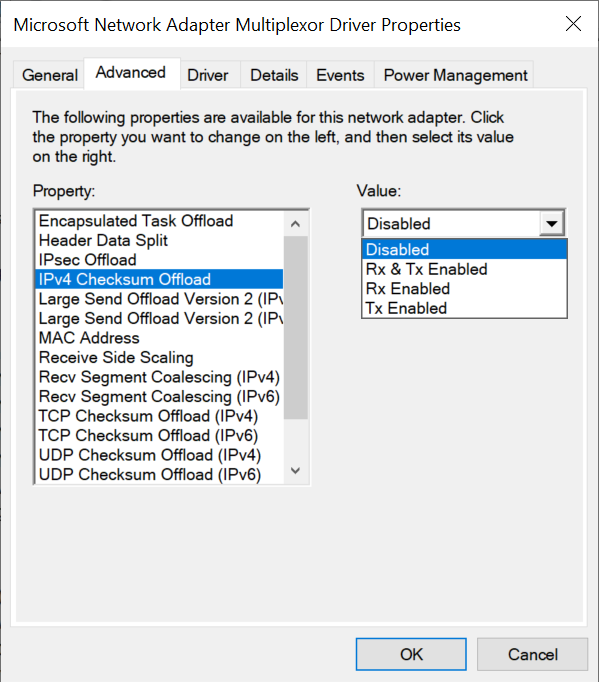
3. In the Advanced tab set the IPv4 Checksum Offload, TCP Checksum Offload (IPv4), and UDP Checksum Offload (IPv4) properties to Disabled; ex.


Ubuntu

Setting up a network bridge on a Ubuntu system using Network Manager is possible as of version 15.04. This section uses screenshots from a Ubuntu 20.04 system.

1. Open Terminal, and check that Network Manager version 0.9.9 or higher is installed

apt-cache show network-manager | grep Version

2. Start Network Manager

nm-connection-editor

3. Click the + button (lower left corner) to create a new connection

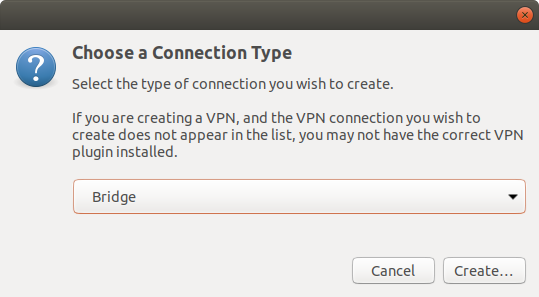
4. Select Bridge as the type, then click Create…

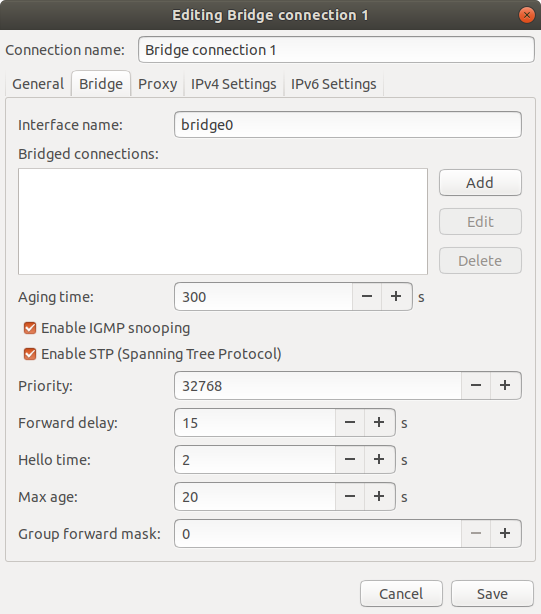
5. Click Add to add a slave connection to the bridge

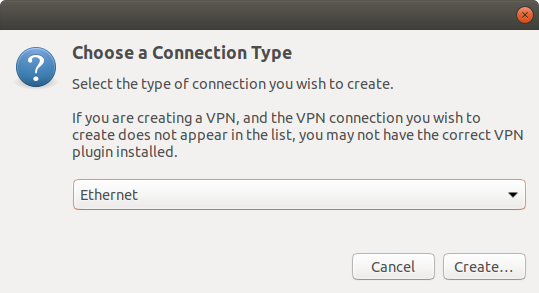
6. Leave Ethernet selected as the type, then click Create…

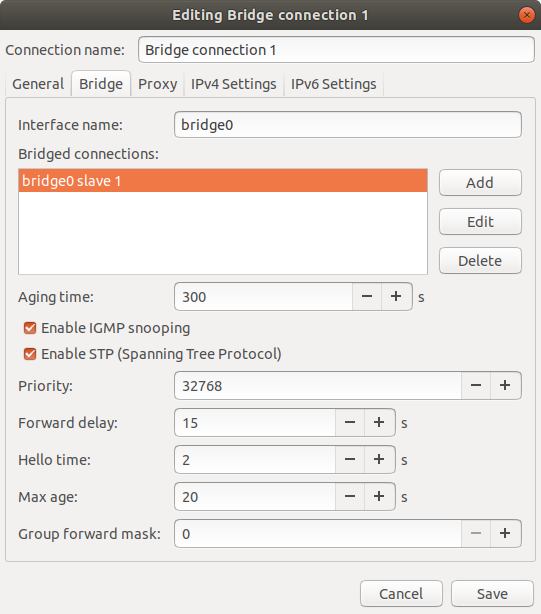
7. Select which interface to enslave to the bridge from the Device list

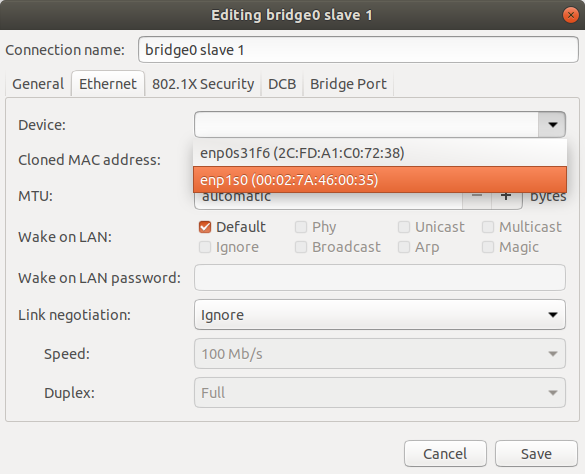
8. Go to the General tab, and make sure the “Automatically connect to this network when it is available” and “All users may connect to this network” options are selected, then click Save

The slave will appear under the Bridged connections list

9. Repeat steps 5 – 8 for other interfaces to add to the bridge

10. Go to the IPv4 Settings tab, and leave Automatic (DHCP) selected for the Method to use DHCP for the bridge, or set it to Manual to assign a static IP address. The bridge should use the same method as the slaves. Click Save to finish.

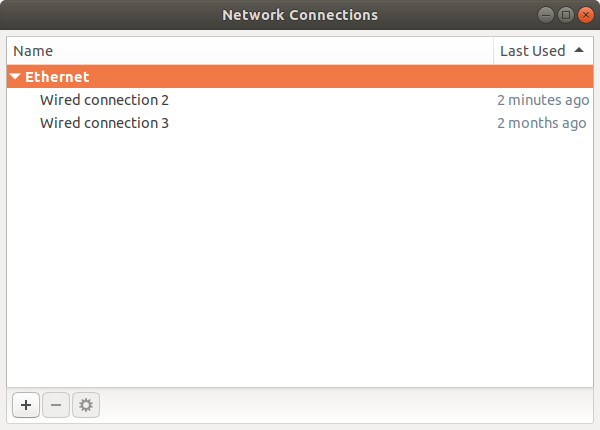
11. The bridge and slaves will be listed in Network Connections. Remove the original wired connections by selecting them and clicking the – button

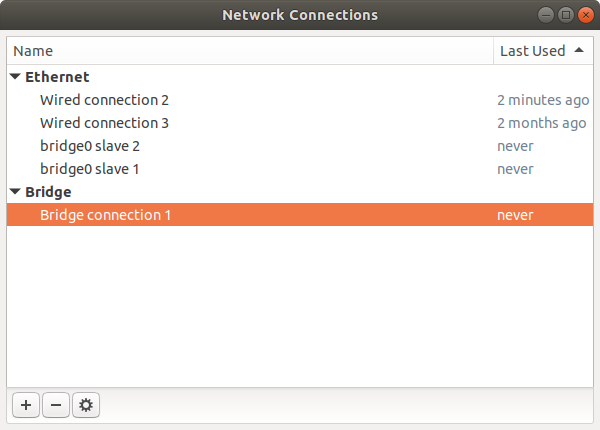
12. The bridge will enable automatically once the original wired connections are removed. If one of the slaves connects to the internet, the connection will be temporarily lost before the bridge is assigned an IP address.

13. Lastly, set the MTU size on the bridge to 9000B using the Terminal command:

sudo ifconfig bridge0 mtu 9000

where bridge0 is the name of the bridge.

13. To remove the bridge, select it in Network Connections and click the – button. The slaves will disappear automatically, and the wired connections can be added back with the + button

Was this helpful?

1 Yes  No
Related Articles
  • Reliability testing of LUCID Cameras
  • Factors for Selecting a PCIe card
  • Default Network Ports for LUCID Cameras
  • Using Multiple ROIs with LUCID Cameras
  • Using VLANs with LUCID Cameras
  • Using TCP with Atlas10 cameras on Linux

Didn't find your answer? Contact Us

  Focusing Universe Compact Lenses

Using TCP with Atlas10 cameras on Windows  

© 2023 LUCID Vision Labs Inc.
Looking to purchase our cameras?
Visit the LUCID Webstore at thinklucid.com