Introduction
The Triton TRI054S featuring the IMX490 (BSI) back-illuminated stacked CMOS sensor allows for simultaneous 120 dB HDR imaging and LED flicker mitigation. With the large 5.4 MP, 2880 x 1860 px resolution this camera enables wide-angle shooting in both daytime and nighttime for Advanced Driver Assistance Systems(ADAS) / Autonomous Driving. This camera model is also well suited for other applications that demand very high HDR imaging such as electrical fuse inspection; high contrast medical imaging; live visible welding analysis; as well as other ITS applications.
These instructions explain how to use the TRI054S-CC in ArenaView.
Requirements
- Triton TRI054S-CC camera
- ArenaView v1.0.27.0 or newer
Setting up cameras in ArenaView
Step 1: Initial Setup
Please make sure you have read and completed the initial setup section found in the Arena SDK documentation. In particular, make sure you have turned on jumbo frames and set your receive buffer size.
Step 2: Connect Camera and Launch ArenaView
Once Arena SDK is installed, the system is properly configured, and the camera is plugged in and powered, you can open ArenaView in Windows and toggle the connect button.

Step 3: Open Pixel Format Options Window
Open the Pixel Format Options window by clicking View -> Toolbars -> Options.

Step 4: Acquire Images
- Press the
 button to acquire a single image in ArenaView.
 - Press the
 button to continuously acquire images in ArenaView.
 - Press the
 button to stop acquisition and close the current tab.
Pixel Formats
The TRI054S supports up to 24-bit Bayer and Mono pixel formats as well as 24-bit on-camera processed formats. Change the camera’s pixel format in the Features window, under Image Format Control -> Pixel Format.
Imaging with TRI054S IMX490
If using the TRI054S IMX490 indoors, the image may appear dark because the default Exposure Time of the camera is set to a value that is intended to be reasonable for many outdoor settings.
You can use a higher bit depth pixel format and choose to display the brighter parts (the higher pixel values) of the image data. See the Bit Depth Display in ArenaView or LUT Control sections for further information.
HDR Processing
The TRI054S IMX490 sensor features the capability to output HDR images. This sensor function captures four images at different Exposure Time and Gain settings and outputs a single combined image, allowing the user to take advantage of the wide-ranging illumination conditions from low to high.
You can customize HDR controls by navigating to the camera’s HDR Control category.

HDR Output
You can choose which HDR image the camera outputs by changing the HDR Output node.
- HDR: The camera generates a 24-bit HDR image by combining the 4 channels
- Channel 0: Outputs the 1st image used in the HDR output. This image is collected from high-sensitivity sub pixel with high conversion gain (most sensitive).
- Channel 1: Outputs the 2nd image used in the HDR output. This image is collected from high-sentitivity sub pixel with low conversion gain.
- Channel 2: Outputs the 3rd image used in the HDR output. This image is collected from low-sensitivty sub pixel, where SNR is prioritized.
- Channel 3: Outputs the 4th image used in the HDR output. This image is collected from low-sensitivity sub-pixel, where illuminance is prioritized (least sensitive).
Set HDR Output to Channel 0, 1, 2, or 3 to view a single uncombined image.

HDR Tuning Enable
When HDR Tuning Enable is False, you can set the Exposure Time node which changes the HDR Channel Exposure Time of all four channels at once. You cannot change the Gains of the channels in this setting.
You can customize each HDR image’s Exposure Time and Gain with the following steps:
- Set HDR Tuning Enable to True
- Set the HDR Tuning Channel Selector to the desired image (0-3)
- Change the image’s HDR Channel Exposure Time
- Change the image’s HDR Channel Analog Gain or HDR Channel Digital Gain
HDR Image Enhancement Enable
The TRI054S IMX490 sensor can perform image processing for the HDR image which include:
- Dark shading compensation (assists in image uniformity)
- Motion-based artifact compensation (reduce artifacts where moving subjects were detected)
- False color compensation (reduces false colors where motion-based artifact compensation is applied)
- Dynamic spot pixel correction
- Noise reduction
This processing is only applicable for the HDR image, in other words when HDR Output = HDR.
To turn off this additional processing, set HDR Image Enancement Enable = False.
HDR Digital Clamping Enable
The TRI054S IMX490 sensor also has a Analog Clamp and Digital Clamp feature to reduce black level fluctuations. The sensor compensates for black level by using the information of the preceding frame and the current frame.
The sensor’s Analog Clamp function occurs on after the ADC step and cannot be disabled. To turn off the Digital Clamp function, set HDR Digital Clamping Enable to False.
LED Flicker Mitigation
Traditional HDR output techniques combine low and high exposures of the same pixels. The short exposure would be used to capture the bright parts of a scene, but the output can result in flickering artifacts.
The TRI054S IMX490 sensor is equipped with low-sensitivity subpixels to reduce LED flickering. This allows longer exposures to be used while still averaging out the LED flicker. This technique is applied when HDR Output is set to HDR.
Bit Depth Display in ArenaView
When capturing in an image in ArenaView, it will process the image and display it as a BGR8 (8-bits per color channel) image. When using a pixel format that is greater than 8-bits you can use ArenaView’s Bit Depth display option to choose which bits are shown in your image.
The following instructions will explain how to use ArenaView’s Bit Depth display option.
1. Open the Bit Depth options by going to the Options window and selecting the Bit Depth tab.


2. Enable the Bit Depth control and use the slider in the Bit Depth options to choose which bits to display. The bits that are displayed in the image highlighted on screen in green.

Use Arena SDK code similar to the following on an image to achieve the same effect:
// In BayerRG24 pixel format
Arena::IImage* pImage = pDevice->GetImage(2000);
double offset = (double)pImage->GetBitsPerPixel() - 1.0;
Arena::IImage* pScaled = Arena::ImageFactory::SelectBitsAndScale(pImage, 8, offset - 20.10);
LUT Control
A Lookup Table (LUT) allows the user to remap an input pixel value to a different output pixel value. There are two options available for a lookup table which are explained below.
Using a Camera LUT
The TRI054S features an on-camera LUT to allow mapping of input pixels to output pixels.
When using a single channel output image, you can map 12-bit raw sensor pixel values to 12-bit user-specified pixel values. Users input values for the even indices including the last index 4095 while averaging is used to calculate rest of the odd indices.
When using an HDR output image, you can map 24-bit raw sensor pixel values to 24-bit user-specified values. 4096 knee points are provided in the mapping. These knee points spread evenly in the input pixel space. Pixel values between knee points are mapped with interpolation.
The following instructions demonstrate how to define a Camera LUT with ArenaView:
1. Open the Camera LUT options by going to the Options window and selecting the LUT tab.

2. Select points in the graph to quickly map an input pixel value to an output pixel value.

Press the ![]() button to apply the LUT to the camera.
button to apply the LUT to the camera.
On the camera, set LUT Enable to True to enable the Camera LUT.

LUT Tone Mapping
The dynamic range of a display is narrower than the the dynamic range of the TRI054S IMX490. The LUT Tone Mapping control performs tone mapping to allow the brightness of the images to be suitable for display based on the histogram of the captured image. Several Gamma curve tone mapping options are available to choose for display. A Linear tone mapping option is available as well.

Using a Software LUT
The following instructions demonstrate how to define a Software LUT with ArenaView:
1. Open the Software LUT options by going to the Options window and selecting the LUT (software) tab.

2. Enable the Software LUT control and select points in the graph to quickly map an input pixel value to an output pixel value.

Press the  button to remove a LUT point.
Press the  button to remove all LUT points (no pixel remapping).
Press the  button to apply a predefined gamma curve to your LUT:
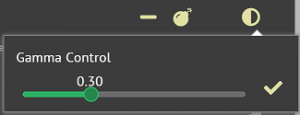
2. Enable the Software LUT control and select points in the graph to quickly map an input pixel value to an output pixel value.