• Support Home
  • Getting Started
    • Connecting Your Camera
    • 3rd Party Software Getting Started Guides
  • Tech Ref Manuals
    • Arena SDK Documentation
    • HTP003S – Helios2+ ToF 3D
    • HLT003S – Helios2 ToF 3D
    • HLS003S – Helios ToF 3D
    • HLF003S – Helios Flex ToF 3D
    • ATX245S – Atlas10 24.5 MP
    • ATX204S – Atlas10 20.4 MP
    • ATX162S – Atlas10 16.2 MP
    • ATX124S – Atlas10 12.3 MP
    • ATX081S – Atlas10 8.1 MP
    • ATX051S – Atlas10 5.0 MP
    • ATL314S – Atlas 31.4 MP
    • ATL196S – Atlas 19.6 MP
    • ATL168S – Atlas 16.8 MP
    • ATL120S – Atlas 12.3 MP
    • ATL089S – Atlas 8.9 MP
    • ATL071S – Atlas 7.1 MP
    • ATL050S – Atlas 5.0 MP
    • ATL028S – Atlas 2.8 MP
    • ATP200S – Atlas IP67 20 MP
    • ATP120S – Atlas IP67 12.3 MP
    • ATP089S -Atlas IP67 8.9 MP
    • ATP071S – Atlas IP67 7.1 MP
    • ATP028S – Atlas IP67 2.8 MP
    • TRI200S – Triton 20.0 MP
    • TRI120S – Triton 12.3 MP
    • TRI122S – Triton 12.2 MP
    • TRI089S – Triton 8.9 MP
    • TRI071S – Triton 7.1 MP
    • TRI064S – Triton 6.3 MP
    • TRI054S – Triton 5.4 MP
    • TRI050S-P/Q – Triton 5.0 MP Polarized
    • TRI050S – Triton 5.0 MP
    • TRI032S – Triton 3.2 MP
    • TRI028S – Triton 2.8 MP
    • TRI023S – Triton 2.3 MP
    • TRI016S – Triton 1.6 MP
    • TRI005S – Triton 0.5 MP
    • TRI004S – Triton 0.4 MP
    • TRI02KA – Triton 2K Line Scan
    • PHX200S – Phoenix 20.0 MP
    • PHX120S – Phoenix 12.3 MP
    • PHX122S – Phoenix 12.2 MP
    • PHX089S – Phoenix 8.9 MP
    • PHX064S – Phoenix 6.3 MP
    • PHX050S-P/Q – Phoenix 5.0 MP Polarized
    • PHX050S – Phoenix 5.0 MP
    • PHX032S – Phoenix 3.2 MP
    • PHX023S – Phoenix 2.3 MP
    • PHX016S – Phoenix 1.6 MP
    • PHX004S – Phoenix 0.4 MP
  • Application Notes
    • Bandwidth Sharing in Multi-Camera Systems
    • Combine Helios 3D Point Cloud with RGB Color
    • I2C Support on LUCID Cameras
    • Using GPIO on LUCID Cameras
    • Using PTP & Scheduled Action Commands
    • Helios2 And Triton Synchronization
    • Product Change Notifications (PCN)
  • Knowledge Base
  • Contact Support
  • Log In
  • Support Home
  • Getting Started
    • Connecting Your Camera
    • 3rd Party Software Getting Started Guides
  • Tech Ref Manuals
    • Arena SDK Documentation
    • HTP003S – Helios2+ ToF 3D
    • HLT003S – Helios2 ToF 3D
    • HLS003S – Helios ToF 3D
    • HLF003S – Helios Flex ToF 3D
    • ATX245S – Atlas10 24.5 MP
    • ATX204S – Atlas10 20.4 MP
    • ATX162S – Atlas10 16.2 MP
    • ATX124S – Atlas10 12.3 MP
    • ATX081S – Atlas10 8.1 MP
    • ATX051S – Atlas10 5.0 MP
    • ATL314S – Atlas 31.4 MP
    • ATL196S – Atlas 19.6 MP
    • ATL168S – Atlas 16.8 MP
    • ATL120S – Atlas 12.3 MP
    • ATL089S – Atlas 8.9 MP
    • ATL071S – Atlas 7.1 MP
    • ATL050S – Atlas 5.0 MP
    • ATL028S – Atlas 2.8 MP
    • ATP200S – Atlas IP67 20 MP
    • ATP120S – Atlas IP67 12.3 MP
    • ATP089S -Atlas IP67 8.9 MP
    • ATP071S – Atlas IP67 7.1 MP
    • ATP028S – Atlas IP67 2.8 MP
    • TRI200S – Triton 20.0 MP
    • TRI120S – Triton 12.3 MP
    • TRI122S – Triton 12.2 MP
    • TRI089S – Triton 8.9 MP
    • TRI071S – Triton 7.1 MP
    • TRI064S – Triton 6.3 MP
    • TRI054S – Triton 5.4 MP
    • TRI050S-P/Q – Triton 5.0 MP Polarized
    • TRI050S – Triton 5.0 MP
    • TRI032S – Triton 3.2 MP
    • TRI028S – Triton 2.8 MP
    • TRI023S – Triton 2.3 MP
    • TRI016S – Triton 1.6 MP
    • TRI005S – Triton 0.5 MP
    • TRI004S – Triton 0.4 MP
    • TRI02KA – Triton 2K Line Scan
    • PHX200S – Phoenix 20.0 MP
    • PHX120S – Phoenix 12.3 MP
    • PHX122S – Phoenix 12.2 MP
    • PHX089S – Phoenix 8.9 MP
    • PHX064S – Phoenix 6.3 MP
    • PHX050S-P/Q – Phoenix 5.0 MP Polarized
    • PHX050S – Phoenix 5.0 MP
    • PHX032S – Phoenix 3.2 MP
    • PHX023S – Phoenix 2.3 MP
    • PHX016S – Phoenix 1.6 MP
    • PHX004S – Phoenix 0.4 MP
  • Application Notes
    • Bandwidth Sharing in Multi-Camera Systems
    • Combine Helios 3D Point Cloud with RGB Color
    • I2C Support on LUCID Cameras
    • Using GPIO on LUCID Cameras
    • Using PTP & Scheduled Action Commands
    • Helios2 And Triton Synchronization
    • Product Change Notifications (PCN)
  • Knowledge Base
  • Contact Support
  • Log In
home/Knowledge Base/Camera Setup/Using TCP with Atlas10 cameras on Linux

Using TCP with Atlas10 cameras on Linux

1504 views 1 December 9, 2021 Updated on June 13, 2024

Introduction

This document will explain how to use TCP with LUCID’s Atlas10 cameras.

Table of Contents

Intro/Prerequisites
Test Environment
Initial NIC Setup
Additional NIC Setup
Enable Large Receive Offload
Using TCP

Prerequisites

  • Ubuntu 18.04 64-bit (Ubuntu 16.04 not supported)
  • Atlas10 camera firmware v1.10.0.0 or higher
    Note: ATX314S does not support TCP.
  • Arena SDK for Linux x64 v0.1.59 or higher / Arena SDK for ARM64 v0.1.43 or higher

Test Environment

System 1 – Streaming 1x Atlas10 camera

Motherboard ASUS PRIME Z270-A
Processor Intel(R) Core(TM) i7-7700 CPU @ 3.60GHz
Memory Kingston KHX2400C15D4 16GB (2x8GB) DDR4 SDRAM
Operating System Ubuntu 18.04.5 64-bit, kernel version 5.4.0-89-generic
Video Intel HD Graphics 630
Storage Samsung SSD 850 EVO 500GB
Network Interface Card PCIE-POE1-MG2 (MFR P/N: IOI GE10P-PCIE4XG301, 1-port 10G/5G/2.5G/1G PoE+ NBASE-T)

System 2 – Streaming 1x Atlas10 camera (ARM64)

Platform Jetson AGX Xavier
Processor 8-core ARM v8.2 64-bit CPU, 8MB L2 + 4MB L3
Memory 32GB 256-Bit LPDDR4x
Operating System Linux4Tegra L4T R32.6.1 (August 2021)
Ubuntu 18.04.5 64-bit, kernel version 4.9.253-tegra
Power Mode: MODE 15W DESKTOP
Video 512-core Volta GPU with Tensor Cores
Storage 32GB eMMC 5.1
Network Interface Card PCIE-POE1-MG2 (MFR P/N: IOI GE10P-PCIE4XG301, 1-port 10G/5G/2.5G/1G PoE+ NBASE-T)

System 3 – Streaming 4x Atlas10 cameras

Motherboard ASUS WS X299 PRO/SE Intel LGA2066 M.2 PCIe USB3.1 Dual Lan ATA
Processor Intel(R) Core(TM) i9-10900X CPU @ 3.70GHz
Memory Corsair VENGEANCE LPX 128GB (8x16GB) DDR4 DRAM 2933MHz (Quad Channel)
Operating System Ubuntu 18.04.5 64-bit, kernel version 5.4.0-89-generic
Video Zotac nVidia GeForce GT710 2GB GDDR3 PCIe
Storage Kingston A2000 M.2 2280 500GB Internal Solid State Drive (SA2000M8/500G)
Network Interface Card 2x PCIE-POE2-MG (MFR P/N: IOI DGEAP2X-PCIE8XG302, 2-port 10G/5G/2.5G/1G PoE+ NBASE-T)

PCIE-POE-MG2 Settings

  • MFR P/N: IOI GE10P-PCIE4XG301
  • 10G/5G/2.5G/1G PoE+ NBASE-T Ethernet Card
  • Chipset: Marvell Aquantia AQC107
  • Driver Version: 2.4.15, Date: July, 1, 2021

PCIE-POE2-MG Settings

  • MFR P/N: IOI DGEAP2X-PCIE8XG30
  • 10G/5G/2.5G/1G PoE+ NBASE-T Ethernet Card
  • Chipset: Marvell Aquantia AQC107
  • Driver Version: 2.4.15, Date: July, 1, 2021

Initial NIC Setup

Install the Aquantia Atlantic drivers found on Marvell’s website:
https://www.marvell.com/support/downloads.html
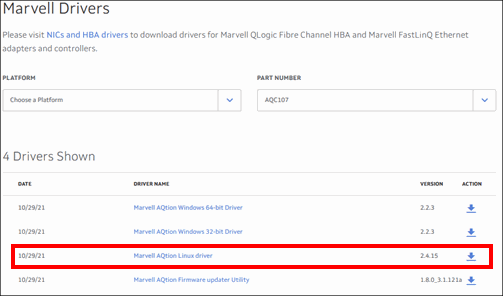
For compilation and installation instructions, see our Knowledge Base article.

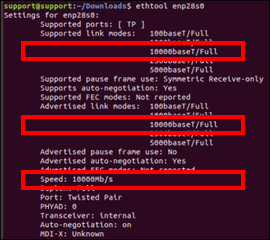
Ensure the Aquantia Atlantic driver is installed and 10Gbps speeds are enabled:

If your BIOS has Secure Boot, it may need to be disabled to install the Aquantia Atlantic driver.

Additional NIC Setup

Set a large socket buffer size, 32MB:

sudo sh -c "echo 'net.core.rmem_default=33554432' >> /etc/sysctl.conf"
sudo sh -c "echo 'net.core.rmem_max=33554432' >> /etc/sysctl.conf"
sudo sysctl -p

Assign an IP Address and Subnet to your NIC:

sudo ifconfig enp28s0 192.168.100.100

where enp28s0 is the name of your NIC

Set MTU size to 16000 bytes:

sudo ifconfig enp28s0 mtu 16000

where enp28s0 is the name of your NIC

Maximize the receive buffer size on the NIC:

sudo ethtool -G enp28s0 rx 4096

where enp28s0 is the name of your NIC

Enable Large Receive Offload

Large Receive Offload (LRO) allows the NIC to combine smaller packets into larger segments, reducing the number of smaller packets needed to be processed by the CPU.

Apply the following parameters on the Aquantia card with ethtool:

Parameter Description Value
Receive Coalesce usecs Amount of usecs to delay an receive interrupt after a packet arrives 112
Large Receive Offload TCP Large receive offload On
Generic Receive Offload Software-based receive offload Off
sudo ethtool -C enp28s0 rx-usecs 112
sudo ethtool -K enp28s0 lro on
sudo ethtool -K enp28s0 gro off

where enp28s0 is the name of your NIC

For convenience, the following can be saved to a script, e.x. nic_setup.sh:

#!/bin/bash
sudo ifconfig $1 mtu 16000
sudo ethtool -G $1 rx 4096
sudo ethtool -C $1 rx-usecs 112
sudo ethtool -K $1 lro on
sudo ethtool -K $1 gro off

Run the script with with the following command:

sudo sh nic_setup.sh enp28s0

where enp28s0 is the name of your NIC

Using TCP

To turn on TCP mode, set TCPEnable = True

In C++ code:

Arena::IDevice* pDevice = pSystem->CreateDevice(deviceInfos[0]);
Arena::SetNodeValue<bool>(pDevice->GetNodeMap(), "TCPEnable", true);

// When using TCP, there is no need to enable packet resend.
//    The packet delay and bandwidth reserve should be set to 0
//    to maximize TCP efficiency.
std::cout << TAB1 << "GevSCPD = " << 0 << std::endl;
Arena::SetNodeValue<int64_t>(pDevice->GetNodeMap(), "GevSCPD", 0);
		
std::cout << TAB1 << "DeviceLinkThroughputReserve = " << 0 << std::endl;
Arena::SetNodeValue<int64_t>(pDevice->GetNodeMap(), "DeviceLinkThroughputReserve", 0);

// It is not necessary to set the GevSCPSPacketSize node when TCPEnable = true.
// The NIC should be set to the maximum available MTU size.

If the camera is streaming images, you must call StopStream before setting TCPEnable.

When the camera is streaming, you can verify that TCP packets are being coalesced on the NIC with the following Terminal command:

sudo ethtool -S enp28s0 | grep Lro

where enp28s0 is the name of your NIC

Example output:

Was this helpful?

1 Yes  1 No
Related Articles
  • Using QOI with LUCID Cameras
  • Projecting a Helios2 3D image to and from a 2D image
  • Focusing a Triton2 EVS Camera
  • Controlling Triton2 EVS camera’s event rate when connected at less than 2.5GigE (Event Rate Control / ERC)
  • Solving driver-related RDMA streaming issues with Ubuntu 22.04
  • Using Multiple RDMA Cameras on a Switch

Didn't find your answer? Contact Us

  Using TCP with Atlas10 cameras on Windows

Using VLANs with LUCID Cameras  

© 2024 LUCID Vision Labs Inc.
Looking to purchase our cameras?
Visit the LUCID Webstore at thinklucid.com
LUCID Support & Help
Welcome to LUCID

We use cookies to facilitate online purchases and analyze our traffic. By clicking "Accept", you consent to our use of cookies.

Functional Always active
The technical storage or access is strictly necessary for the legitimate purpose of enabling the use of a specific service explicitly requested by the subscriber or user, or for the sole purpose of carrying out the transmission of a communication over an electronic communications network.
Preferences
The technical storage or access is necessary for the legitimate purpose of storing preferences that are not requested by the subscriber or user.
Statistics
The technical storage or access that is used exclusively for statistical purposes. The technical storage or access that is used exclusively for anonymous statistical purposes. Without a subpoena, voluntary compliance on the part of your Internet Service Provider, or additional records from a third party, information stored or retrieved for this purpose alone cannot usually be used to identify you.
Marketing
The technical storage or access is required to create user profiles to send advertising, or to track the user on a website or across several websites for similar marketing purposes.
Manage options Manage services Manage {vendor_count} vendors Read more about these purposes
View preferences
{title} {title} {title}