• Support Home
  • Getting Started
    • Connecting Your Camera
    • 3rd Party Software Getting Started Guides
  • Tech Ref Manuals
    • Arena SDK Documentation
    • HTP003S – Helios2+ ToF 3D
    • HLT003S – Helios2 ToF 3D
    • HLS003S – Helios ToF 3D
    • HLF003S – Helios Flex ToF 3D
    • ATX245S – Atlas10 24.5 MP
    • ATX204S – Atlas10 20.4 MP
    • ATX162S – Atlas10 16.2 MP
    • ATX124S – Atlas10 12.3 MP
    • ATX081S – Atlas10 8.1 MP
    • ATX051S – Atlas10 5.0 MP
    • ATL314S – Atlas 31.4 MP
    • ATL196S – Atlas 19.6 MP
    • ATL168S – Atlas 16.8 MP
    • ATL120S – Atlas 12.3 MP
    • ATL089S – Atlas 8.9 MP
    • ATL071S – Atlas 7.1 MP
    • ATL050S – Atlas 5.0 MP
    • ATL028S – Atlas 2.8 MP
    • ATP200S – Atlas IP67 20 MP
    • ATP120S – Atlas IP67 12.3 MP
    • ATP089S -Atlas IP67 8.9 MP
    • ATP071S – Atlas IP67 7.1 MP
    • ATP028S – Atlas IP67 2.8 MP
    • TRI200S – Triton 20.0 MP
    • TRI120S – Triton 12.3 MP
    • TRI122S – Triton 12.2 MP
    • TRI089S – Triton 8.9 MP
    • TRI071S – Triton 7.1 MP
    • TRI064S – Triton 6.3 MP
    • TRI054S – Triton 5.4 MP
    • TRI050S-P/Q – Triton 5.0 MP Polarized
    • TRI050S – Triton 5.0 MP
    • TRI032S – Triton 3.2 MP
    • TRI028S – Triton 2.8 MP
    • TRI023S – Triton 2.3 MP
    • TRI016S – Triton 1.6 MP
    • TRI005S – Triton 0.5 MP
    • TRI004S – Triton 0.4 MP
    • TRI02KA – Triton 2K Line Scan
    • PHX200S – Phoenix 20.0 MP
    • PHX120S – Phoenix 12.3 MP
    • PHX122S – Phoenix 12.2 MP
    • PHX089S – Phoenix 8.9 MP
    • PHX064S – Phoenix 6.3 MP
    • PHX050S-P/Q – Phoenix 5.0 MP Polarized
    • PHX050S – Phoenix 5.0 MP
    • PHX032S – Phoenix 3.2 MP
    • PHX023S – Phoenix 2.3 MP
    • PHX016S – Phoenix 1.6 MP
    • PHX004S – Phoenix 0.4 MP
  • Application Notes
    • Bandwidth Sharing in Multi-Camera Systems
    • Combine Helios 3D Point Cloud with RGB Color
    • I2C Support on LUCID Cameras
    • Using GPIO on LUCID Cameras
    • Using PTP & Scheduled Action Commands
    • Helios2 And Triton Synchronization
    • Product Change Notifications (PCN)
  • Knowledge Base
  • Contact Support
  • Log In
  • Support Home
  • Getting Started
    • Connecting Your Camera
    • 3rd Party Software Getting Started Guides
  • Tech Ref Manuals
    • Arena SDK Documentation
    • HTP003S – Helios2+ ToF 3D
    • HLT003S – Helios2 ToF 3D
    • HLS003S – Helios ToF 3D
    • HLF003S – Helios Flex ToF 3D
    • ATX245S – Atlas10 24.5 MP
    • ATX204S – Atlas10 20.4 MP
    • ATX162S – Atlas10 16.2 MP
    • ATX124S – Atlas10 12.3 MP
    • ATX081S – Atlas10 8.1 MP
    • ATX051S – Atlas10 5.0 MP
    • ATL314S – Atlas 31.4 MP
    • ATL196S – Atlas 19.6 MP
    • ATL168S – Atlas 16.8 MP
    • ATL120S – Atlas 12.3 MP
    • ATL089S – Atlas 8.9 MP
    • ATL071S – Atlas 7.1 MP
    • ATL050S – Atlas 5.0 MP
    • ATL028S – Atlas 2.8 MP
    • ATP200S – Atlas IP67 20 MP
    • ATP120S – Atlas IP67 12.3 MP
    • ATP089S -Atlas IP67 8.9 MP
    • ATP071S – Atlas IP67 7.1 MP
    • ATP028S – Atlas IP67 2.8 MP
    • TRI200S – Triton 20.0 MP
    • TRI120S – Triton 12.3 MP
    • TRI122S – Triton 12.2 MP
    • TRI089S – Triton 8.9 MP
    • TRI071S – Triton 7.1 MP
    • TRI064S – Triton 6.3 MP
    • TRI054S – Triton 5.4 MP
    • TRI050S-P/Q – Triton 5.0 MP Polarized
    • TRI050S – Triton 5.0 MP
    • TRI032S – Triton 3.2 MP
    • TRI028S – Triton 2.8 MP
    • TRI023S – Triton 2.3 MP
    • TRI016S – Triton 1.6 MP
    • TRI005S – Triton 0.5 MP
    • TRI004S – Triton 0.4 MP
    • TRI02KA – Triton 2K Line Scan
    • PHX200S – Phoenix 20.0 MP
    • PHX120S – Phoenix 12.3 MP
    • PHX122S – Phoenix 12.2 MP
    • PHX089S – Phoenix 8.9 MP
    • PHX064S – Phoenix 6.3 MP
    • PHX050S-P/Q – Phoenix 5.0 MP Polarized
    • PHX050S – Phoenix 5.0 MP
    • PHX032S – Phoenix 3.2 MP
    • PHX023S – Phoenix 2.3 MP
    • PHX016S – Phoenix 1.6 MP
    • PHX004S – Phoenix 0.4 MP
  • Application Notes
    • Bandwidth Sharing in Multi-Camera Systems
    • Combine Helios 3D Point Cloud with RGB Color
    • I2C Support on LUCID Cameras
    • Using GPIO on LUCID Cameras
    • Using PTP & Scheduled Action Commands
    • Helios2 And Triton Synchronization
    • Product Change Notifications (PCN)
  • Knowledge Base
  • Contact Support
  • Log In
home/Knowledge Base/Arena Software/Using TCP with Atlas10 cameras on Windows

Using TCP with Atlas10 cameras on Windows

2153 views 1 December 9, 2021 Updated on September 25, 2023

Introduction

This document will explain how to use TCP with LUCID’s Atlas10 cameras.

Table of Contents

Intro/Prerequisites
Test Environment
Initial NIC Setup
Set TCP Receive Window Auto-tuning
Set TCP Acknowledgement Frequency
Enable Receive Side Coalescing
Using TCP

Prerequisites

  • Windows 10 64-bit (Windows 7 not supported)
  • Atlas10 camera firmware v1.10.0.0 or higher
    Note: ATX314S does not support TCP.
  • Arena SDK for Windows v1.0.31.5 or higher

Test Environment

System 1 – Streaming 1x Atlas10 camera

Motherboard ASUS PRIME Z270-A
Processor Intel(R) Core(TM) i7-7700 CPU @ 3.60GHz
Memory Kingston KHX2400C15D4 16GB (2x8GB) DDR4 SDRAM
Operating System Microsoft Windows 10 Professional (x64) version 19.09, build 18363.1082
Video Intel HD Graphics 630
Storage Samsung SSD 850 EVO 500GB
Network Interface Card PCIE-POE1-MG2 (MFR P/N: IOI GE10P-PCIE4XG301, 1-port 10G/5G/2.5G/1G PoE+ NBASE-T)

System 2 – Streaming 4x Atlas10 cameras

Motherboard ASUS WS X299 PRO/SE Intel LGA2066 M.2 PCIe USB3.1 Dual Lan ATA
Processor Intel(R) Core(TM) i9-10900X CPU @ 3.70GHz
Memory Corsair VENGEANCE LPX 128GB (8x16GB) DDR4 DRAM 2933MHz (Quad Channel)
Operating System Microsoft Windows 10 Pro 64-bit version 20H2, build 19042.804
Video Zotac nVidia GeForce GT710 2GB GDDR3 PCIe
Storage Kingston A2000 M.2 2280 500GB Internal Solid State Drive (SA2000M8/500G)
Network Interface Card 2x PCIE-POE2-MG (MFR P/N: IOI DGEAP2X-PCIE8XG302, 2-port 10G/5G/2.5G/1G PoE+ NBASE-T)

PCIE-POE-MG2 Settings

  • MFR P/N: IOI GE10P-PCIE4XG301
  • 10G/5G/2.5G/1G PoE+ NBASE-T Ethernet Card
  • Chipset: Marvell Aquantia AQC107
  • Driver Version: 3.1.3, Date: 7/5/2021

PCIE-POE2-MG Settings

  • MFR P/N: IOI DGEAP2X-PCIE8XG30
  • 10G/5G/2.5G/1G PoE+ NBASE-T Ethernet Card
  • Chipset: Marvell Aquantia AQC107
  • Driver Version: 3.1.3, Date: 7/5/2021

Initial NIC Setup

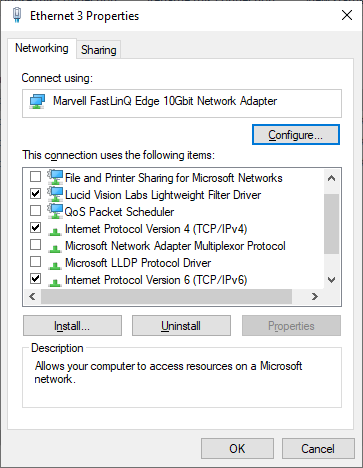
Open your NIC properties window. Uncheck all Networking options except:

  • LUCID Vision Labs Lightweight Filter Driver
  • Internet Protocol Version 4 (TCP/IPv4)
  • Internet Protocol Version 6 (TCP/IPv6) (not used by Arena SDK, but this must be enabled to utilize receive side coalescing)
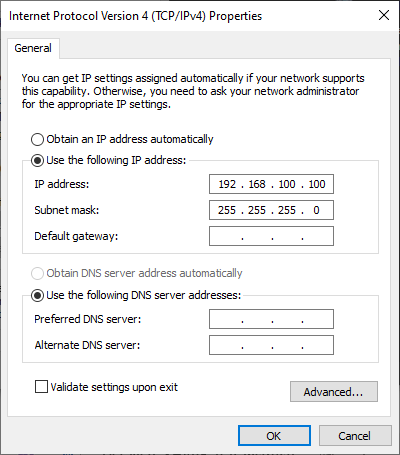
Assign an IP Address and Subnet to your NIC:
Apply the following to cards featuring the Marvell Aquantia AQC107 chipset:

  • Transmit Buffers: 4096
  • Receiver Buffers: 4096
  • Jumbo Packets: 16348 Bytes
  • Interrupt Moderation: Enabled
  • Interrupt Moderation Rate: Adaptive
  • IPv4 Checksum Offload: Rx & Tx enabled
  • TCP/UDP Checksum Offload (IPv4): Rx & Tx enabled
  • Energy-Efficient Ethernet: Disabled
  • Receive Segment Coalescing (IPv4): Enabled
  • Receive Segment Coalescing (IPv6): Enabled
  • Allow the computer to turn off this device to save power: Unchecked

Set TCP Receive Window Auto-tuning

We set the TCP autotuning to restricted to optimize the TCP connection. See the following article for more information:

https://docs.microsoft.com/en-us/windows-server/networking/technologies/network-subsystem/net-sub-performance-tuning-nics#bkmk_tcp

Set Receive Window Auto-tuning Level to Restricted

netsh interface tcp set global autotuninglevel=restricted

Confirm you have set the auto-tuning level by looking at the output of:

netsh interface tcp show global

Example output:

Querying active state...

TCP Global Parameters
----------------------------------------------
Receive-Side Scaling State          : enabled
Receive Window Auto-Tuning Level    : restricted
Add-On Congestion Control Provider  : default
ECN Capability                      : disabled
RFC 1323 Timestamps                 : disabled
Initial RTO                         : 1000
Receive Segment Coalescing State    : enabled
Non Sack Rtt Resiliency             : disabled
Max SYN Retransmissions             : 4
Fast Open                           : enabled
Fast Open Fallback                  : enabled
HyStart                             : enabled
Pacing Profile                      : off

Set TCP Acknowledgement Frequency

We set the TCP Acknowledgement Frequency to 1 to enable the NIC to immediately acknowledge packets. See the following article for further information:

https://docs.microsoft.com/en-us/troubleshoot/windows-server/networking/registry-entry-control-tcp-acknowledgment-behavior

Determine your Interface GUID in PowerShell (administrator permission required):

Get-NetAdapter | Format-List Name,InterfaceDescription,InterfaceGuid

Example output:

Name                 : Ethernet
InterfaceDescription : Intel(R) Ethernet Connection I219-V
InterfaceGuid        : {8EA428C5-8537-4FC2-BCEF-406CEDE78660}

Name                 : Ethernet 3
InterfaceDescription : Marvell FastLinQ Edge 10Gbit Network Adapter
InterfaceGuid        : {76BD61F4-3BE7-43FC-8126-8923C7C5CFE4}

Set the TcpAckFrequency = 1 for your NIC:

1. Go to the following location in your registry:

HKEY_LOCAL_MACHINE\SYSTEM\CurrentControlSet\Services\Tcpip\Parameters\Interfaces\

where InterfaceGuid is the value found with the PowerShell command seen in the previous steps.

2. Create a new REG_DWORD entry: TcpAckFrequency, Value: 1

3. Reboot the system after applying this registry key

Enable Receive Side Coalescing

Receive Side Coalescing (RSC) allows the NIC to combine smaller packets into larger segments, reducing the number of smaller packets needed to be processed by the CPU.

List RSC-compatible NICs in PowerShell (administrator permission required):

Get-NetAdapterRsc | Format-List Name, InterfaceDescription

Example output:

Name                 : Ethernet 3
InterfaceDescription : Marvell FastLinQ Edge 10Gbit Network Adapter

Enable RSC on your NIC:

Set-NetAdapterRsc -Name "Ethernet 3"

where Ethernet 3 is the name of your NIC

Set-NetAdapterRsc -Name "*"

will enable RSC for all compatible NICs

Verify that RSC has been enabled with no errors with the following PowerShell command:

Get-NetAdapterRsc

Example output:

Each column must look exactly like the above screenshot for RSC to work.

Using TCP

To turn on TCP mode, set TCPEnable = True:
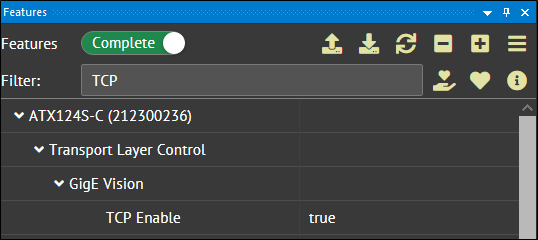
In C++ code:

Arena::IDevice* pDevice = pSystem->CreateDevice(deviceInfos[0]);
Arena::SetNodeValue<bool>(pDevice->GetNodeMap(), "TCPEnable", true);

// When using TCP, there is no need to enable packet resend.
//    The packet delay and bandwidth reserve should be set to 0
//    to maximize TCP efficiency.
std::cout << TAB1 << "GevSCPD = " << 0 << std::endl;
Arena::SetNodeValue<int64_t>(pDevice->GetNodeMap(), "GevSCPD", 0);
		
std::cout << TAB1 << "DeviceLinkThroughputReserve = " << 0 << std::endl;
Arena::SetNodeValue<int64_t>(pDevice->GetNodeMap(), "DeviceLinkThroughputReserve", 0);

// It is not necessary to set the GevSCPSPacketSize node when TCPEnable = true.
// The NIC should be set to the maximum available jumbo frame size.

If the camera is streaming images, you must call StopStream before setting TCPEnable.

When the camera is streaming, you can verify that TCP packets are being coalesced on the NIC with the following PowerShell command:

(Get-NetAdapterStatistics -Name "Ethernet 3").RscStatistics

where Ethernet 3 is the name of your NIC

Example output:

Was this helpful?

1 Yes  No
Related Articles
  • Using QOI with LUCID Cameras
  • Projecting a Helios2 3D image to and from a 2D image
  • Focusing a Triton2 EVS Camera
  • Controlling Triton2 EVS camera’s event rate when connected at less than 2.5GigE (Event Rate Control / ERC)
  • Solving driver-related RDMA streaming issues with Ubuntu 22.04
  • Using Multiple RDMA Cameras on a Switch

Didn't find your answer? Contact Us

  Setting up a Network Bridge

Using TCP with Atlas10 cameras on Linux  

© 2024 LUCID Vision Labs Inc.
Looking to purchase our cameras?
Visit the LUCID Webstore at thinklucid.com
LUCID Support & Help
Welcome to LUCID

We use cookies to facilitate online purchases and analyze our traffic. By clicking "Accept", you consent to our use of cookies.

Functional Always active
The technical storage or access is strictly necessary for the legitimate purpose of enabling the use of a specific service explicitly requested by the subscriber or user, or for the sole purpose of carrying out the transmission of a communication over an electronic communications network.
Preferences
The technical storage or access is necessary for the legitimate purpose of storing preferences that are not requested by the subscriber or user.
Statistics
The technical storage or access that is used exclusively for statistical purposes. The technical storage or access that is used exclusively for anonymous statistical purposes. Without a subpoena, voluntary compliance on the part of your Internet Service Provider, or additional records from a third party, information stored or retrieved for this purpose alone cannot usually be used to identify you.
Marketing
The technical storage or access is required to create user profiles to send advertising, or to track the user on a website or across several websites for similar marketing purposes.
Manage options Manage services Manage {vendor_count} vendors Read more about these purposes
View preferences
{title} {title} {title}