• Support Home
  • Getting Started
    • Connecting Your Camera
    • 3rd Party Software Getting Started Guides
  • Tech Ref Manuals
    • Arena SDK Documentation
    • HTP003S – Helios2+ ToF 3D
    • HLT003S – Helios2 ToF 3D
    • HLS003S – Helios ToF 3D
    • HLF003S – Helios Flex ToF 3D
    • ATX245S – Atlas10 24.5 MP
    • ATX204S – Atlas10 20.4 MP
    • ATX162S – Atlas10 16.2 MP
    • ATX124S – Atlas10 12.3 MP
    • ATX081S – Atlas10 8.1 MP
    • ATX051S – Atlas10 5.0 MP
    • ATL314S – Atlas 31.4 MP
    • ATL196S – Atlas 19.6 MP
    • ATL168S – Atlas 16.8 MP
    • ATL120S – Atlas 12.3 MP
    • ATL089S – Atlas 8.9 MP
    • ATL071S – Atlas 7.1 MP
    • ATL050S – Atlas 5.0 MP
    • ATL028S – Atlas 2.8 MP
    • ATP200S – Atlas IP67 20 MP
    • ATP120S – Atlas IP67 12.3 MP
    • ATP089S -Atlas IP67 8.9 MP
    • ATP071S – Atlas IP67 7.1 MP
    • ATP028S – Atlas IP67 2.8 MP
    • TRI200S – Triton 20.0 MP
    • TRI120S – Triton 12.3 MP
    • TRI122S – Triton 12.2 MP
    • TRI089S – Triton 8.9 MP
    • TRI071S – Triton 7.1 MP
    • TRI064S – Triton 6.3 MP
    • TRI054S – Triton 5.4 MP
    • TRI050S-P/Q – Triton 5.0 MP Polarized
    • TRI050S – Triton 5.0 MP
    • TRI032S – Triton 3.2 MP
    • TRI028S – Triton 2.8 MP
    • TRI023S – Triton 2.3 MP
    • TRI016S – Triton 1.6 MP
    • TRI005S – Triton 0.5 MP
    • TRI004S – Triton 0.4 MP
    • TRI02KA – Triton 2K Line Scan
    • PHX200S – Phoenix 20.0 MP
    • PHX120S – Phoenix 12.3 MP
    • PHX122S – Phoenix 12.2 MP
    • PHX089S – Phoenix 8.9 MP
    • PHX064S – Phoenix 6.3 MP
    • PHX050S-P/Q – Phoenix 5.0 MP Polarized
    • PHX050S – Phoenix 5.0 MP
    • PHX032S – Phoenix 3.2 MP
    • PHX023S – Phoenix 2.3 MP
    • PHX016S – Phoenix 1.6 MP
    • PHX004S – Phoenix 0.4 MP
  • Application Notes
    • Bandwidth Sharing in Multi-Camera Systems
    • Combine Helios 3D Point Cloud with RGB Color
    • I2C Support on LUCID Cameras
    • Using GPIO on LUCID Cameras
    • Using PTP & Scheduled Action Commands
    • Helios2 And Triton Synchronization
    • Product Change Notifications (PCN)
  • Knowledge Base
  • Contact Support
  • Log In
  • Support Home
  • Getting Started
    • Connecting Your Camera
    • 3rd Party Software Getting Started Guides
  • Tech Ref Manuals
    • Arena SDK Documentation
    • HTP003S – Helios2+ ToF 3D
    • HLT003S – Helios2 ToF 3D
    • HLS003S – Helios ToF 3D
    • HLF003S – Helios Flex ToF 3D
    • ATX245S – Atlas10 24.5 MP
    • ATX204S – Atlas10 20.4 MP
    • ATX162S – Atlas10 16.2 MP
    • ATX124S – Atlas10 12.3 MP
    • ATX081S – Atlas10 8.1 MP
    • ATX051S – Atlas10 5.0 MP
    • ATL314S – Atlas 31.4 MP
    • ATL196S – Atlas 19.6 MP
    • ATL168S – Atlas 16.8 MP
    • ATL120S – Atlas 12.3 MP
    • ATL089S – Atlas 8.9 MP
    • ATL071S – Atlas 7.1 MP
    • ATL050S – Atlas 5.0 MP
    • ATL028S – Atlas 2.8 MP
    • ATP200S – Atlas IP67 20 MP
    • ATP120S – Atlas IP67 12.3 MP
    • ATP089S -Atlas IP67 8.9 MP
    • ATP071S – Atlas IP67 7.1 MP
    • ATP028S – Atlas IP67 2.8 MP
    • TRI200S – Triton 20.0 MP
    • TRI120S – Triton 12.3 MP
    • TRI122S – Triton 12.2 MP
    • TRI089S – Triton 8.9 MP
    • TRI071S – Triton 7.1 MP
    • TRI064S – Triton 6.3 MP
    • TRI054S – Triton 5.4 MP
    • TRI050S-P/Q – Triton 5.0 MP Polarized
    • TRI050S – Triton 5.0 MP
    • TRI032S – Triton 3.2 MP
    • TRI028S – Triton 2.8 MP
    • TRI023S – Triton 2.3 MP
    • TRI016S – Triton 1.6 MP
    • TRI005S – Triton 0.5 MP
    • TRI004S – Triton 0.4 MP
    • TRI02KA – Triton 2K Line Scan
    • PHX200S – Phoenix 20.0 MP
    • PHX120S – Phoenix 12.3 MP
    • PHX122S – Phoenix 12.2 MP
    • PHX089S – Phoenix 8.9 MP
    • PHX064S – Phoenix 6.3 MP
    • PHX050S-P/Q – Phoenix 5.0 MP Polarized
    • PHX050S – Phoenix 5.0 MP
    • PHX032S – Phoenix 3.2 MP
    • PHX023S – Phoenix 2.3 MP
    • PHX016S – Phoenix 1.6 MP
    • PHX004S – Phoenix 0.4 MP
  • Application Notes
    • Bandwidth Sharing in Multi-Camera Systems
    • Combine Helios 3D Point Cloud with RGB Color
    • I2C Support on LUCID Cameras
    • Using GPIO on LUCID Cameras
    • Using PTP & Scheduled Action Commands
    • Helios2 And Triton Synchronization
    • Product Change Notifications (PCN)
  • Knowledge Base
  • Contact Support
  • Log In
home/Knowledge Base/Camera Features/Using Auto Exposure and Auto Gain on LUCID Cameras

Using Auto Exposure and Auto Gain on LUCID Cameras

5898 views 11 July 14, 2020 Updated on September 6, 2022

Supported Cameras: Phoenix, Triton, Atlas, Atlas10

Set Auto Exposure and Auto Gain

LUCID cameras come with the ability to automatically adjust Exposure Time and Gain.

To turn on the auto exposure algorithm, set as Exposure Auto to Continuous:

To turn on the auto gain algorithm, set Gain Auto to true:

Using Target Brightness

The auto exposure and auto gain algorithms try to achieve the value defined in the node called Target Brightness.

Target Brightness is the pixel value the camera will try to reach by automatically adjusting the Exposure Time and Gain values. Target Brightness is represented in 8-bit (0-255) and by default it is set to 128. To try to increase or decrease the brightness of the image, simply adjust Target Brightness to a desired value and Exposure Time and Gain will adjust automatically to achieve Target Brightness.

Users can control the method used to obtain the Target Brightness value by changing the Exposure Auto Algorithm. Choose Pixel Average to allow the camera to evaluate the image’s pixel average to achieve the Target Brightness value, Chose Pixel Median to allow the camera evaluate the image’s pixel median to achieve the Target Brightness value.

LUCID cameras also have a control called Exposure Auto Damping represented as a percentage. This will determine how fast the automatic exposure algorithm can oscillate.

The auto exposure function is similar to the following equation:

Imagen+1 = Pgain * (TargetBrightness – Imagen)

where Pgain is your Exposure Auto Damping value. A larger Exposure Auto Damping value may allow the camera to converge on the Target Brightness value faster, but it may have higher chance of oscillating.

Auto exposure is prioritized over auto gain. If the Target Brightness value can be reached by increasing Exposure Time, auto gain will not be used.

Outdoor Auto Exposure and Gamma Settings

To achieve a more qualitative image for uncontrolled outdoor environments, setting the target brightness and gamma nodes to the following values has shown to produce the best results:

  • Target Brightness = 70

  • Gamma = 0.5

Once the Target Brightness and Gamma values are set, save these parameters to User Set incase the camera must be power cycled.

Set Auto Exposure and Auto Gain Limits

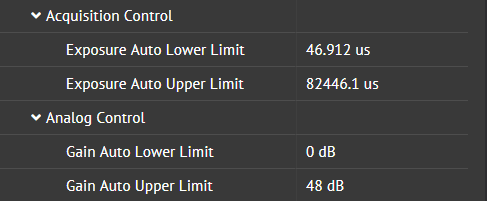
To further customize Auto Exposure and Auto Gain to a certain range, users can set Exposure Auto Lower Limit/Exposure Auto Upper Limit and Gain Auto Lower Limit/Gain Auto Upper Limit.
Apply Auto Exposure to a Specific AOI

Users can set the auto exposure algorithm to be evaluated on a specific region of the image by using the Auto Exposure AOI features. To use Auto Exposure AOI, set Exposure Auto to Continuous:

Set AOI Enable to true:
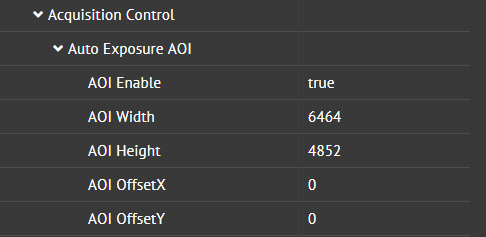
AOI OffsetX and AOI OffsetY can be adjusted after reducing your image’s ROI. If the Auto Exposure AOI is not reduced and at its maximum value, there is no room for offset to be adjusted. The offset’s start point is at the origin of the image.
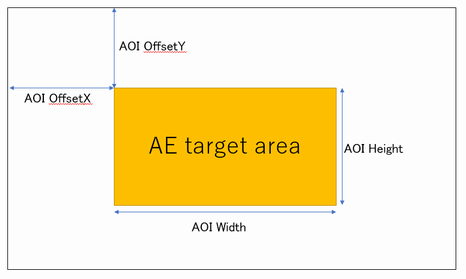
If using a reduced ROI, Auto Exposure AOI is constrained by the Width or Height image that is already set.

Was this helpful?

11 Yes  8 No
Related Articles
  • Using QOI with LUCID Cameras
  • Projecting a Helios2 3D image to and from a 2D image
  • Focusing a Triton2 EVS Camera
  • Controlling Triton2 EVS camera’s event rate when connected at less than 2.5GigE (Event Rate Control / ERC)
  • Solving driver-related RDMA streaming issues with Ubuntu 22.04
  • Using Multiple RDMA Cameras on a Switch

Didn't find your answer? Contact Us

  How to access documentation on Windows/Linux

Using ADLINK PCle-GIE72/74 PRO with Trigger Over Ethernet (ToE)  

© 2024 LUCID Vision Labs Inc.
Looking to purchase our cameras?
Visit the LUCID Webstore at thinklucid.com
LUCID Support & Help
Welcome to LUCID

We use cookies to facilitate online purchases and analyze our traffic. By clicking "Accept", you consent to our use of cookies.

Functional Always active
The technical storage or access is strictly necessary for the legitimate purpose of enabling the use of a specific service explicitly requested by the subscriber or user, or for the sole purpose of carrying out the transmission of a communication over an electronic communications network.
Preferences
The technical storage or access is necessary for the legitimate purpose of storing preferences that are not requested by the subscriber or user.
Statistics
The technical storage or access that is used exclusively for statistical purposes. The technical storage or access that is used exclusively for anonymous statistical purposes. Without a subpoena, voluntary compliance on the part of your Internet Service Provider, or additional records from a third party, information stored or retrieved for this purpose alone cannot usually be used to identify you.
Marketing
The technical storage or access is required to create user profiles to send advertising, or to track the user on a website or across several websites for similar marketing purposes.
Manage options Manage services Manage {vendor_count} vendors Read more about these purposes
View preferences
{title} {title} {title}